Hi I am David

Network & Systems Professional From the Netherlands

Loadbalancers

Recently we were notified by a supplier that a particular application that we exposed via the NetScaler to Internet was vulnerable to particular exploit.
The only way to mitigate the threat was by making sure that only a specific path could be used, and nothing else.

For example: you only want that webmail.domain.com/owa works, and nothing else.
No problem! The NetScaler can fix that for you! This is how.

Create a responder policy and choose as action: DROP. Not NOOP (No Operation), you want to do something with it.
Expression will be:
 

HTTP.REQ.URL.PATH_AND_QUERY.CONTAINS("owa").NOT


The downside of doing it like that it is CASE sensitive. To overcome that, you can use this expression:

HTTP.REQ.URL.SET_TEXT_MODE(IGNORECASE).PATH.GET(1).EQ("owa").NOT


Or if you have like two paths that should work, and nothing else use it like this, in case that path1 OR path2 are matched:

HTTP.REQ.URL.SET_TEXT_MODE(IGNORECASE).PATH.GET(1).EQ("owa").NOT || HTTP.REQ.URL.SET_TEXT_MODE(IGNORECASE).PATH.GET(1).EQ("ecp").NOT


After this, just add is a responder policy to your vServer and test it out.

Cheers,
David

Sometimes I wonder; what was that command again to get the a particular output.

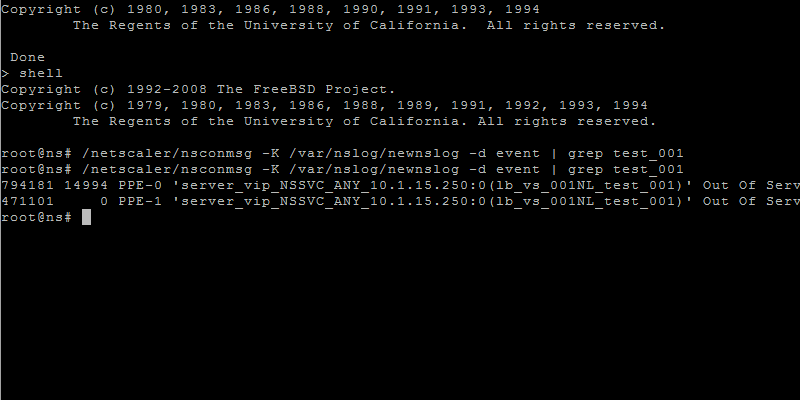
You can for example run the following command for the newnslog files to get information about the "states" of all your created objects like vservers or services.


/netscaler/nsconmsg -K /var/nslog/newnslog -d event


If a vserver goes down or up you will see it with this command.

Every 2 days, the NetScaler makes a new log file. Go to /var/nslog/ and do a ls -l to show the timestamp information.

Also you can can use the PIPE and GREP commands to get specific information that you want to see. It also works with files that are compressed like tar.gz.


For example:


/netscaler/nsconmsg -K /var/nslog/newnslog.63.tar.gz -d event | grep exchange


Use the nsconmsg command to only display a span of time within the given file, as shown in the following example:

/netscaler/nsconmsg -K /var/nslog/newnslog -s time=22Mar2007:20:00 -T 7 -s ConLb=2 -d oldconmsg


Where

  • s time=22Mar2007:20:00 is start at March 22, 2007 at exactly 8 p.m.

  • T 7 is display seven seconds of data

  • s ConLb=2 is a detail level for load balancing statistics

  • d oldconmsg is display statistical information


Here is also a short Citrix article how to get some statistics from the newnslog.


Uncompress an archived log file:

gunzip newnslog.21.gz

Discover the time period covered by the log: 

nsconmsg -K newnslog.21 -d setime

View load-balancing statistics from the archived log: 

nsconmsg -K newnslog.21 -s ConLb=2 -d oldconmsg

Extract logging information for a shorter duration: 

nsconmsg -K newnslog.21 -s time=12Jan2006:00:00 -k short_log.nsl -T 1200 -d copy

Start the log process for newnslog: 

nsconmsg -k /var/nslog/newnslog -T 172800 &


View the time span of the current newnslog file: 

nsconmsg -K newnslog -d setime

View the time span of the archived newnslog file: 

zcat filename | nsconmsg -K pipe -d setime

View events in the current newnslog file: 

nsconmsg -K newnslog -d event

View console messages in the current newnslog file: 

nsconmsg -K newnslog -d consmsg

View counter values in the current newnslog file: 

nsconmsg -K newnslog -d stats

View counter values in the current newnslog file: 

nsconmsg -K newnslog -d stats -d current

View non-zero counter values in the current newnslog file: 

nsconmsg -K newnslog -d statswt0 -d current


to display event information, such as entity up/down, alerts and configuration saves in the shell:

nsconmsg -K newnslog -d event


Display CPU usage in the shell:

nsconmsg -K newnslog -s totalcount=200 -g cpu_use -d current


Display memory utilization in the shell:

nsconmsg -s ConMEM=1 -d oldconmsg


Display established HTTP connections in the shell:

nsconmsg -j server_NSSVC_HTTP_vserver -d current

Display load balancing statistics in the shell:

nsconmsg -K newnslog -s ConLb=x -d oldconmsg

This command gives basic information when x=1 and detailed information when x=2.


use the following command to view traffic distribution from the shell.

nsconmsg -K /var/nslog/newnslog -s time -s ConLB=2 -2 distrconmsg


to display load-balancing information in the shell.

nsconmsg -s ConLb=1 -d oldconmsg


Display monitoring statistics in the shell.

nsconmsg -K newnslog -s ConMon=x -d oldconmsg

This command gives basic information when x=1 and gives detailed information when x=2.


View SSL stats for front-end connections: 

nsconmsg -K newnslog -s ConSSL=1 -d oldconmsg

View SSL stats for back-end connections: 

nsconmsg -K newnslog -s ConSSL=2 -d oldconmsg

View SSL stats for front and back-end connections: 

nsconmsg -K newnslog -s ConSSL=3 -d oldconmsg


Display content switching statistics in the shell.

nsconmsg -K newnslog -s ConCSW=1 -d oldconmsg


Display compression statistics in the shell.

nsconmsg -K newnslog -s ConCMP=x -d oldconmsg

This command gives old compression method related statistics when x=1 and gives new compression method related statistics when x=2


Display integrated caching statistics in the shell.

nsconmsg -K newnslog -s ConIC=1 -d oldconmsg


Update 09-06-2017: This does not work anymore for both Exchange CU10 and Exchange 2016 CU4 and up, see my other blog article for the details
Update 01-03-2016: This also applies to Exchange 2016 CU 3!


NOTE: This article does not apply anymore for both Exchange 2013 CU10 and Exchange 2016 CU4 and up. Microsoft decided to roll back the feature that was introduced in Exchange 2013 CU9 and Exchange CU 3. Please see my other blog article explaining the details why and how to resolve it.


We know that Exchange 2013 has a known limitation in its logoff string for Outlook Web App (Webmail).
When you try to logoff, you would tell the client to send  '/owa/logoff.owa' request, but the client wouldn't log off unless you closed the client manually.


Microsoft announced recently to change this. Effective from CU9 and up, it will be possible to use this log off string: "/owa/auth/signout.aspx".
Remember; this is only effective after CU9 and up. Before CU9 this is not available to use.


When you configured (Edge Security Pack) ESP on your Loadmaster using template or manually, only the OWA SubVS needs to be configured for the "/owa/auth/signout.aspx" 
Exchange Control Panel (ECP) uses the same string but, by virtue of content switching, the request is sent to the OWA SubVS. For this reason, there is no need to configure this logoff string on an ECP SubVS.


For a complete article; open the link above.


When using OWA, and when you click on sign out:

  1. The client initiates logoff with the request to “/owa/logoff.owa”

  2. Client then gets a 302 redirect to “/owa/auth/logon.aspx”

And you’re back at the logon page.


After the change you will get this:

When using OWA, and when you click on sign out:

  1. Client initiates logoff with the request to “/owa/logoff.owa”

  2. The server sends to client a 302 redirect to the landing page “/owa/auth/signout.aspx”


Steps needed to be done if you are running all roles on 1 machine:

  • Search for 3 web.config files on these locations

    • %ExchangeInstallPath%\FrontEnd\HttpProxy\OWA\web.config

    • %ExchangeInstallPath%\ClientAccess\OWA\web.config

    • %ExchangeInstallPath%\ClientAccess\ECP\web.config


Search for this string:

 
<add key="LogonSettings.SignOutKind" value="LegacyLogOff" />
 

And replace it for:

 
<!-- add key="LogonSettings.SignOutKind" value="LegacyLogOff" /-->
 

After this; recycle the MSExchangeOWAAppPool in Internet Information Services on the server (IIS Management)


And don’t forget, the next Cumulative Update will reset this manual modification, so be prepared to do it again if you must after CU10 releases.
Ideally though, if the reason you are doing this is to allow some third party app to work, that app should be updated to live with the new behavior.


I recently installed CU10 and i can confirm that need redo these steps after the installation of CU10


Thanks for reading and cheers!
David