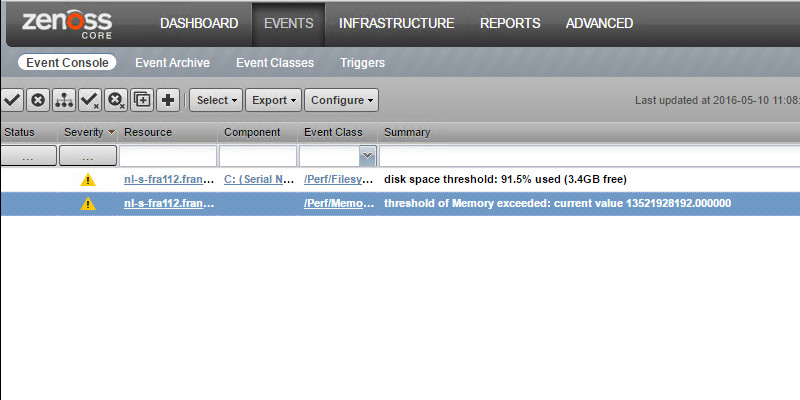
When you added your first windows machine, you might notice that the memory is somewhat strangely formatted.
I noticed this myself due to the exchange server eating up allot of memory and generated a warning event
Firstly; there are transforms available that can turn the value to something more readable; some of them show only the Gigabytes that are available en others only show percentages…. I wanted both :)
You can find that transform, together with a CPU transform, here on my blog.
Secondly; you must change the memory threshold of component template that is in place on top of you device class.
In my case; that is /Server/Microsoft/Windows.
Click Infrastructure -> Devices and navigate until you have Windows devices shown and click on Details; that will show the templates that are in place in that specific device class.
Then select the Device template on the left and edit the Memory threshold on the right.
Default it is configured like the picture above.
The problem with this is that it will calculate the maximum memory value based on its hardware and virtual memory… as a total; in my case 16 Gigabytes. And the maximum value is set 90% of the total hardware memory; in my case 8 Gigabytes. And that is where the problem lies. This will never work and should be adjusted.
So if you follow the article here, that will fix this.
In short, you'll have to do this and save it:
Change the maximum value to none and fill this in the minimum value:
here.hw.totalMemory * .1
It will look like this:
This will correct this issue and will alert you when the machine drops below the 10% of free available memory… that's nice right ? :)
I've combined some transforms that are already available from the ZenOss community. I have made it compatible for my own ZenOss 5.1.2, because the transform is written in such a way that both Linux and Windows are targeted.
Also I changed the folder where the transform should hit and I added a section for my Synology
You must add this piece of code on a specific location in order to let it work.
Also don't forget to change line 4, 11, 18 and 25 accordingly to match your own DeviceClasses, otherwise it won't work.
Go to Events > Event Classes, open on the left in the tree-view perf and CPU.
1. After this select in the dropdown box for transform and past afterwards the code beneath for CPU transform.
2. Do the same for the memory transform, but in this case under perf and memory.
Don't forget to save after pasted one transform. It cannot save both at the same time, you must do this after each change.
The nice CPU transform
# Converts Linux and Windows CPU to a percentage. This is assuming ssCpuIdle is being used for the Linux threshold
import re
regex = re.search('threshold of .*(CPU).* (exceeded|restored|not met): current value ([\d\.]+)', evt.message, re.I)
if regex and device and device.getDeviceClassPath().startswith("/Server/SSH/Linux"):
    lincpu = re.search("current value ([\d\.]+)", evt.summary)
    if lincpu:
        currentcpu = 100 - float(lincpu.group(1))
        evt.component = "CPU"
        evt.summary = "High CPU Utilization: Currently %3.0f%%" % (currentcpu)
        evt.message = evt.summary
if regex and device and device.getDeviceClassPath().startswith("/Server/Synology"):
    lincpu = re.search("current value ([\d\.]+)", evt.summary)
    if lincpu:
        currentcpu = 100 - float(lincpu.group(1))
        evt.component = "CPU"
        evt.summary = "High CPU Utilization: Currently %3.0f%%" % (currentcpu)
        evt.message = evt.summary
if regex and device and device.getDeviceClassPath().startswith("/Server/Linux"):
    lincpu = re.search("current value ([\d\.]+)", evt.summary)
    if lincpu:
        currentcpu = 100 - float(lincpu.group(1))
        evt.component = "CPU"
        evt.summary = "High CPU Utilization: Currently %3.0f%%" % (currentcpu)
        evt.message = evt.summary
if regex and device and device.getDeviceClassPath().startswith("/Server/Microsoft/Windows"):
    wincpu = re.search("current value ([\d\.]+)", evt.summary)
    if wincpu:
        currentcpu = float(wincpu.group(1))
        evt.component = "CPU"
        evt.summary = "High CPU Utilization: Currently %3.0f%%" % (currentcpu)
        evt.message = evt.summary
After pasting this, the transform will look like this:
The nice memory transform
# Converts memory events into percentage with raw values
import time, re, logging

match = re.search('threshold of .*(swap|memory).* (exceeded|restored|not met): current value ([\d\.]+)', evt.message, re.I)
if match and device:
    available = float(match.groups()[2])
    total = device.hw.totalMemory
    evt.component = "Memory"
    if match.groups()[0].lower() == "swap":
        total = device.os.totalSwap
        evt.component = "Swap"
    evt.memoryavailable = available
    evt.total = total
    total_gb = (float(device.hw.totalMemory) / 1048576)
    if total:
        percent_free = (available / total) * 100
        percent_used = ((total - available) / total) * 100
        evt.summary = "High Memory Utilization: Currently %3.0f%% used of %3.1fMB (%3.0f%% free)" % (percent_used, total_gb, percent_free)
        evt.message = evt.summary
    else:
        evt.summary = 'High Memory Utilization: Currently: %s' %(convToUnits(available))
        evt.message = evt.summary

sum=evt.summary
if (sum.find("cbsModuleFreePageAvailableNorm") >= 0):
  sum=re.sub ("cbsModuleFreePageAvailableNorm", "cbsModuleFreePageAvailableHigh", sum)
  evt.summary=sum
  evt.message = evt.summary
I always wanted a solution to monitor my own environment at home. Not only the basics like CPU, Memory and Hard Disk etc. but also Windows Events. I investigated multiple solutions out there, both Cloud as On-Premise solutions, but none of them where 'complete' in my opinion like ZenOss is. Also a big selling point is that the Zenoss.Core version is free to use and is highly customizable. A community is available for questions and zenpacks (a zenpack is a expansion for specific hardware/software that you want to monitor)
As time of this writing, there are 2 versions of ZenOss available;
ZenOss 4.2.5
ZenOss 5.1.2
My first ZenOss 5.x.x. install i did, i used the install guide i found on IncrediGeek.com (site is down)
The guide was focused on using BtrFS (because ZenOss 5 was using BtrFS in that version) and easy install by copy and pasting all the CLI commands. Everything was fine for quite a time, but after a while my disks where running full and couldn't find out what was causing it. So after troubleshooting with my limited Linux Skills, i decided after a few evenings troubleshooting, to throw it in the thrash and start all over again. The version 5.1.2 is configured with XFS filesystem.
This time i decided to use the proper install guide of ZenOss. Also, keep in mind to read the install guide carefully, and not scroll to all the CLI commands without reading properly what is written around the CLI command :) I messed a install once, by not reading carefully :)
So, this post is based on the install and plan guide that is available by ZenOss.
You can see (and will notice) that i copy and pasted the guide, but in between you can find comments and appended text to help you when you don't have a lot of Linux experience (like i did :); you'll notice that your Linux skills learning curve will be steep at the end of this post :)
Ready, steady, Go!
When i installed ZenOss i used the following hardware specs for my virtual machine, this is based on the planning guide of ZenOss.
Also i used the thin provision option of my VM disks; i only monitor like 10 VM's, so the penalty of expanding will not affect the performance. And this way i can overprovision (yes yes, I know :) )
Virtual Machine Specs
What
How much
Memory
20 Gigabyte
CPU
1vCPU (4 vCores)
Hard disks
5 Disks (thin-provisioned) on SAS-disk Array
Network
1 VMXNET3 adapter
CD-Drive
Yes
SCSI
LSI Logic Parallel
Install CentOS 7
First get your copy of CentOS ready; you can download it from the CentOS project site (https://www.centos.org/download/)
I choose to install it with a Minimal iso.
Then mount the ISO to your machine. Personally; i uploaded it to a location on the Datastore and from there i mounted the ISO. Otherwise if you mount it via the Console Client, the ISO gets lost when you boot the machine, or when it reboots during install.
Also when you have problems with not seeing the fullscreen of the console during the install and/or buttons are missing ; you can solve this by installing CentOS via the Troubleshooting option.
Choose Troubleshooting
Select Install CentOS 7 in basic graphics mode
Set time and turn on Network time and select the Installation Source
Select Auto partition
Set network and turn on adapter
Set Root password
After reboot; log in and update system and reboot again.
Update your CentOS system via this command:
Yum update -y
Preparing storage for the master host
Read first! Then configure, otherwise you may mis important steps!
In addition to the storage required for its operating system, a Control Center master host requires the following
storage areas:
A local partition for Docker data, configured as a device mapper thin pool.
A local partition for Control Center internal services data, formatted with the XFS file system.
Note Control Center internal services include ZooKeeper, which requires consistently fast storage. Zenoss
recommends using a separate, high-performance storage resource for Control Center internal services. For
example, a drive that is configured with only one primary partition, which eliminates contention by other
services.
A local or remote primary partition for Zenoss Core data, configured as a device mapper thin pool.
A local primary partition, a remote primary partition, or a remote file server, for backups of Zenoss Core data.
The local or remote primary partition is formatted with the XFS file system. A remote file server must provide a
file system that is compatible with XFS.
Note If you are using a primary partition on a local device for backups, ensure that the primary partition for
Control Center internal services data is not on the same device.
I use the disks as followed throughout this post:
Disk
Function
Sdb1
Docker Data
Sdc1
Control Center
Sdd1
ZenOss Core Data
Sde1
Zenoss Backup Core Data
Create partitions
In short do the following:
Create XFS partitions for a local partition for Control Center internal services data, formatted with the XFS file system.
Create XFS partitions for a local primary partition, a remote primary partition, or a remote file server, for backups of Zenoss Core data. The local primary partition is formatted with the XFS file system.
Docker data and Zenoss Core Data are configured as device mapper thin pool, thus primary partitions; no actions needed here.
For ControlCenter and Zenoss Core Data; we must create XFS file systems.
Disks before
Disks after
For Control Center
1 Log in to the target host as root, or as a user with superuser privileges.
2 Identify the target primary partition for the file system to create.
lsblk --output=NAME,SIZE,TYPE,FSTYPE,MOUNTPOINT
For more information about the output of the lsblk command, and about creating primary partitions, refer to
the Zenoss Core Planning Guide.
3 Create an XFS file system.
Replace Partition with the path of the target primary partition:
mkfs -t xfs /dev/sdb1
4 Add an entry to the /etc/fstab file.
Replace Partition with the path of the primary partition used in the previous step:
5 Create the mount point for internal services data.
mkdir -p /opt/serviced/var/isvcs
6 Mount the file system, and then verify it mounted correctly.
mount -a && mount | grep isvcs
Example result:
/dev/xvdb1 on /opt/serviced/var/isvcs type xfs
(rw,relatime,seclabel,attr2,inode64,noquota)
Remark; be careful in step 4; there is a trailing white-space after /dev/sdb1 and the backslash, otherwise the mount action won't work
For Backups
Creating a file system for backups
To perform this procedure, you need a host with at least one unused primary partition, or a remote file server.
The Control Center master host requires local or remote storage space for backups of Control Center data. This
procedure includes steps to create an XFS file system on a primary partition, if necessary, and steps to mount a file
system for backups. For more information about primary partitions, refer to the Zenoss Core Planning Guide.
Note If you are using a primary partition on a local device for backups, ensure that the primary partition for
Control Center internal services data is not on the same device.
1 Log in to the target host as root, or as a user with superuser privileges.
2 Optional: Identify the target primary partition for the file system to create, if necessary. Skip this step if you are using a remote file server.
lsblk --output=NAME,SIZE,TYPE,FSTYPE,MOUNTPOINT
For more information about the output of the lsblk command, and about creating primary partitions, refer to
the Zenoss Core Planning Guide.
3 Optional: Create an XFS file system, if necessary.
mkfs -t xfs /dev/sde1
4 Create an entry in the /etc/fstab file.
■ the path of the primary partition used in the previous step
6 Mount the file system, and then verify it mounted correctly.
mount -a && mount | grep backups
Example result:
/dev/sdb3 on /opt/serviced/var/backups type xfs
(rw,relatime,seclabel,attr2,inode64,noquota)
Remark; also be careful inr step 4; there is a space after /dev/sde1 and the backslash, otherwise the mount action won't work
Preparing the master host operating system
This procedure prepares a RHEL/CentOS 7.1 or 7.2 host as a Control Center master host.
1 Log in to the candidate master host as root, or as a user with superuser privileges.
2 Add an entry to /etc/hosts for localhost, if necessary.
a Determine whether 127.0.0.1 is mapped to localhost.
grep 127.0.0.1 /etc/hosts | grep localhost
If the preceding commands return no result, perform the following substep.
b Add an entry to /etc/hosts for localhost.
echo "127.0.0.1 localhost" >> /etc/hosts
3 Disable the firewall, if necessary. This step is required for installation but not for deployment. For more information, refer to the Zenoss Core
Planning Guide.
a Determine whether the firewalld service is enabled.
systemctl status firewalld.service
■ If the result includes Active: inactive (dead), the service is disabled. Proceed to the nextstep.
■ If the result includes Active: active (running), the service is enabled. Perform the following substep.
b Disable the firewalld service.
On success, the preceding commands display messages similar to the following example:
rm '/etc/systemd/system/dbus-org.fedoraproject.FirewallD1.service'
rm '/etc/systemd/system/basic.target.wants/firewalld.service'
4 Enable persistent storage for log files, if desired.
By default, RHEL/CentOS systems store log data only in memory or in a small ring-buffer in the /run/log/journal directory.
By performing this step, log data persists and can be saved indefinitely, if you implement log file rotation practices. For more information, refer to your operating system documentation.
5 Disable Security-Enhanced Linux (SELinux), if installed.
a Determine whether SELinux is installed.
test -f /etc/selinux/config && grep '^SELINUX=' /etc/selinux/config
If the preceding commands return a result, SELinux is installed.
b Set the operating mode to disabled.
Open /etc/selinux/config in a text editor, and change the value of the SELINUX variable to disabled.
c Confirm the new setting.
7 Install the Nmap Ncat utility.
The utility is used to verify ZooKeeper ensemble configurations.
If you are installing a single-host deployment, skip this step.
yum install -y nmap-ncat
8 Install and configure the NTP package.
a Install the package.
yum install -y ntp
b Set the system time.
ntpd -gq
c Enable the ntpd daemon.
systemctl enable ntpd
d Configure ntpd to start when the system starts.
Currently, an unresolved issue associated with NTP prevents ntpd from restarting correctly after a reboot.
The following commands provide a workaround to ensure that it does.
This procedure installs and configures Docker, and installs Control Center.
1 Log in to the master host as root, or as a user with superuser privileges.
2 Install Docker 1.9.0, and then disable accidental upgrades.
a Add the Docker repository to the host's repository list.
yum clean all && yum makecache fast
yum install -y docker-engine-1.9.0
c Open /etc/yum.repos.d/docker.repo with a text editor.
vi /etc/yum.repos.d/docker.repo
Use insert key to change something and ESC key when ready. Also type :wq to Write and Quit
d Change the value of the enabled key from 1 to 0. (Use insert key to change something and ESC key when ready)
e Save the file and close the text editor. (Type :wq to Write and Quit)
3 Create a symbolic link for the Docker temporary directory.
Docker uses its temporary directory to spool images. The default directory is /var/lib/docker/tmp.
The following command specifies the same directory that Control Center uses, /tmp. You can specify any directory that has a minimum of 10GB of unused space.
a Create the docker directory in /var/lib.
mkdir /var/lib/docker
b Create the link to /tmp.
ln -s /tmp /var/lib/docker/tmp
4 Create a systemd override file for the Docker service definition.
a Create the override directory.
5 Install Control Center.
Control Center includes a utility that simplifies the process of creating a device mapper thin pool.
yum clean all && yum makecache fast
yum --enablerepo=zenoss-stable install -y serviced-1.1.3
6 Create a device mapper thin pool for Docker data.
a Identify the primary partition for the thin pool to create.
lsblk --output=NAME,SIZE,TYPE,FSTYPE,MOUNTPOINT
b Create the thin pool.
Replace Path-To-Device with the path of an unused primary partition:
serviced-storage create-thin-pool docker Path-To-Device
On success, the result includes the name of the thin pool, which always starts with /dev/mapper.
In my case:
You will see the following confirmation:
Created thin-pool device '/dev/mapper/docker-docker--pool'
7 Configure and start the Docker service.
a Create variables for adding arguments to the Docker configuration file. The --exec-opt argument is a workaround for a Docker issue on RHEL/CentOS 7.x systems.
Replace Thin-Pool-Device with the name of the thin pool device created in the previous step (I already did this for you :) )
The initial startup takes up to a minute, and may fail. If the startup fails, repeat the previous command.
Systemctl status docker to check status
It will look similar to this:
[root@nl-mon-fra201 ~]# systemctl status docker
● docker.service - Docker Application Container Engine
   Loaded: loaded (/usr/lib/systemd/system/docker.service; disabled; vendor preset: disabled)
  Drop-In: /etc/systemd/system/docker.service.d
           └─docker.conf
   Active: active (running) since Tue 2016-05-03 17:10:55 EDT; 28s ago
     Docs: https://docs.docker.com
 Main PID: 10359 (docker)
   CGroup: /system.slice/docker.service
<Outpout ommited>
8 Configure name resolution in containers.
Each time it starts, docker selects an IPv4 subnet for its virtual Ethernet bridge. The selection can change; this step ensures consistency.
a Identify the IPv4 subnet and netmask docker has selected for its virtual Ethernet bridge.
ip addr show docker0 | grep inet
In my case; type this:
ip addr show docker0 | grep inet
It will look like this:
[root@nl-mon-fra201 ~]# ip addr show docker0 | grep inet
    inet 172.17.0.1/16 scope global docker0
b Open /etc/sysconfig/docker in a text editor.
vi /etc/sysconfig/docker
c Add the following flags to the end of the OPTIONS declaration.
Replace Bridge-Subnet with the IPv4 subnet docker selected for its virtual bridge, and replace Bridge-Netmask
with the netmask docker selected: --dns=Bridge-Subnet --bip=Bridge-Subnet/Bridge-Netmask
For example, if the bridge subnet and netmask is 172.17.0.1/16, the flags to add are
--dns=172.17.0.1--bip=172.17.0.1/16.
Note Leave a blank space after the end of the thin pool device name, and make sure the double quote
character (") is at the end of the line.
d Restart the Docker service.
systemctl restart docker
Installing Zenoss Core
This procedure installs Zenoss Core and configures the NFS server.
1 Log in to the master host as root, or as a user with superuser privileges.
2 Install Zenoss Core.
3 Configure and restart the NFS server.
Currently, an unresolved issue prevents the NFS server from starting correctly. The following commands provide a
workaround to ensure that it does.
a Open /lib/systemd/system/nfs-server.service with a text editor.
b Change rpcbind.target to rpcbind.service on the following line:
Requires= network.target proc-fs-nfsd.mount rpcbind.target
c Reload the systemd manager configuration.
systemctl daemon-reload
Configuring Control Center
This procedure creates a thin pool for application data and customizes key configuration variables of Control
Center.
1 Log in to the master host as root, or as a user with superuser privileges.
2 Configure Control Center to serve as the master and as an agent.
The following variables configure serviced to serve as both master and agent:
SERVICED_AGENT
Default: 0 (false)
Determines whether a serviced instance performs agent tasks. Agents run application services
scheduled for the resource pool to which they belong. The serviced instance configured as the master
runs the scheduler. A serviced instance may be configured as agent and master, or just agent, or just
master.
SERVICED_MASTER
Default: 0 (false)
Determines whether a serviced instance performs master tasks. The master runs the application
services scheduler and other internal services, including the server for the Control Center browser interface.
A serviced instance may be configured as agent and master, or just agent, or just master. Only one
serviced instance in a Control Center cluster may be the master.
a Open /etc/default/serviced in a text editor.
b Find the SERVICED_AGENT declaration, and then change the value from 0 to 1.
The following example shows the line to change:
# SERVICED_AGENT=0
c Remove the number sign character (#) from the beginning of the line.
d Find the SERVICED_MASTER declaration, and then change the value from 0 to 1.
The following example shows the line to change:
# SERVICED_MASTER=0
e Remove the number sign character (#) from the beginning of the line.
f Save the file, and then close the editor.
3 Create a thin pool for Zenoss Core data.
a Identify the primary partition for the thin pool to create.
lsblk --output=NAME,SIZE,TYPE,FSTYPE,MOUNTPOINT
For more information about the output of the lsblk command, and about creating primary partitions,
refer to the Zenoss Core Planning Guide.
b Create the thin pool.
Replace Path-To-Device with the path of an unused primary partition (yep; already done that :):
On success, the result includes the name of the thin pool, which always starts with /dev/mapper.
4 Configure Control Center with the name of the thin pool for Zenoss Core data.
The Control Center configuration file is /etc/default/serviced. (For more information about serviced configuration options, refer to the Control Center online help.)
a Open /etc/default/serviced in a text editor.
b Locate the SERVICED_FS_TYPE declaration.
c Remove the number sign character (#) from the beginning of the line.
d Add SERVICED_DM_THINPOOLDEV immediately after SERVICED_FS_TYPE.
Replace Thin-Pool-Name with the name of the thin pool created previously:
e Save the file, and then close the editor.
5 Optional: Specify an alternate private subnet for Control Center, if necessary.
The default private subnet may already be in use in your environment. The following variable configures
serviced to use an alternate subnet:
SERVICED_VIRTUAL_ADDRESS_SUBNET
Default: 10.3
The 16-bit private subnet to use for serviced's virtual IPv4 addresses. RFC 1918 restricts private
networks to the 10.0/24, 172.16/20, and 192.168/16 address spaces. However, serviced accepts any
valid, 16-bit, IPv4 address space for its private network.
a Open /etc/default/serviced in a text editor.
b Locate the SERVICED_VIRTUAL_ADDRESS_SUBNET declaration, and then change the value.
The following example shows the line to change:
# SERVICED_VIRTUAL_ADDRESS_SUBNET=10.3
c Remove the number sign character (#) from the beginning of the line.
d Save the file, and then close the editor.
Starting Control Center
This procedure starts the Control Center service, serviced.
1 Log in to the master host as root, or as a user with superuser privileges.
2 Start serviced.
systemctl start serviced
To monitor progress, enter the following command:
journalctl -flu serviced -o cat
The serviced daemon invokes docker to pull its internal services images from Docker Hub. The Control
Center browser and command-line interfaces are unavailable until the images are installed and the services are
started. The process takes approximately 5-10 minutes. When the message Trying to discover my
pool repeats, Control Center is ready for the next steps.
3 Note Perform this step only if you are installing a single-host deployment.
Optional: Add the master host to the default resource pool.
Replace Hostname-Or-IP with the hostname or IP address of the Control Center master host:
If you enter a hostname, all hosts in your Control Center cluster must be able to resolve the name, either through
an entry in /etc/hosts, or through a nameserver on your network.
Deploying Zenoss Core
This procedure adds the Zenoss Core application to the list of applications that Control Center manages, and pulls
application images from Docker Hub.
1 Log in to the master host as root, or as a user with superuser privileges.
2 Add the Zenoss.core application to Control Center.
3 Deploy the application.
Replace Template-ID with the template identifier returned in the previous step, and replace Deployment-ID with a
name for this deployment (for example, Dev or Test):
Control Center pulls Zenoss Core images into the local registry.
To monitor progress, enter the following command:
journalctl -flu serviced -o cat
Control Center and Zenoss Core are now installed, and Zenoss Core is ready to be configured for your
environment. For more information, refer to the Zenoss Core Configuration Guide.
But wait!; your ZenOss deployment is not started yet.
Now go to you control center website and log in
After that start your deployment by pressing the play button. In my case; it is already running.
.png)
.png)
.png)
.png)
.png)
.png)
.jpg)
.jpg)
.jpg)
.jpg)
.jpg)
.png)
.png)
.png)
.png)