NOTE: read my post carefully and thoroughly! I know; you are probably (frustrated )searching for a first time right fix; and I can assure you; this is it.
But It all depends of course that you RELAX, ARE NOT IN A HURRY AND YOU READ THIS THOROUGHLY AND DO NOT JUMP TO THE POWERSHELL SYNTAXES WITHOUT READING THE CONTEXT!
If you have 2 DirectAccess servers on your site; and you want to accomplish manage-out; you're in a challenge.
Just like I did; if you Google on this; you probably will go to Richard Hick's Website; a thru guru when it comes to Direct Access.
In one of his Webinars, he speaks about ISATAP for Manage out Connectivity; this is how its called for connecting to your Direct Access Clients from within the corporation.
This is not possible over the same connection a Direct Access Client makes to the Direct Access Server.
Richard didn't gave price the details about accomplishing this, but it told me; it is possible, although officially not supported by Microsoft :).
So it eventually cost me 36 HOURS of reading various articles on the interweb and reverse engineering it to make it fit a multi-server Direct Access environment that uses an external load balancer.
The articles I read:
Limiting ISATAP Services to UAG by Jason Jones
Configuring an ISATAP Router with Windows Server 2008 R2 by Deb Shinder
Windows 2012 Direct Access – ISATAP Router by Brajesh Panda
This post is based on a specific situation:
-
You have 2 or more Direct Access servers on the same site (not multi site) and it's probably in the same VLAN; in other words; routing is not used between the 2 DA servers.
-
You are loadbalancing with use of a External Loadbalancer; a KEMP, NetScaler or F5; what ever the brand.
-
You are NOT using Windows NLB.
-
The ISATAP router (Windows Server) is in the same site as the 2 DA servers, and in the same VLAN.
-
The DA servers already have a IPv6 address assigned to it.
-
The ISATAP server already has a IPv6 address.
A short introduction to DirectAccess.
DirectAccess server uses solely IPv6 for its connectivity. If you are using IPv6 throughout your corporation, you will not have any problems with manage out. But the fact you are reading this; you are probably not using IPv6 throughout your environment :)
So; DirectAccess is using IPv6 for its connectivity to Direct Access clients when using IP-HTTPS; it wraps its 'interesting' traffic (using the Cisco terminology :) ) in a IPv6 packet, it is natively encrypted with IPsec due to the nature of IPv6, and put again in a HTTPS package and sent off to the Direct Access servers (or Load balancer VIP)
When it arrives at the DA servers; it is unpacked and sent off to its destination in its IPv4 form.
This connection is not bidirectional; in other words; the connection between the DA client and the DA server cannot be used as a upstream connection from another endpoint in your environment. For this you must setup a new connection to the DA client.
Here comes the problem if you try to manage your DA client from a IPv4 station; your IPv4 station cannot communicate to the DA client because it is only reachable by its IPv6 address.
To solve this; you have two options; one: make your environment IPv6 ready two: use a technique called ISATAP.
So ISATAP; what is it ?
ISATAP is a technique that lets a server (or router) function as a gateway between IPv6 and IPv4 networks with use of NAT64 and DNS64. Your IPv4 clients builds a ISATAP tunnel interface to the ISATAP routers IPV4 address. When you try to connect to a IPv6 client; your computer will get a IPv6 address back from the DNS server. Your client will try to connect to the IPv6 address via its ISATAP tunnel; hence that is the only way it knows how to connect to the destination. The ISATAP router will make sure that the packet will be sent to the corresponding destination that you wanted to reach. But this doesn't mean that the return traffic will flow correctly back; you must add specific routes on your DA servers so that return traffic will it reach its source (read: destination).
OK; let's go!
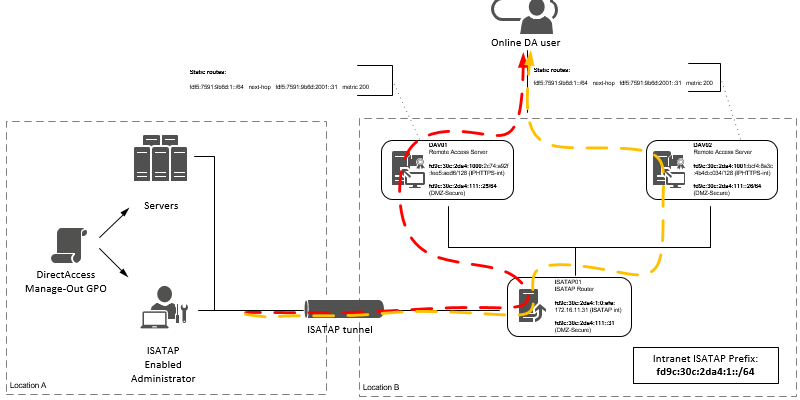
The Overview of the DA environment.
I have written down my IPv6 addresses that i used throughout this post.
Also i have made a Visio drawing, so that you have a visual idea of how everything is tied together :)
|
Server |
IPv6 address |
VLAN 111 |
|---|---|---|
|
DAV01 |
fd9c:30c:2da4:111::25/64 |
Yes |
|
DAV02 |
fd9c:30c:2da4:111::26/64 |
Yes |
|
ISATAP01 |
fd9c:30c:2da4:111::31/64 |
Yes |

On the ISATAP server.
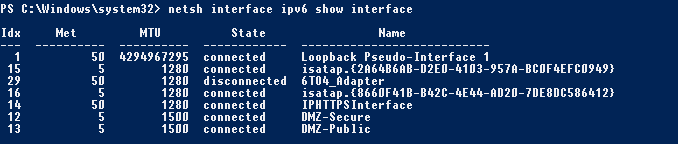
First; use the the following netshell cmd-let to find how your interfaces are named and what index numbers it has assigned to.
The following cmd-lts throughout this post I will use the index numbers of the interfaces.
netsh interface ipv6 show interface
In my case the result was the following below.

Now; configure the ISATAP router to set itself as the ISATAP router:
Make sure that you configure a DNS record for this name; it should point to you ISATAP router/server.
In my case; i created a CNAME record for the da-isatap.domain.local and pointed to the isatap01.domain.local
TIP; you could choose to go for the isatap.domain.local; you will notice that if you do a get-netisatapconfiguration in PowerShell on one of your DA servers, you will see that it points to isatap.domain.local. If you create a DNS record isatap in your domain, every ISATAP capable device (that is, it has ISATAP enabled on it) will see this and create a ISATAP interface. It may virtually break every communication on it (and thus on every computer that has ISATAP enabled). This is because when the computer detects that it can reach its destination via a IPv6 address, it will use the ISATAP interface to get there. That is not want you want (although, i think that you don't want it :) )
You can read more on this here
Here is the cmd-let to set it as the ISATAP router:
C:\Windows\system32> netsh interface ipv6 isatap set router da-isatap.domain.local
TIP; incase of that you want to bring 'down' the ISATAP interface and afterwards 'up' again, use to following cmd-let in PowerShell:
Set-NetISATAPconfiguration -Router ''
Set-NetISATAPconfiguration -Router 'da-isatap.domain.local'
Set the ISATAP interface to enable its routing functionality; look carefully at the number 6; you should replace it with the interface index number that you have on your own server that corresponds with the ISATAP interface.
netsh interface ipv6 set interface 6 forwarding=enable
Set the ISATAP interface to advertise the routes to its 'ISATAP clients'. Again; take in account that you should change the interface index number that corresponds with your own ISATAP interface.
netsh interface ipv6 set interface 6 advertise=enable
|
Next thing is quit important, if not, one of the key steps to let this work: |
If you check your DA server; you will see under 'Tunnel adapter isatap.{GUID}' next to IPv6 address, the IPv6 prefix listed that you should use on your ISATAP server.
In my case; you see two ISATAP adapters -each one belonging to one interface-, you must look at the adapter that holds the IPv4 address of the configured 'INSIDE' interface;
that is fd9c:30c:2da4:1:0:5efe:172.168.16.10.25
Incase if you don't see a correct formed ISATAP address on your ISATAP adapter (recognizable via the /96 IPv6 prefix ánd trailing IPv4 address ) you can see it also on the DA server.
Go to your Windows Firewall Advanced Security management console of your DA server and check the Connection Security Rules.
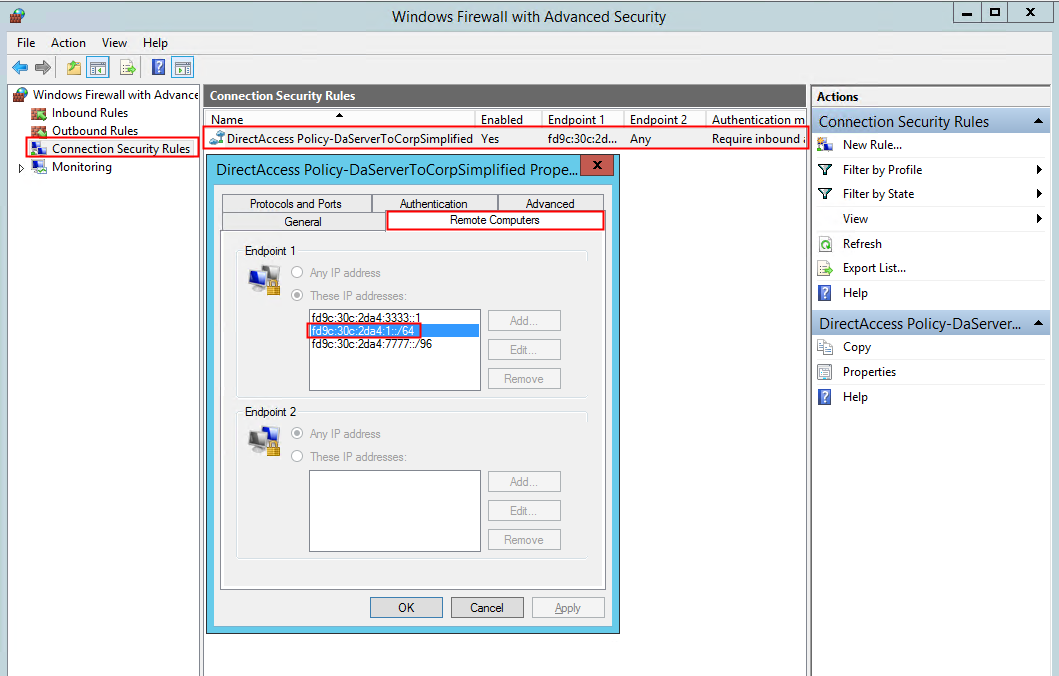
There should be one rule configured by DirectAccess via Policy; on the tab Remote Computers, you'll see three IPv6 addresses:
The one with a 3333 address in it, is for the DNS64 service. Richard Hicks explains more in depth on this via this link.
The other one with 777 address in it, is for the NAT64 translation. Also more on this on Richard Hicks his blog via this link.
So in my case; the middle one is interesting to us; we should use this IPv6 prefix for your ISATAP clients.
So get the first 64bits of the prefix; that is fd9c:30c:2da4:4::/64 and publish this via the following cmdlet.
Take note again I use my interface index 6; you should change it to yours :)
netsh interface ipv6 add route fd9c:30c:2da4:1::/64 6 publish=yes

This is from my DA Server.
Next; make sure that routing is enabled on your ethernet interface that is connected to your internal network
netsh interface ipv6 set interface 10 forwarding=enabled
|
|
Now you must make sure that your ISATAP router knows the route to your DA servers when it receives packets destined for DA clients.
|
You must know that the DA clients are registered on your DNS server consisting out of the first 64-bits that are unique to each one of your DA servers. The trailing 64-bits of the IPv6 address belonging to the DA client are built dynamically by the DA client itself. |
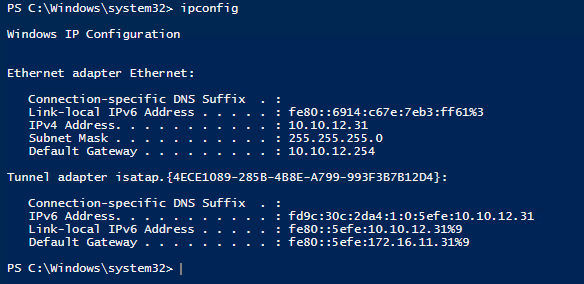
Go to your each one of you DA servers and fill in the following cmdlet to get hold of the IPHTTPS IPv6 prefix:
ipconfig
Below you'll see that it is fd9c:30c:2da4:1000 on my first DA server

My second DA server has the following IPHTTPS IPv6 prefix: fd9c:30c:2da4:1001
You'll should notice that the first 48-bits are the same, but the following 16-bits are slightly different

The following should route statements should be done on your ISATAP server:
Replace the pink part for your IPHTTPS IPv6 prefix that corresponds to your first DA server .
Make sure that the interface ID in orange is similar to yours; it must be the ethernet connection to your internal network.
Replace the green section with the IPv6 address of your first DA server IP v6 address.
netsh interface ipv6 add route fd9c:30c:2da4:1000::/64 10 nexthop=fd9c:30c:2da4:111::25 publish=yes
Replace the pink part for your IPHTTPS IPv6 prefix that corresponds to your second DA server.
Make sure that the interface ID in orange is similar to yours; it must be the ethernet connection to your internal network.
Replace the green section with the IPv6 address of your first DA server IP v6 address.
netsh interface ipv6 add route fd9c:30c:2da4:1001::/64 10 nexthop=fd9c:30c:2da4:111::26 publish=yes
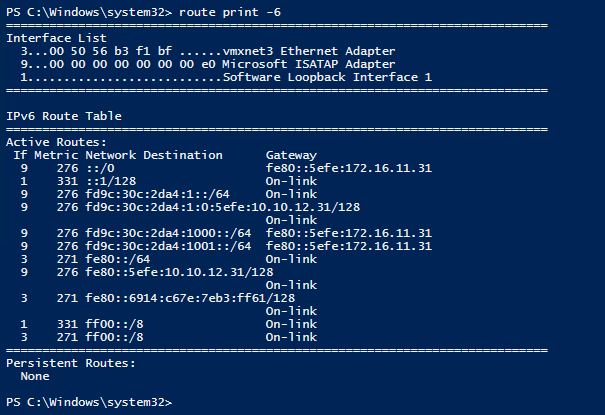
When all done; you should see the following (or similar of course :) ) when issuing the following cmd-let route print -6.
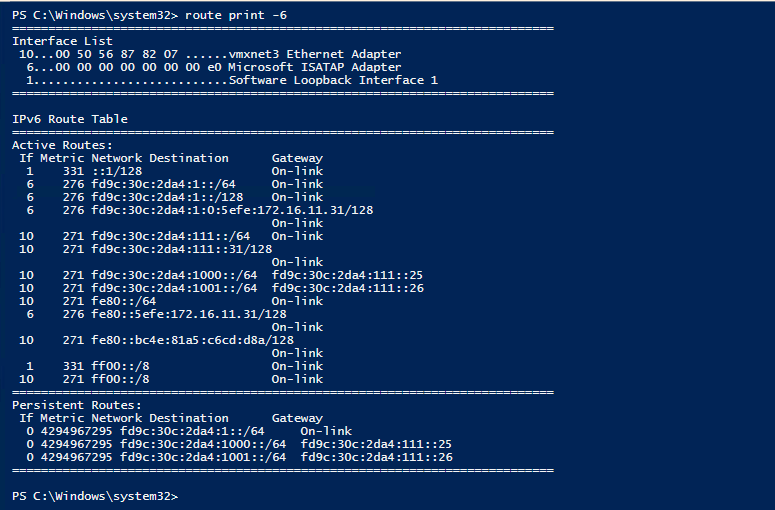
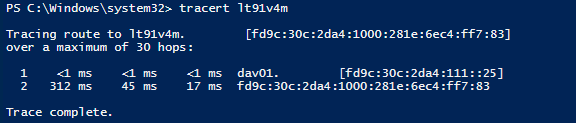
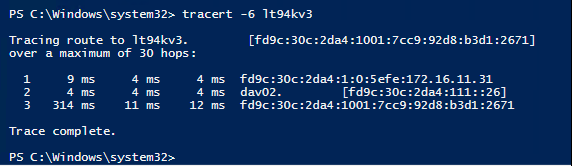
Now should be able to ping a DA client from your ISATAP server.
If you do a traceroute to your DA client; you'll see it traverses an IPv6 path from your ISATAP router to your DA server and then from there to your DA client.
|
Important Notice: |
On the Direct Access server 01
Now let's move to the first DA server.
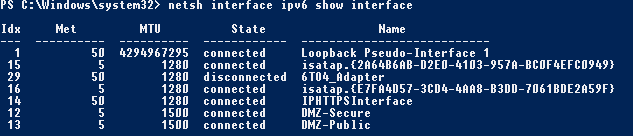
Use the the following netshell cmd-let to find how your interfaces are named and what index numbers it has assigned to.
The following cmd-lts throughout this section I will use the index numbers of the interfaces.
netsh interface ipv6 show interface
In my case the result was the following below.
This cmd-let will let the DA server find the path back to the ISATAP client. You'll recognize the purple part; it should be the same as the IPv6 prefix the ISATAP router publishes in the preceding section of this post.
So let's get to it:
-
The pink part is the IPv6 prefix the ISATAP router publishes (and in return the ISATAP clients will use to form a ISATAP client address)
-
The orange part is the interface index number from where the ISATAP router can be reached; in my case the 'DMZ-Secure' interface
-
The yellow part is the IPv6 address of the ISATAP router's normal ethernet interface (not the ISATAP routers ISATAP interface)
-
The light gray section is the metric you'll give with this route; it is important that the metric is lower than the metric of the current ISATAP interface on your DA server (I'll elaborate on that one below)
netsh interface ipv6 add route fd9c:30c:2da4:1::/64 12 nexthop=fd9c:30c:2da4:111::31 metric=200
|
Remember that the DA server also has a ISATAP interface, and that prefix can be found in the Endpoint 1 list of the Connection Security Rules of the DA server and DA clients) |
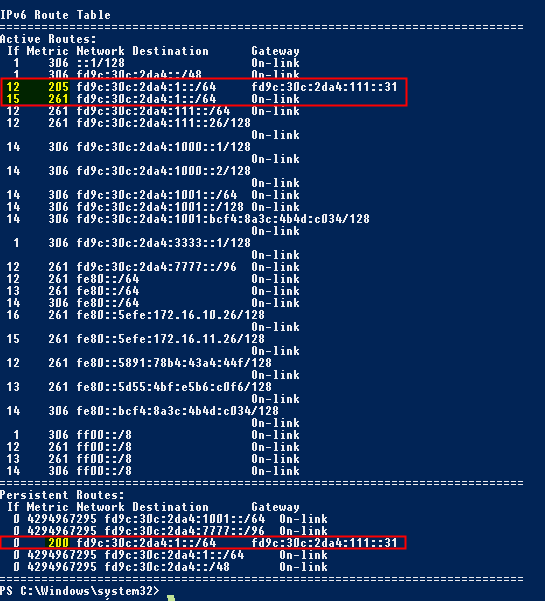
Here you see the live example of my DA server; in the first red box you see two active routes; the first route is the persistent route I add via the cmdlet above. The second route is the route added by DA itself. Notice the metrics and Interface ID's; I altered the traffic flow so that it will reach my ISATAP server, not its own ISATAP interface. This is because Microsoft doesn't officially support Load balanced DA setups with ISATAP; they only support ISATAP via single DA server setups. Microsoft used to support ISATAP on Load balanced DA setups, but withdrawn there Technet Article from the web due to the 'complexity'.
I now know why :) this can be quit overwhelming for a Sysadmin that has no networking knowledge :)
So back to the metrics; I made sure that my custom added route has a lower metric, thus will be chosen first above the route of the DA server's ISATAP interface itself.
It is possible that you need a lower or higher metric that the number I used in my setup; it purely depends on your own setup. I hope that by explaining the thought behind it, you'll understand what to change so that it will work in your own environment.

You're done here; you can move on to your second DA server
On the Direct Access server 02
Again; use the the following netshell cmd-let to find how your interfaces are named and what index numbers it has assigned to.
The following cmd-lts throughout this section I will use the index numbers of the interfaces.
netsh interface ipv6 show interface
In my case the result was the following below.
This cmd-let will let the DA server find the path back to the ISATAP client. You'll recognize the purple part; it should be the same as the IPv6 prefix the ISATAP router publishes in the preceding section of this post.
So let's get to it:
-
The pink part is the IPv6 prefix the ISATAP router publishes (and in return the ISATAP clients will use to form a ISATAP client address)
-
The orange part is the interface index number from where the ISATAP router can be reached; in my case the 'DMZ-Secure' interface
-
The yellow part is the IPv6 address of the ISATAP router's normal ethernet interface (not the ISATAP routers ISATAP interface)
-
The light gray section is the metric you'll give with this route; it is important that the metric is lower than the metric of the current ISATAP interface on your DA server (I'll elaborate on that one below)
netsh interface ipv6 add route fd9c:30c:2da4:1::/64 12 nexthop=fd9c:30c:2da4:111::31 metric=200
The result of this should be similar of that of mine setup:
Enable ISATAP interface on your Clients and test it
There are a few options you can choose from for enabling ISATAP on your client. I will elaborate on the one via Group Policy.
I mentioned earlier that i created the DNS A-record 'da-isatap.domain.local'.
Create a GPO that matches my figure below :) (save's me some typing) (I assume that you are familiar with creating GPO's)
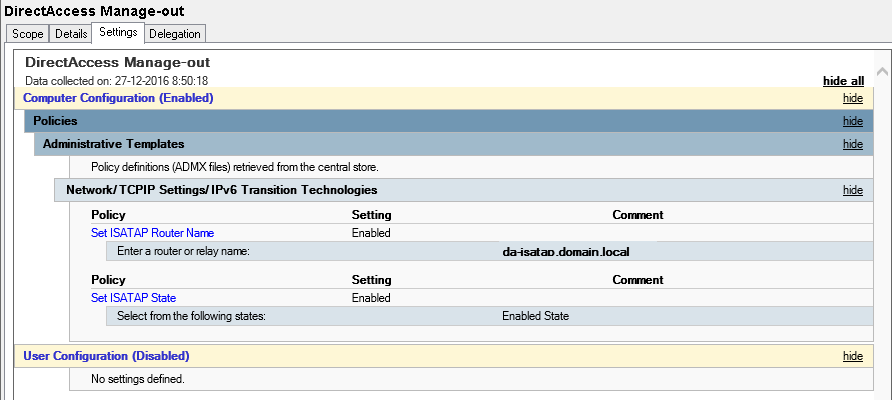
When you created the GPO, make sure that only selected clients get them; you can do this via security group.
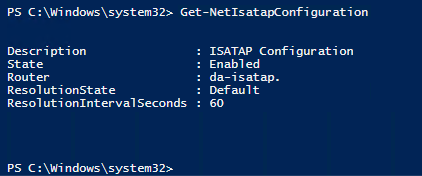
Then, make sure that your clients get the GPO, you can verify this by issuing the following cmd-let from PowerShell:
Get-NetISATAPConfiguration
If you check your interfaces; you should see that the ISATAP interface is now Connected and that is has a IP address
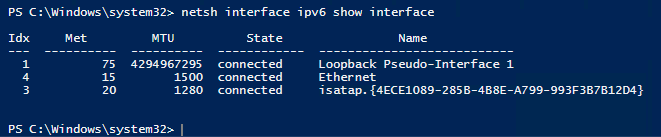
Also you see that the ISATAP interface has a IPv6 address
And you can see that you have learned routes to your two DA servers (via the ISATAP router)
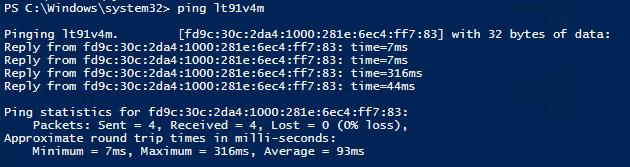
Finally try to traceroute a DA client via its NETBIOS name (or FQDN; what you would like).
Fin.
That's really it. Nothing more. I hope to create in the future a new post about creating a ISATAP environment when using Multi Site Direct Access Deployments; that involves using ISATAP tunnel's between ISATAP servers when you have a not adopted IPv6 internally. That's my new challenge :)
You can read my next post here about Things to NOT to DO on Direct Access deployments (and what the consequences of them are).