When using Direct Access; it is best practice to harden your Direct access server.
You can find them here via this link.
Watch out when disabling transition techniques
One of them is to disable transition techniques that you are not using; for example 6to4 tunneling and Teredo tunneling.
Only I found out you should do this only on your Clients, not your Direct Access servers. This because it will raise errors in your event log on the DA servers about disabled transition technologies and will show an error in the remote dashboard.
It is OK to disable unused transition technologies via a separate group policy, but not by altering the Direct Access Client policy that was created during the installation of Direct Access. This is because your adjustments are overwritten when you alter your direct access configuration when you change it via the Remote Access snap -in on of your Direct Access servers.
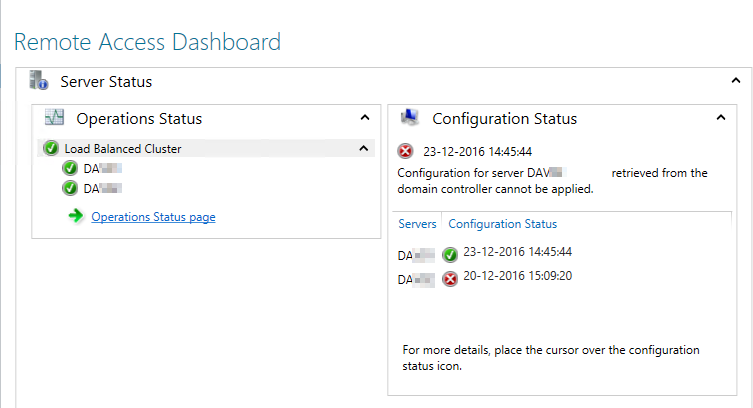
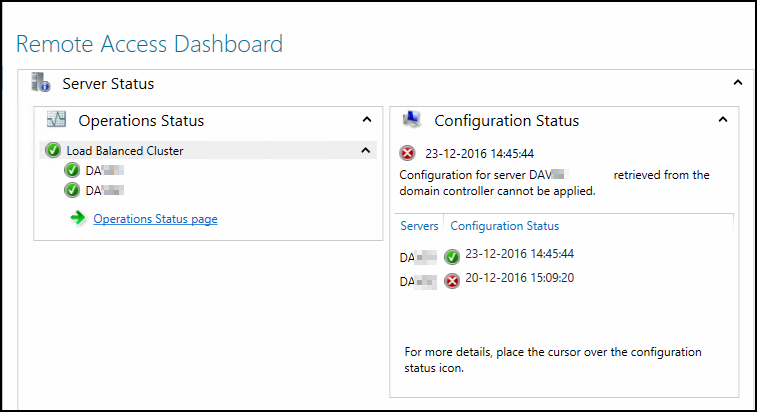
The below figure you can see that an error on one of my direct access servers. The error states that the retrieved configuration for server <server name> could not be applied. It suggests that the Direct Access policy cannot be applied. In my case, the policy actually did apply, but not fully apply. So there is no problem with ACL rights or what so ever on the GPO.
The problem lies in the fact that the direct access GPO tried to do something with a transition technique, like 6to4 or Teredo tunneling. But it couldn't do that, because I disabled it via another policy, thus getting this error.
On the following TechNet article you can find all the configuration statusses that are available.
If you look at the table, you can find the one that describes my problem.
Error
Configuration for server [server name] retrieved from the domain controller cannot be applied.
The configuration in the GPO reached the server but is not successfully applied, and more than 15 minutes have passed since the configuration was changed.
This could happen in one of the following scenarios:
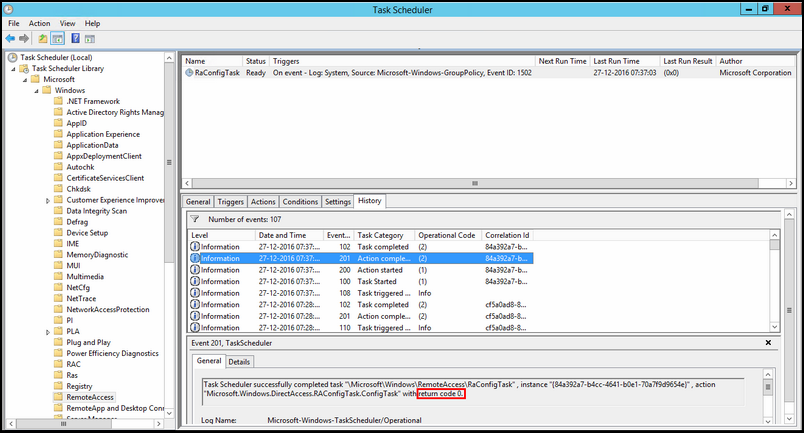
1. The configuration is currently in the process of being applied. This is shown as an error because it may have taken a long time to retrieve the configuration from the GPO. To verify whether this is the reason, use Task Scheduler and navigate to Microsoft\Windows\RemoteAccess to verify that RAConfigTask is currently running.
2. If RAConfigTask is not currently running, it may have failed to apply the configuration on the server. Check for errors in Event Viewer under the Remote Access server operations channel, which is located at \Applications and Services Logs\Microsoft\Windows\RemoteAccess-RemoteAccessServer. Check for errors in OPERATIONS STATUS in the Remote Access Management Console. For more information, see Monitor the operations status of the Remote Access server and its components.
Looking at the task sequence like the TechNet article suggested. It is important to notice that the return code (check the figure below) is 0. That means no error was found and everything is honky dorry.
I found it quit difficult to configure DirectAccess on the Citrix NetScaler combined with Windows 10 machines.
This because Windows 8 and 10 machines connect differently to DirectAccess than previous versions when using a IP-HTTPS connection. Keep that in mind if you have already a DirectAccess setup in place (combined or not combined with a Load balancer), and you are deciding to upgrade the client platform to Windows 10 (yet that latter one is not a bad idea )
Yet again, I struggled with this setup after watching again a real good Webinar by Citrix about using advanced ADC configuration for Microsoft DirectAccess to improve data center security in which Richard Hicks took a big part in. In that webinar he showed what to watch out for when configuring a VIP for DirectAccess; the only thing is; when you pause the video at 43m 17s, and look closely to the SSL configuration… you'll notice it wouldn't work; encryptions protocols like TLS 1.0, 1.1, 1.2 and SSLv3 are disabled; if you would copy that literary to your NetScaler; it won't work. So the part of the used Cipher suites is true, but don't pay close attention to the rest of the screen. But still; this Citrix video is great to watch and Richard explains a lot; what is good thing of course.
So what has changed ?
Previous version of Windows, Windows 7, utilizes a double encryption method when using a IP-HTTPS connection to DirectAccess. The data is encrypted via IPv6, and put inside a HTTPS packet, that is also encrypted; hence double encryption is utilized. Imagine putting a written letter in a Safe, and put that Safe in another Safe; and when it arrives on its destination; both Safes must be unlocked to see the letter. You can imagine that double encryption comes with more processing power on both ends of the connection; the letter doesn't get on its own into two safe's
From Windows 8 up to Windows 10, the use of a IP-HTTPS null encryption method was utilized in combination with the SSLv3 protocol (the one released 21 years ago back in 1996). The data can be encrypted via IPv6, because IPsec security is mandated in the IPv6 protocol specification, allowing IPv6 packet authentication and/or payload encryption via the Extension Headers. However, IPsec is not automatically implemented, it must be configured and used with a security key exchange; in case of DirectAccess, DA utilizes this. The IPv6 packet is placed inside a HTTPS packet, that uses a NULL cipher suite; the NULL ciphers are ones that do not offer encryption. So coming back to the safe comparison; the letter is put in a Safe, but that safe is put in a briefcase (that looks like a Safe, but is not a Safe :) ) That speeds up a lot and enhances performance and scalability (less servers needed because less processing power is needed for the same amount of users). I can hear you thinking; what about security. Well the good thing is, if the briefcase was intercepted by some entity; they only find a real safe in the briefcase. In depth information about this you can find here at Richard Hicks Blog
Keep this change in mind about how Windows Clients utilizes DirectAccess connections when you have hardened your DirectAccess setup. If you have hardened the SSL Cipher Suites by following best practices (which is not a bad thing of course); Windows 10 machines probably can't connect to your DA infrastructure. Big chance you disabled the NULL cipher suite, because SSL Labs would rate a thick red F (will come back to this later.)
But wait a minute; SSLv3 ?! That is vulnerable for POODLE attacks!
Yes that is true, and I can't 'put a needle in between of that' (literary Dutch translation :) ). Yes, SSLv3 is vulnerable for POODLE and I'm fully 100% agreeing with you that it shouldn't be utilized. Think back to my Safe comparison; the interesting payload is encrypted via IPv6 using its Extension Headers; so no matter what the safe is transported in; hence if it was a wicker basket (extreme comparison), the interesting data is still protected.
What will I have after reading this blog post ?
Well, if you ask me :) you will have a highly scalable and performing DirectAccess environment that is both safe and very fast. This because we are using the HTTPS with the SSLv3 protocol, a NULL cipher and protecting the VIP with the 'request client certificate' that is mandatory for successfully setting up a DA connection by the client.
Prerequisites / shopping list.
Citrix NetScaler 11.1; one armed configuration with 2 subnets.
Four VIPs
One for External Connections
One for Internal Connections
One for Network Locations Services
One for the WebProbeHost of Direct Access
Two Windows 2012 R2 servers, properly updated
Windows 10 machines domain joined
Own PKI Infrastructure available
Windows 10 Clients are receiving Computer Certificates.
The PKI CA certificate is installed on your NetScaler.
This blog post is about preparing DirectAccess on Windows 2012 R2 for Windows 10 clients and is based on the following prerequisites.
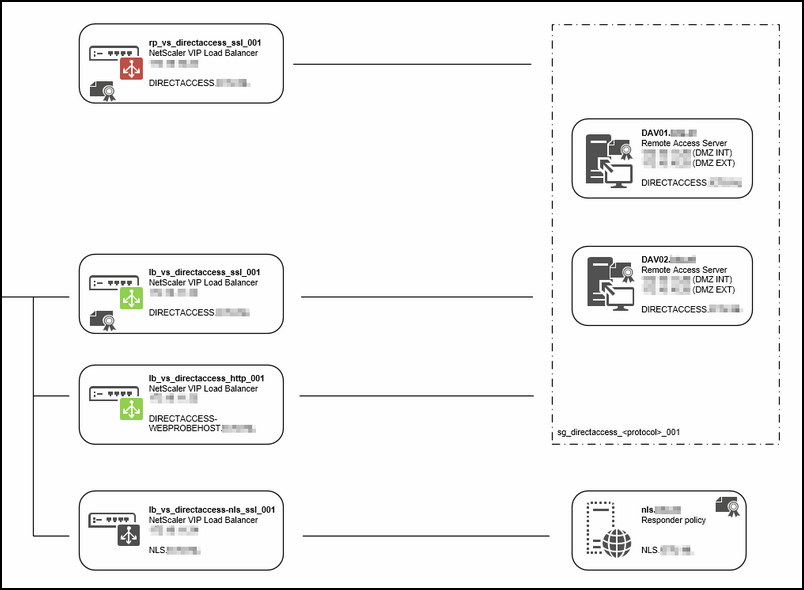
Here you can see a technical design (figure 1) how it will look like when were are done.
Figure 1: High Level Design
DirectAccess depends on Network Location services to check if the computer is on-premise or not, so the NLS service is a critical part of your DirectAccess Setup. Microsoft discourages to install this role on the same server as DA itself. Also don't install this NLS role on an intranet web server, but use a dedicated server for this.
The Citrix NetScaler can do this for you; just go to this website. Richard Hicks explained it very well how to do this, so I won't type it for you.
Install the first DA server
I borrowed this part from another site for your convience.
First import the certificate on the first DA server; make sure that it is place in the Personal store of the Computer. Incase that you don't know how; follow this article on TechNet.
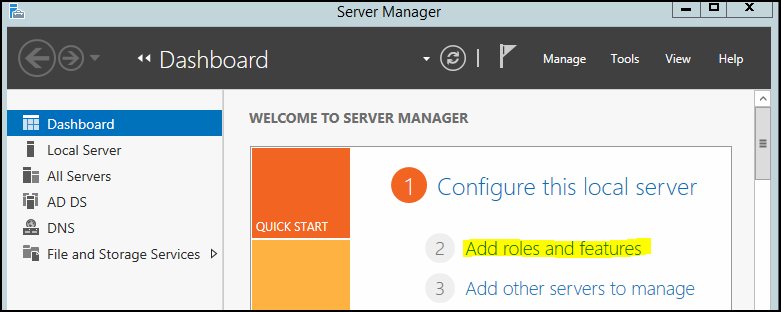
Step 1: Adding the DirectAccess role to the designated server
1. Log on to the designated server as member of domain administrator or enterprise administrator security group
Figure 2
2. Navigate to Server Manager > Add Roles and Features
Figure 3
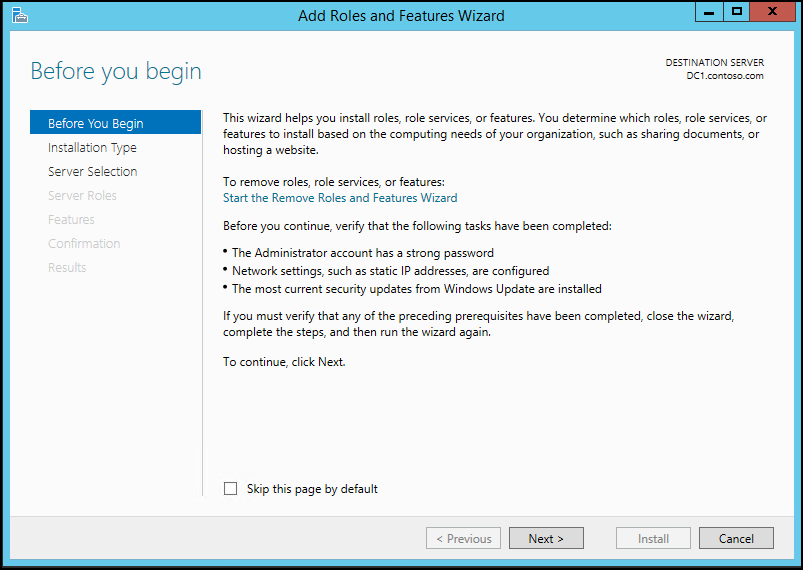
3. Once the wizard opens, click next to continue
Figure 4
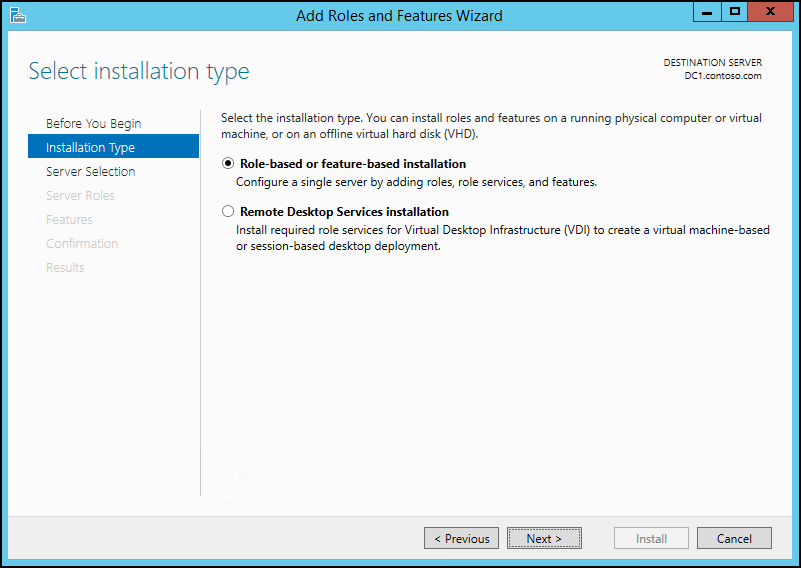
4. Select option “role-based or feature-based installation” and click next
Figure 5
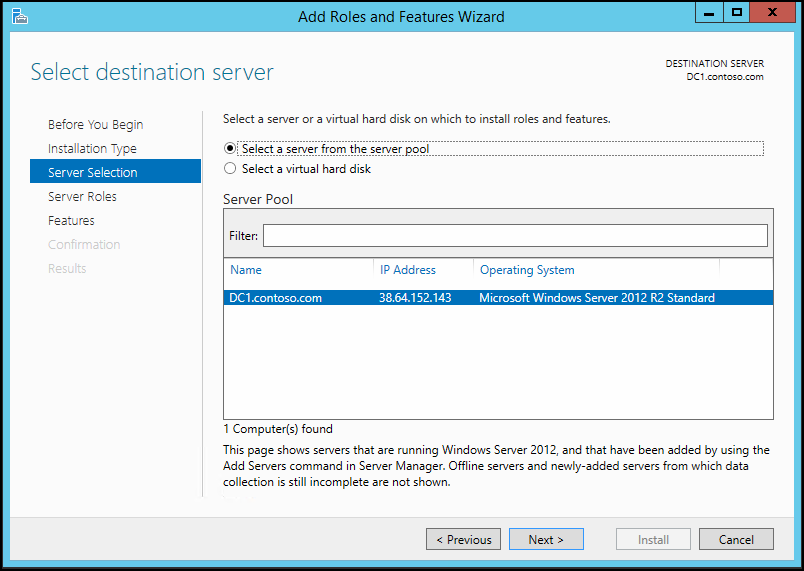
5. From the server selection I keep the default and click next
Figure 6
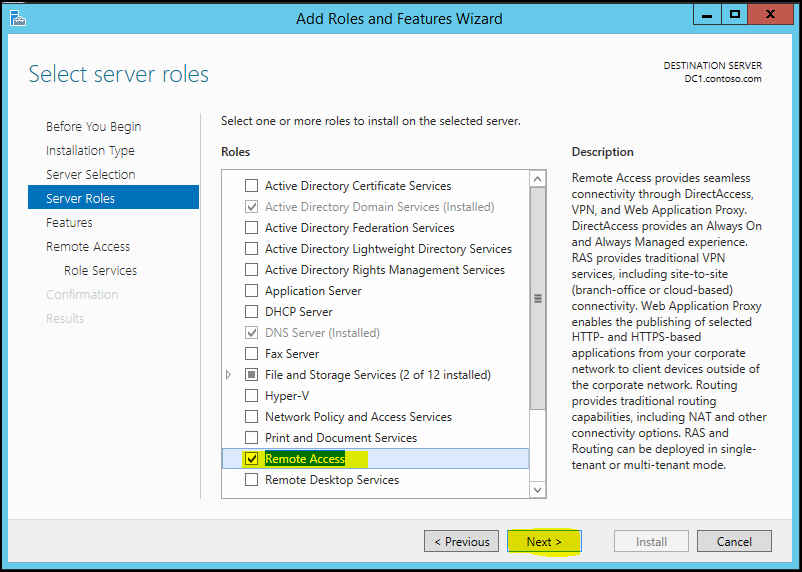
6. From the server roles list, put tick box on “Remote Access” option and click next
Figure 7
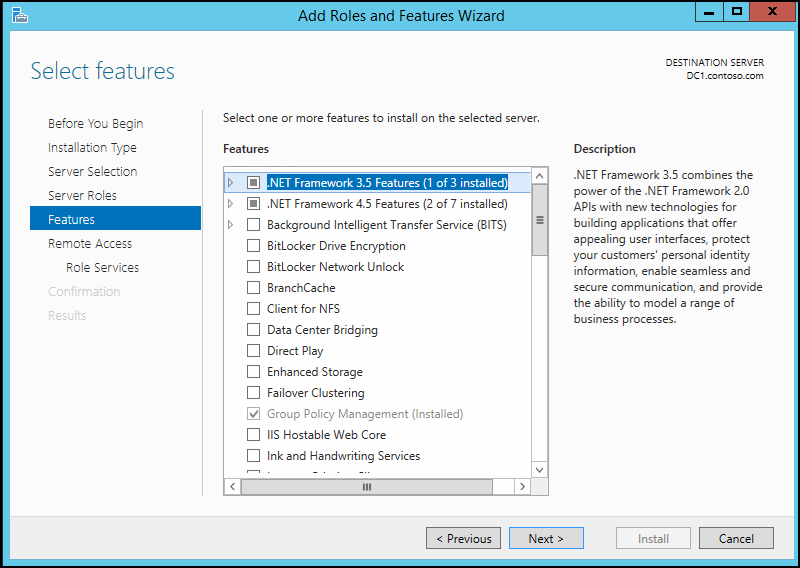
7. From the features list keep default and click next
Figure 8
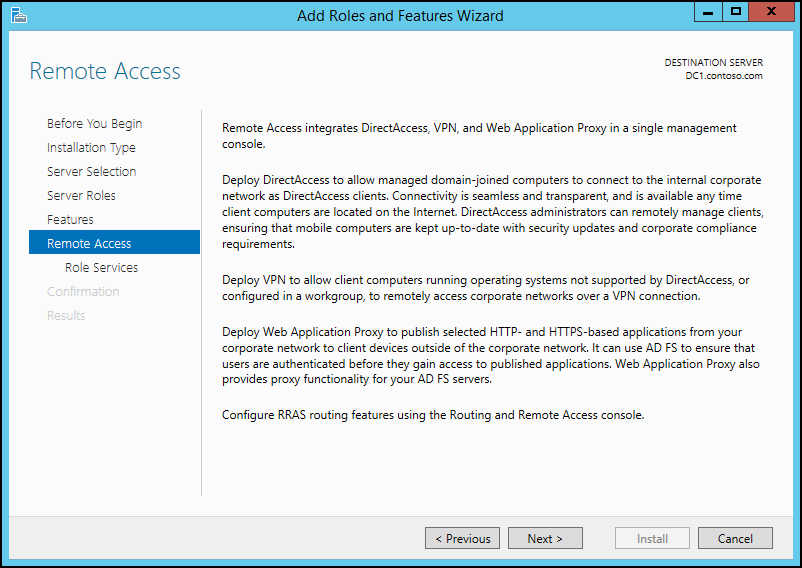
8. In next window it gives explanation about remote access role and click next to continue
Figure 9
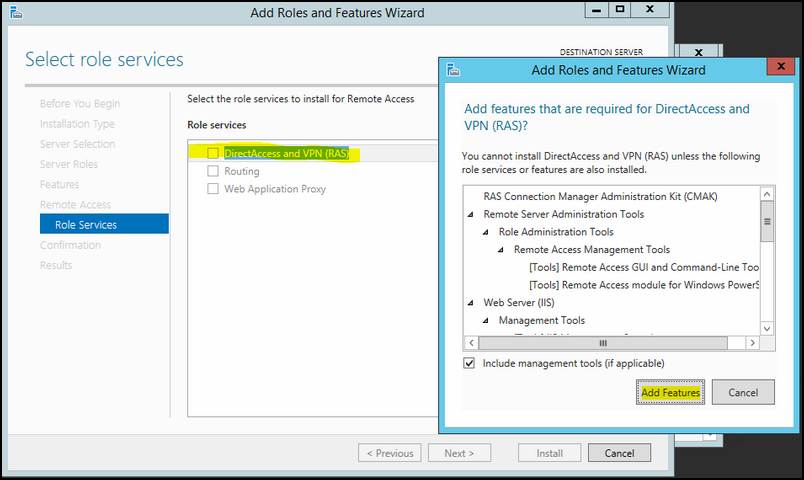
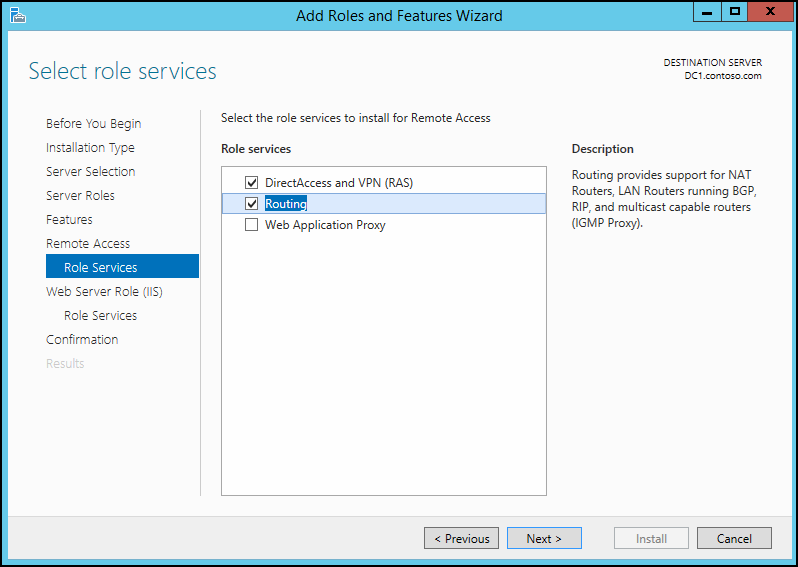
9. On role service list click on “DirectAccess and VPN (RAS)” option to select. Then it will prompt to add related features. Click add feature to add them
Figure 10
10. If the deployment also need routing services make sure to add “Routing” option too. Then click next to continue
11. Click next to continue when the process displays a description about web server role
12. For IIS role services keep default and click next to continue
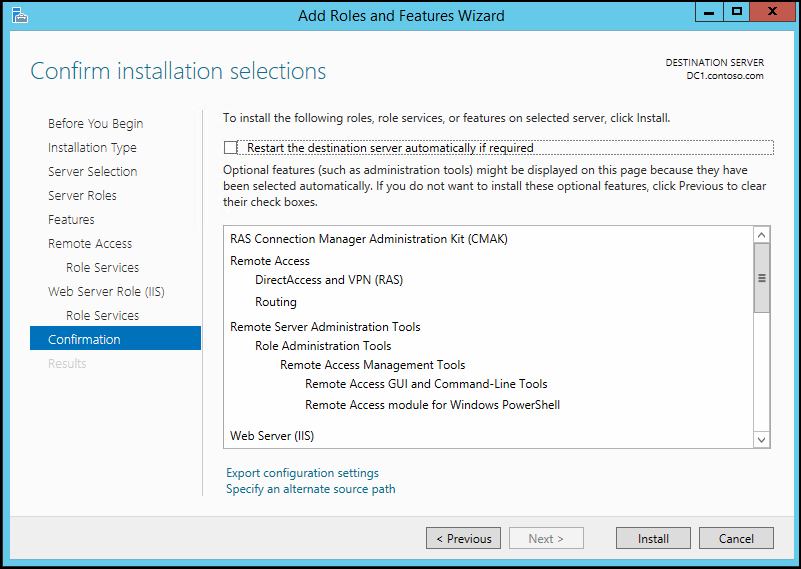
13. At the confirmation about roles and features screen, click install to continue
Figure 11
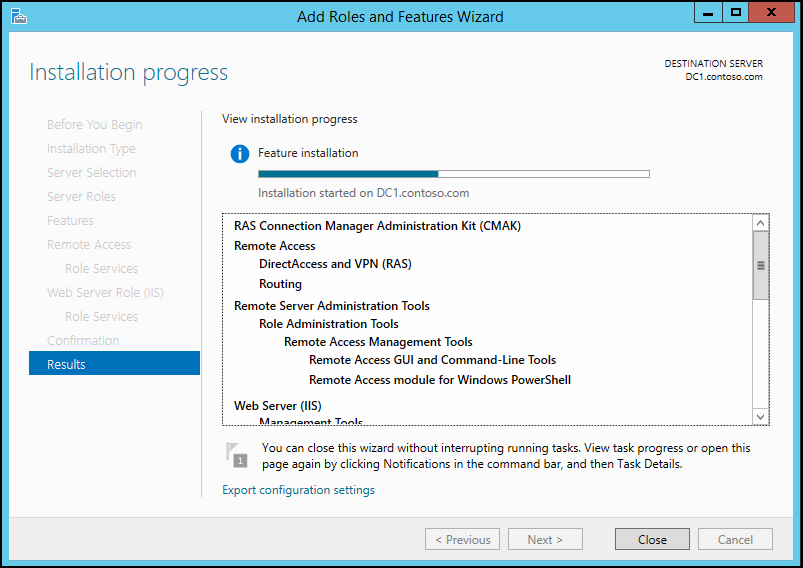
14. Wait for the installation to complete
Figure 12
15. After it is completed close the console to exit from the wizard
Step 2: Configuring the DirectAccess service
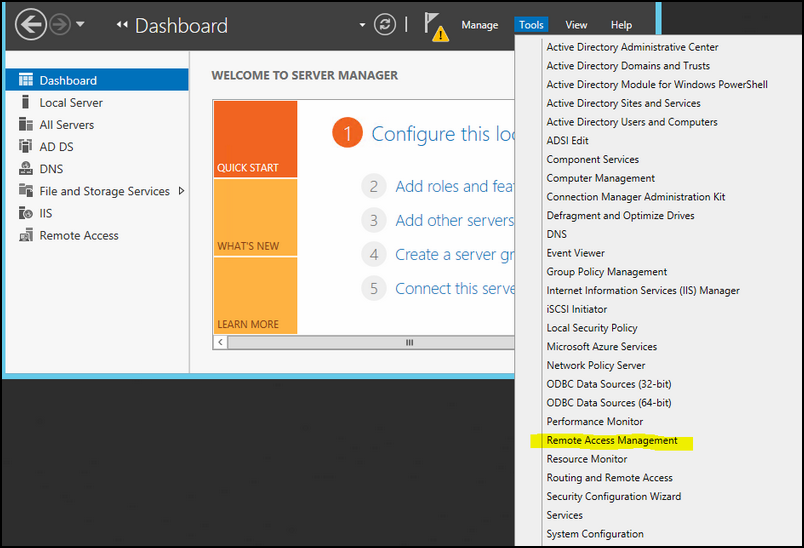
1. Navigate to Server Manager > Tools > Remote Access Management
Figure 13
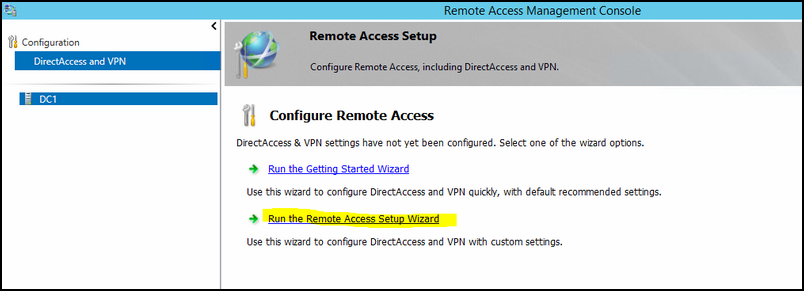
2. Then it will load the mmc and from there select DirectAccess and VPN and configuration section in left hand panel
3. To run the wizard click on the option from Remote access mmc
Figure 14
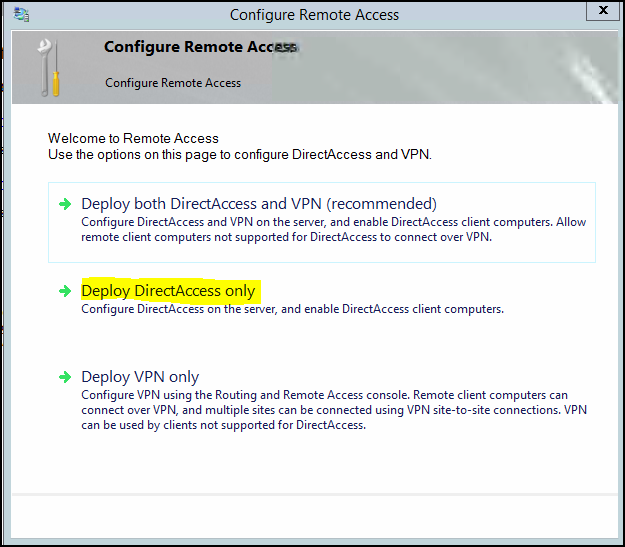
4. From the console select option Deploy DirectAccess Only
Figure 15
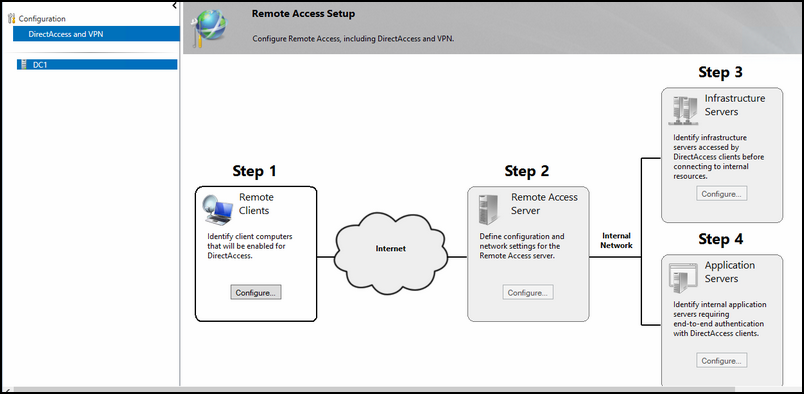
5. Then in next window (figure 16) it shows 4 main steps to complete the configuration.
Figure 16
Configuring of DirectAccess.
Configuration of DirectAccess is done in 4 steps like shown in the above figure; the steps 1 till 4 is as followed:
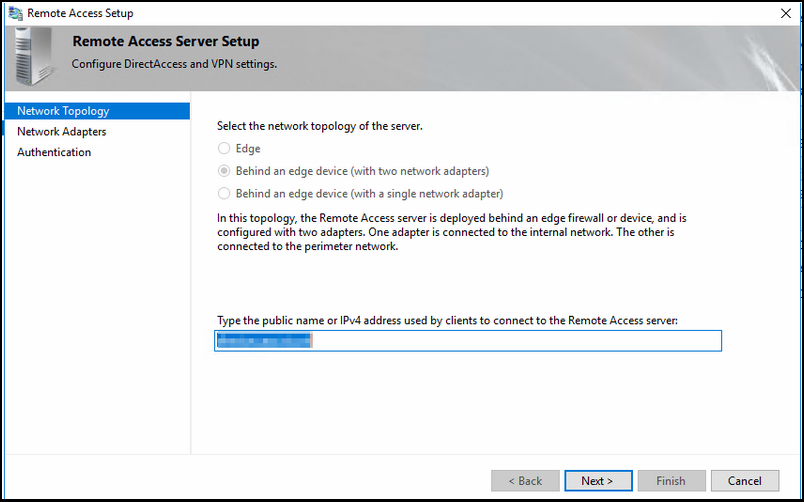
Step 1
Select the first option; that is what you want.
Figure 17
Select a security group by clicking Add; I would suggest that you first select a specific group for testing purposes that only have DirectAccess test workstations.
You can always change afterwards it to something else; like for example Domain Computers; but keep in mind that you always must use the wizard like the one below (figure 18). Altering the GPO directly will have negative effects. Also make sure that both check boxes are NOT selected.
Figure 18
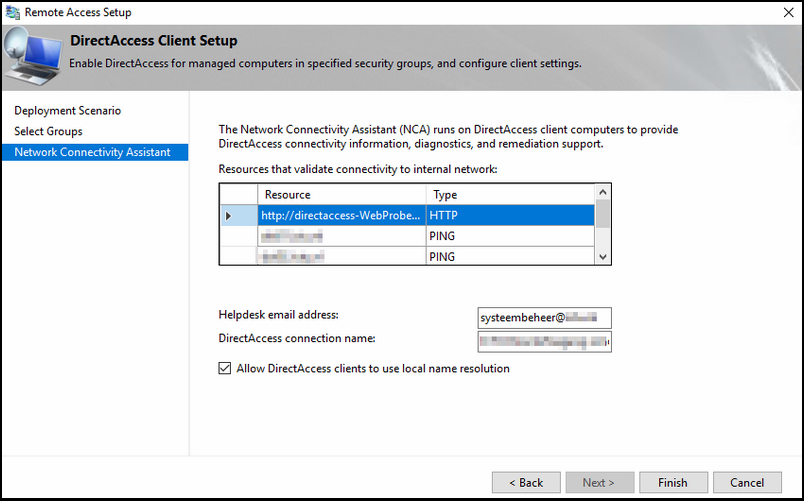
Fill in the blanks; I would suggest that the resources validation check would be consisting out of the following:
Reaching the web probe on HTTP
Pinging to servers; for example two domain controllers.
Also fill in the helpdesk email address and the DA connection name; that name will be visible in the Network & Sharing Centre and make sure that the local name resolution is checked.
Figure 19
Step 2.
Fill in the name for your DirectAccess service; this URL will be used for the DA clients to connect to.
Figure 20
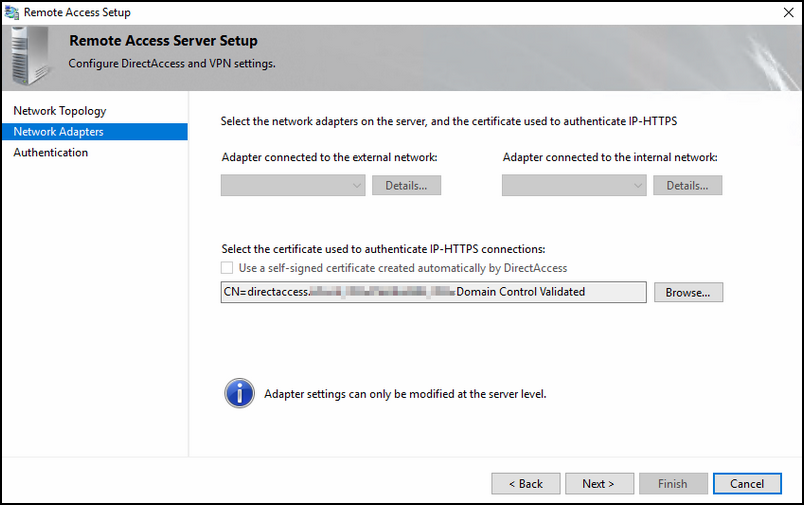
During installation; you have imported the certificate already in the computer personal store, if not; follow this article how to do this
Once you have imported the SSL certificate for DirectAccess to use, choose the correct adapters for internal and external connections.
Figure 21
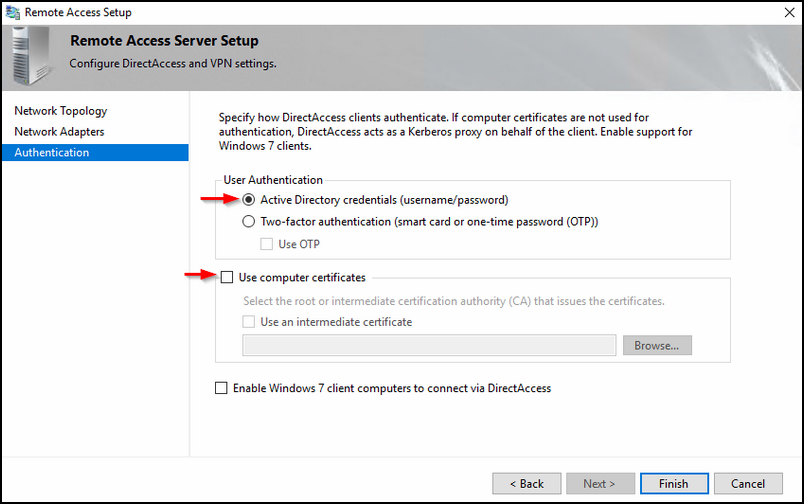
Select the option 'Active Directory Credentials (username/password) and make sure the "use computer certitifcates'' is unchecked. The last one can be enabled if you use windows 7 clients; this has to do with the WMI filter that would be enabled on your DA policy.
Figure 22
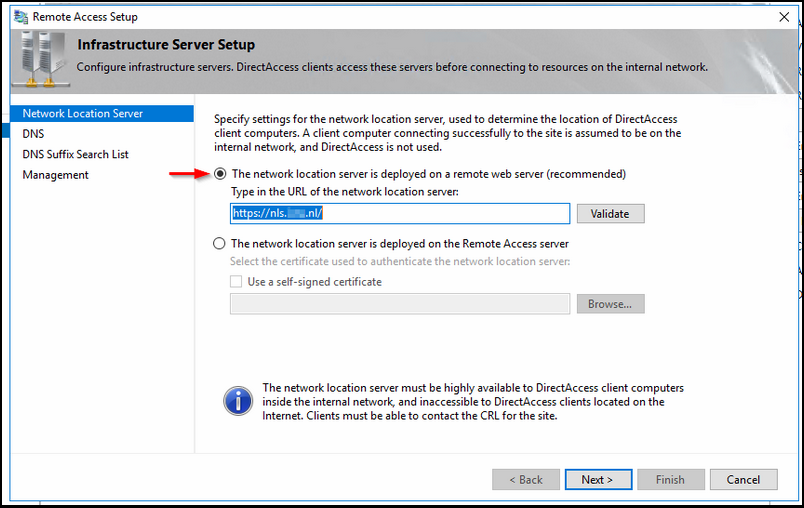
Step 3
Fill in the NLS URL and validate it. this URL will be installed on the NetScaler.
Figure 23
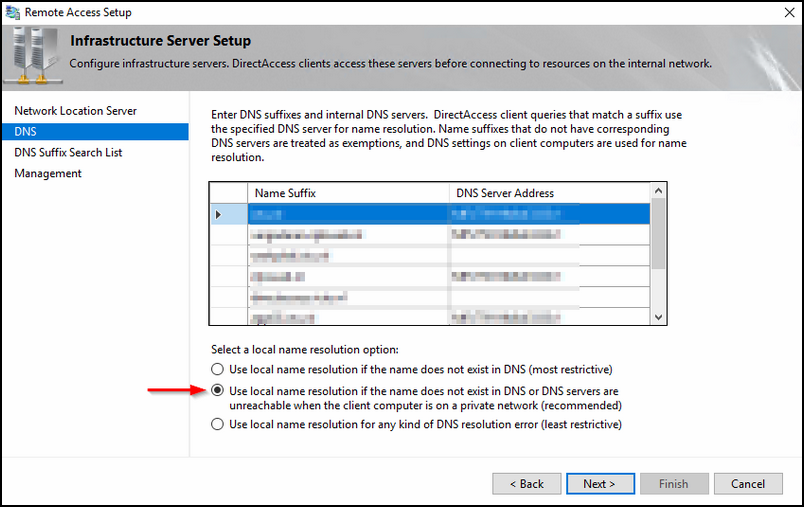
Here you must select the interesting traffic for to be put in the DA tunnel and what specifically not. Before adding name suffixes; choose the 2nd of local name resolution options.
Figure 24
This is how it works:
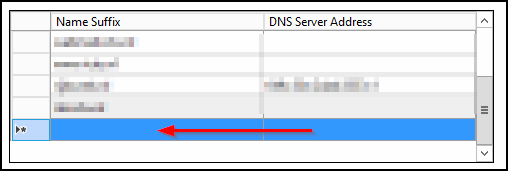
To add a line; scroll down until you see the asterisk
Figure 25
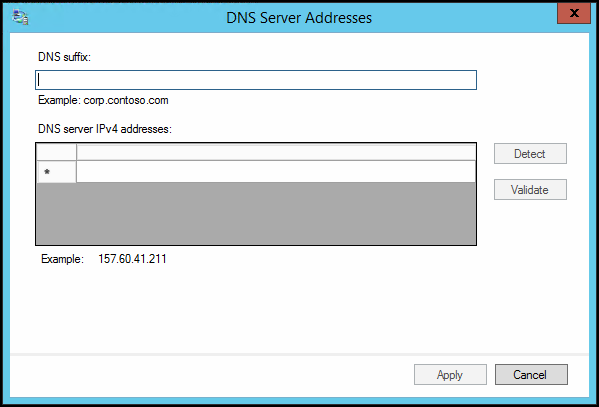
Doubleclick on the empty line and you see the follwing screen
Figure 26
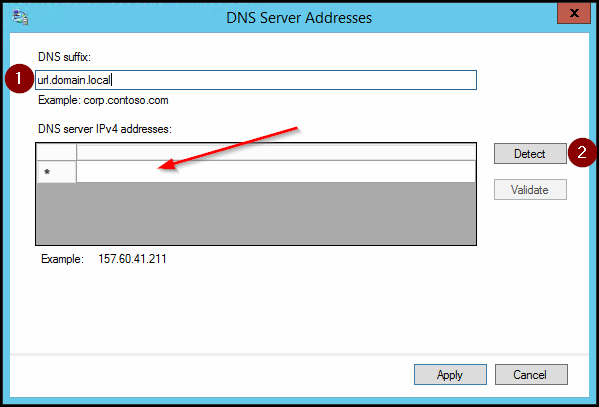
If you want that the traffic for a specific URL must be tunneled over the DirectAccess tunnel, you must do the following:
Fill in the URL
Click on Detect; you'll notice under the RED ARROW that the DNS64 address will be filled in with a IPv6 address (to be specific the DNS64 address of DA.
Figure 27
NOTE: If you add a line without a DNS server, thus filling in the URL and click directly on Apply; the DirectAccess tunnel will not be used for that URL and local name resolution will be applied. Traffic will not traverse the DA tunnel.
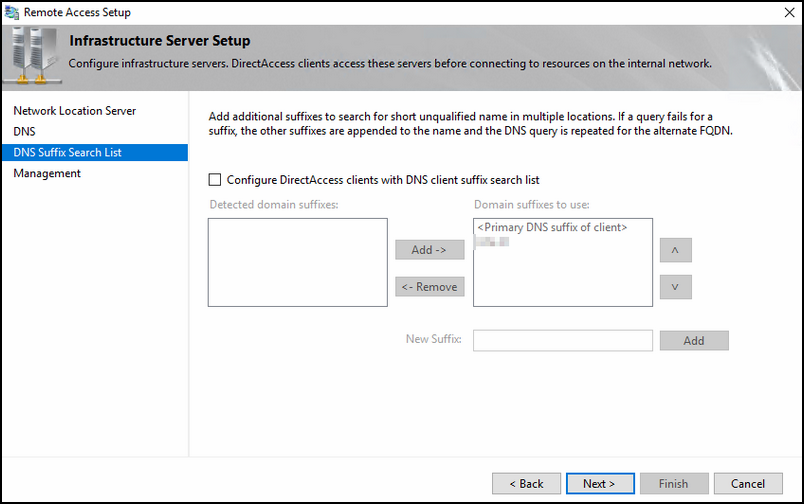
Leave this default; don't change anything, unless you have more DNS suffixes that you use within your organization.
Figure 28
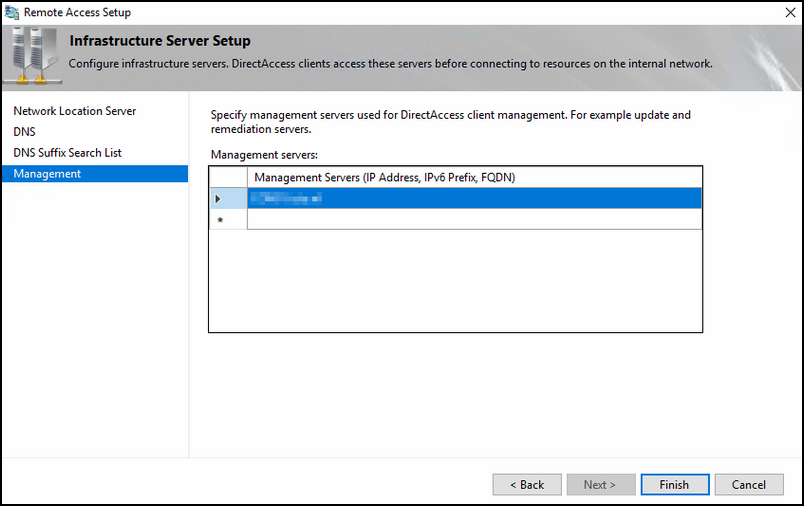
The management section; you can fill in a SCCM server for example for remediation.
Figure 29
Step 4
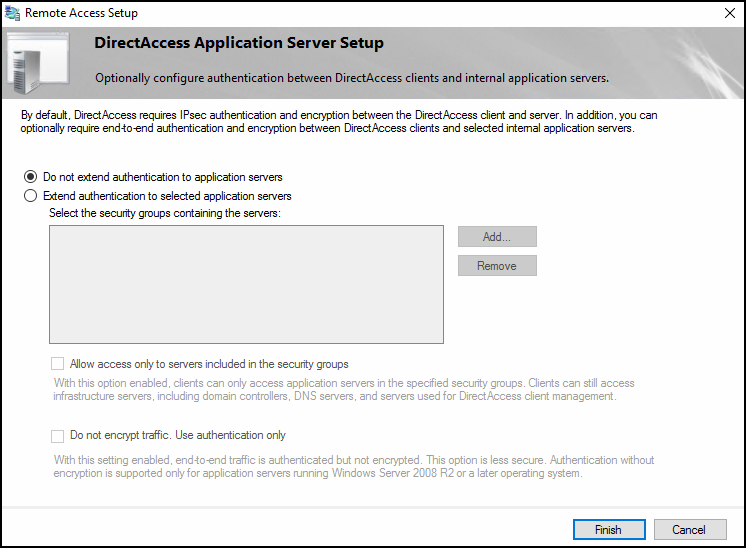
Let this one default.
Figure 30
So that's it for the DirectAccess setup (woohoo!) now lets continue by enabling External Loadbalancing.
Enabling External Loadbalancing
Before I start telling how to configure load balancing, you must make sure that the DirectAccess certificate is present in Computer Personal store of your SECOND NODE (!) After this; enable the load balance feature.
Configure your DirectAccess environment for use with the external hardware load balancer, we perform the following step:
1. Logon to the DirectAccess server that is currently in operation. This will be Node1. Launch the Remote Access console to begin the DirectAccess configuration.
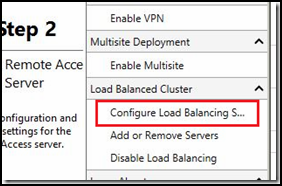
2. From the right-most pane, select “Configure Load Balancing”
Figure 31
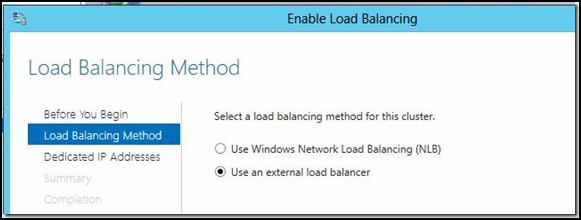
3. Selection the option for “Use an external load balancer” and click “Next”
Figure 32
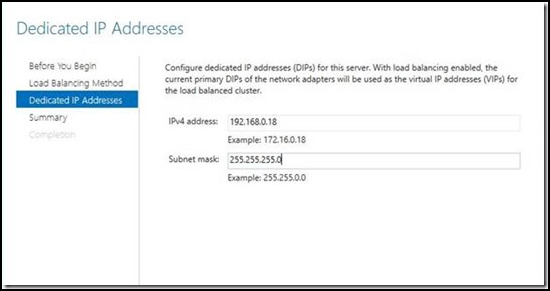
4. The wizard will ask for a new dedicated IP address for Node 1. The existing dedicated IP address will be used as the virtual IP address of the load balancer to avoid requiring any DNS changes as a result of this process.
Figure 33
If you receive the error message “Either the server is configured as an ISATAP router or no IPv6 addresses were detected on the internal adapter on the server. This is not supported in a cluster configured to use an external load balancer. Either deploy IPv6 in the internal network, or deploy an external ISATAP router, and configure IPv6 connectivity between the router and the Remote Access server”, then head over to Microsoft Support to obtain a hotfix that will resolve the issue. Once the hotfix has been applied, run through the steps again.
5. Click “Next” to proceed to the Summary page and then click “Commit” to apply the changes.
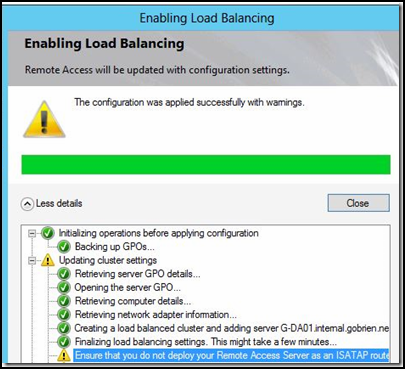
6. Upon committing the changes, you will see a warning message regarding ISATAP:
Figure 34
This warning occurs because we may not be able to use ISATAP on the DirectAccess server any longer. In this scenario, there are two options: place an external load balancer that supports ISATAP on the internal network and enable ISATAP on either DirectAccess servers, or disable ISATAP completely which then disables the “manage-out” functionality of DirectAccess.
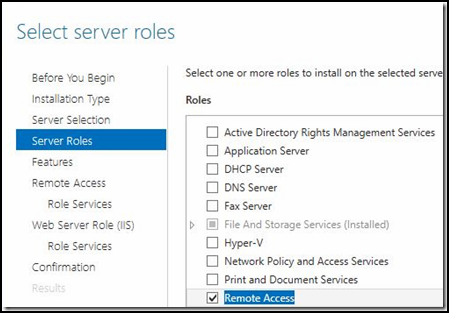
7. Now head over to your second DirectAccess server and configure the Roles and Features to add the Remote Access components.
Figure 35
8. Once the Roles and Features installation is complete, be sure to import the IP-HTTPS certificate used in the initial DirectAccess configuration into the Computer Store of the second DA server. (A self-signed certificate will not work in this scenario)
9. Now head back to first DirectAccess server and open the Remote Access console.
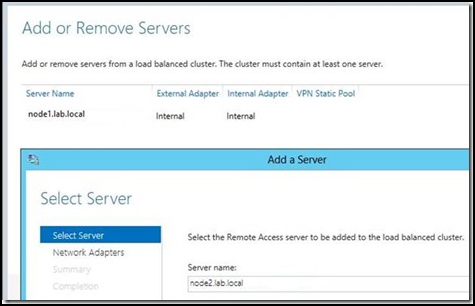
10. Look for the option to “Add or Remove Servers” in the right pane
Figure 36
11. Type in the name of Node2 and click “Next”
Figure 37
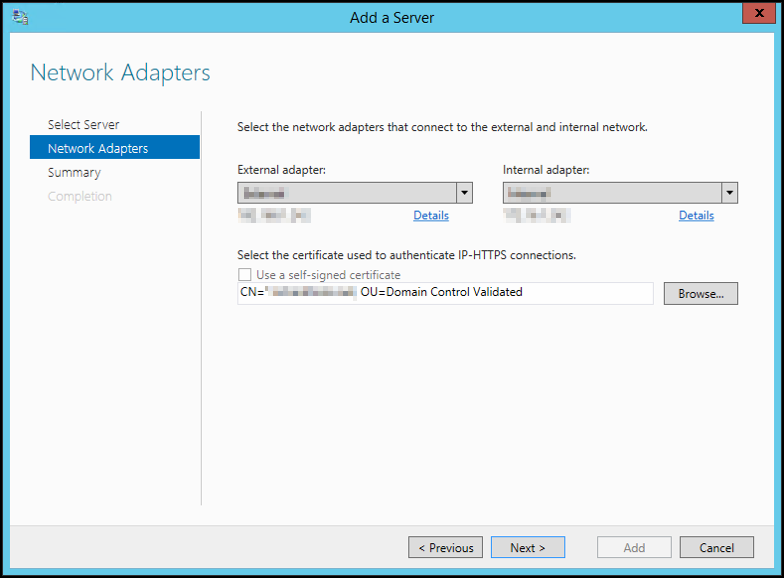
12. Now select the Network Adapters for External and internal use and the IP-HTTPS certificate that Node2 will be using:
Figure 38
13. Click “Commit” and then close to apply the configuration.
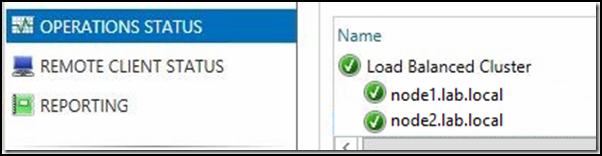
14. Once the configuration is complete, you can click on the “Operations Status” link in the console to check the status of the array. Once the load balancer can communicate with both nodes, they should turn green with a check mark.
Figure 39
And with that all completed, we have a Dual-NIC DirectAccess 2012 deployment with external load balancing!
So that's it for the DA config; let's move to the Citrix NetScaler config
Configure Citrix NetScaler for DirectAccess load balancing and reverse proxy
From here I will show how to configure the DirectAccess infrastructure in to your Citrix NetScaler.
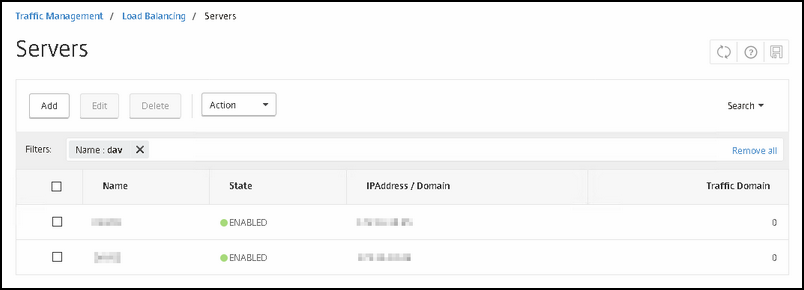
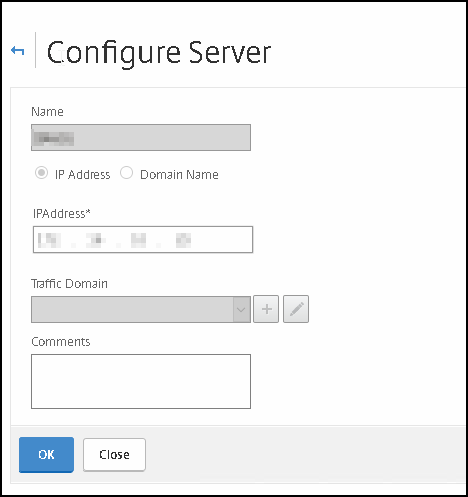
First; create the real servers. Go to traffic management -> Load balancing -> Servers and click Add
Figure 40
Fill in the FQDN name so that you can recognize it easily and its IP address to where the NetScaler will connect to; in our case, this must be the External IP of the DirectAccess server. After that, click OK and repeat the steps for the seconde Node.
Figure 41
Before we create the service groups; me must make sure that we have created the SSL profiles. Go to System -> Profiles -> SSL Profile and click on the SSL Profile Tab.
Figure 42
Now create two SSL profiles;
one for the front-end connections towards the clients
one for the back-end connections towards the real servers.
That way we can easily change an SSL profile that is configured for multiple VIPS, if for example a cipher suite gets depreciated in the future for some reason.
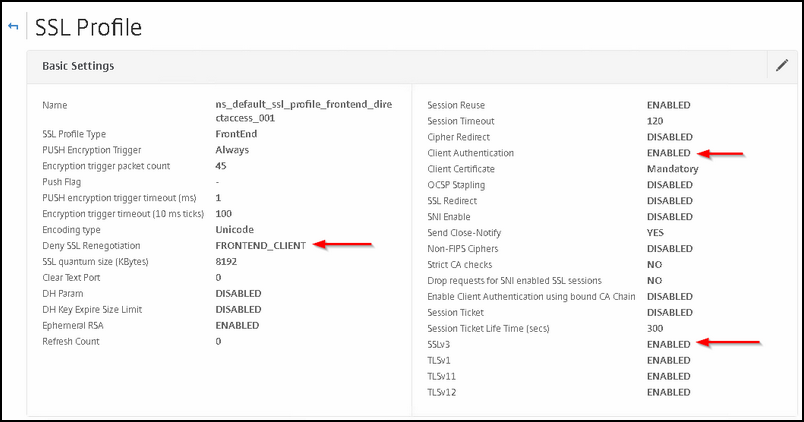
The first profile that we will create is used for Front end facing connections. Compared to the standard front end profile; adjust the following settings:
Deny SSL Regeneration: Frontend_Client
Client Authentication: Enabled (will come back on that one later)
SSLv3 (What?! Yes, this is important for Windows 10 Clients, remember the part about NULL encryption?)
Figure 43
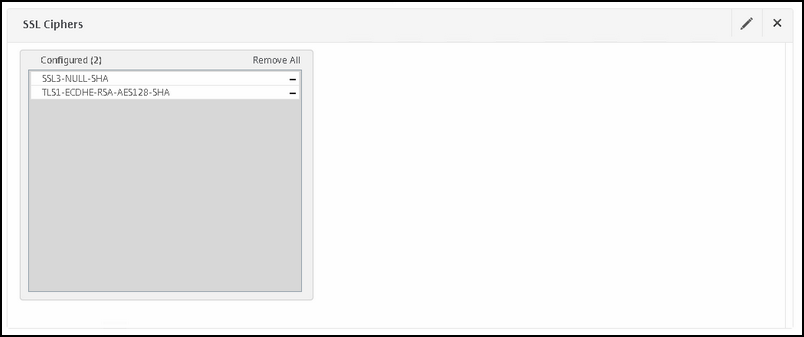
Deselect ALL CIPHERS (!) and choose only two:
SSL-NULL-SHA
TLS1-ECDHE-RSA-AES128-SHA
Figure 44
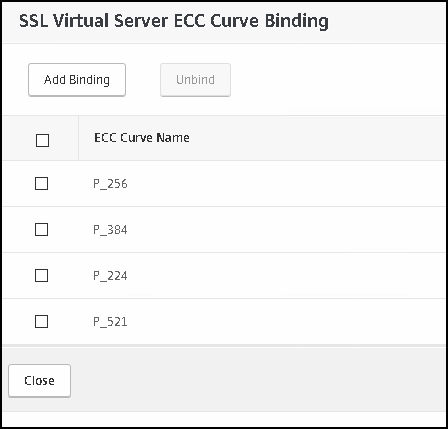
ECC Curves are left default; but for the completeness here is the picture:
Figure 45
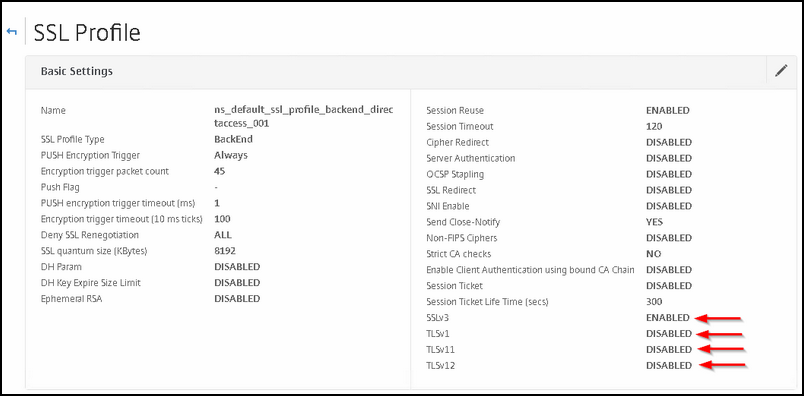
Next we will create the SSL profile that will be used as the back end facing one; lets create it. Here it is important to enable SSLv3 and disable all TLS protocols:
SSLv3: ENABLED
TLS1: DISABLED
TLS1.1: DISABLED
TLS1.2: DISABLED
Figure 46
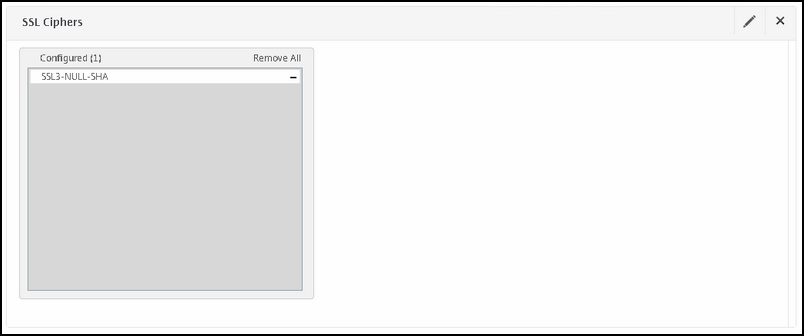
After that, disable all cipher suites and add SSLv3-NULL-SHA :
Figure 47
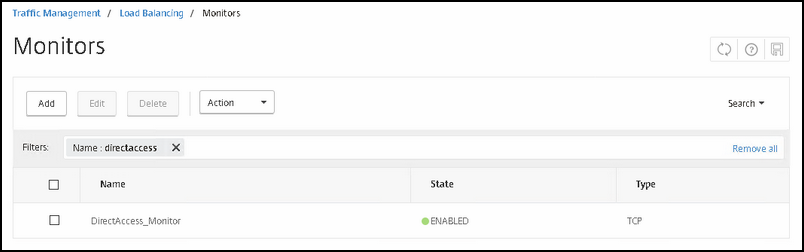
Now let's create a monitor for the NetScaler so that it can perform health checks of each DirectAccess server. Go to Traffic Management -> Load balancing -> Monitors
Figure 48
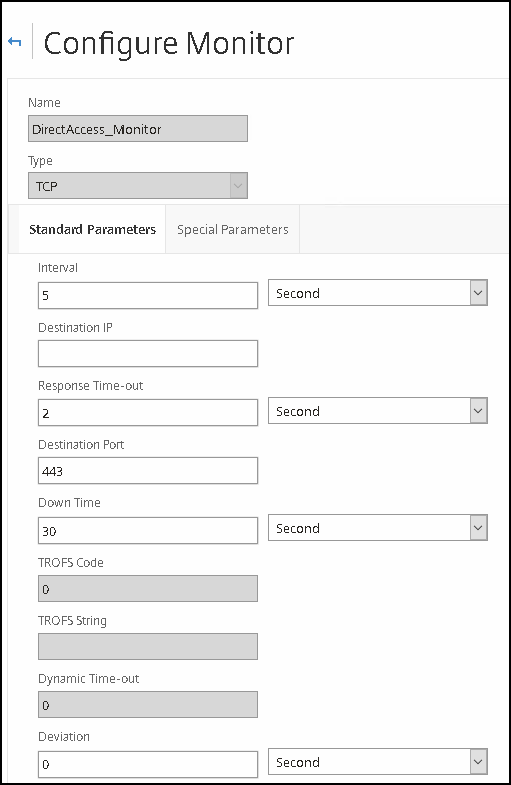
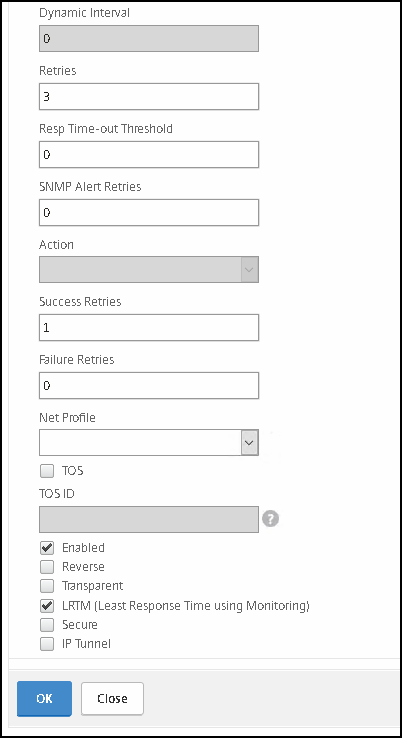
Configure as followed:
Type
Value
Type
5 seconds
Interval
5 seconds
Response timeout
2 seconds
Destination port
443
Down time
30 seconds
Deviation
0 seconds
Retries
3
Response time-out threshold
0
Success retries
1
Failure retries
0
Enabled
Check
LTRM
Check
Figure 49
Figure 50
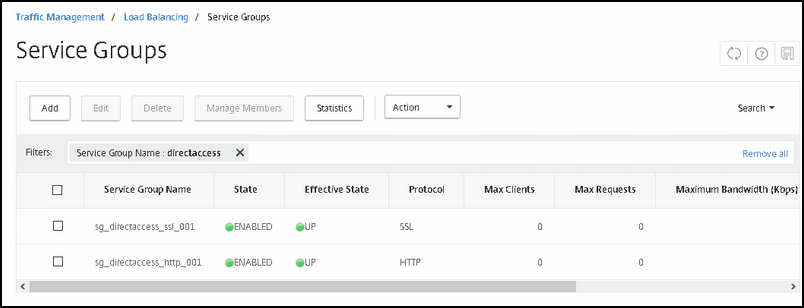
After that; we will create two service groups;
One for SSL connections
One for HTTP connections (like the webprobe).
Go to Traffic Management -> Load Balancing -> Service Groups
Figure 51
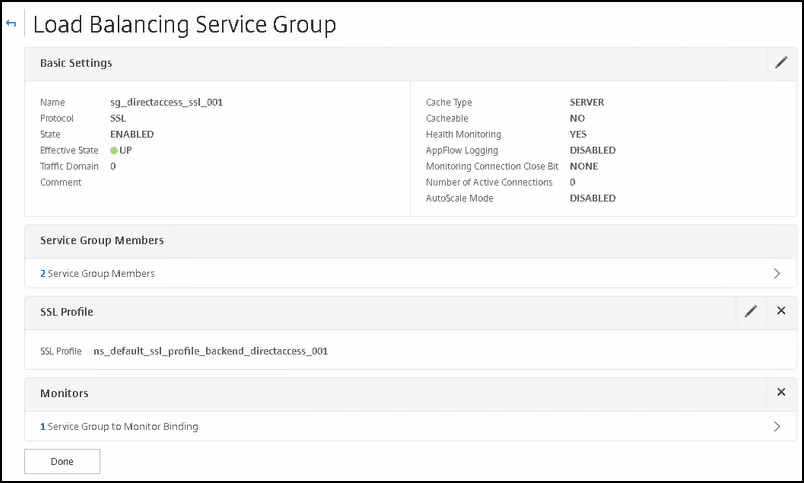
First we will create the service group for SSL connections
Type
Value
Protocol
SSL
Service group members
DirectAccess Real server 1 DirectAccess Real server 2
SSL profile
The back end profile you created earlier
Health Monitor
The DA monitor we created earlier
Figure 52
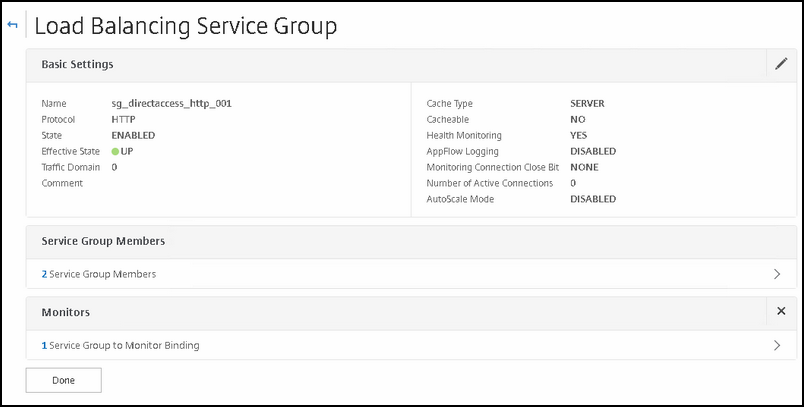
Now create the service group for HTTP connections
Type
Value
Protocol
HTTP
Service group members
DirectAccess Real server 1 DirectAccess Real server 2
Health Monitor
The DA monitor we created earlier
Figure 53
No we can create the VIP's and configure them appropriately. Go to Traffic Management -> Load Balancing -> Virtual Servers
NOTE: The VIP with NLS in its name is the one I created by following Richard Hicks thread on his Blog, you can follow the article that Richard Hicks posted; I won't elaborate on that one.
Figure 54
As you maybe can remember, i have created four VIPS.
1st VIP is for Network Locations Services 2nd VIP is for DirectAccess SSL client connections that come from the inside (will explain it below) 3rd VIP is for DirectAccess HTTP connections, like the DirectAccess-webProbeHost 4th VIP is for DirectAccess SSL client connections that come from the internet
The SSL VIP is for load balancing client connections that originate from within the organization; in case you have a two armed NetScaler setup and want to have an extra layer of security for secure connections from example Wi-Fi notebooks, then you can use this (this also needs some configuration to block certain traffic so that the clients thinks it is outside / not on premise and connects to DA servers; elaborate on that one later)
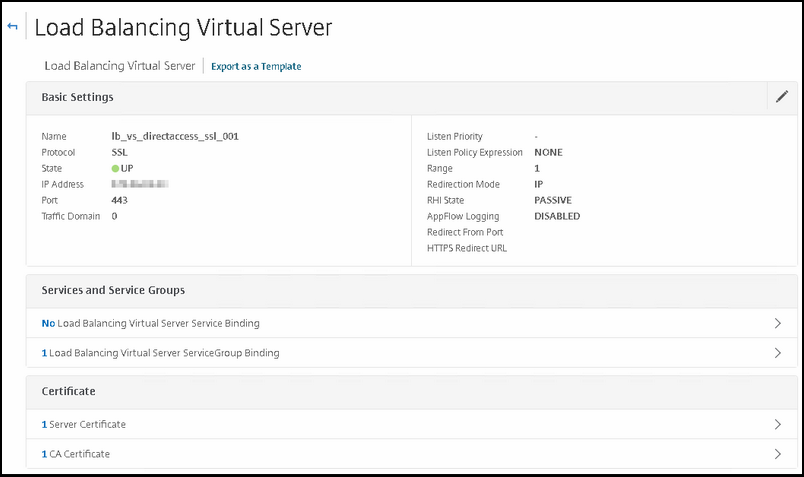
Create the first VIP for internal load balancing DirectAccess client connections.
Type
Value
Name
You can take over my naming convention
Protocol
SSL
IP Address
your VIP address
Service group
Select the service group that you created earlier.
Certificate (SERVER)
The DirectAccess certificate that you will use for client connections
Certificate (CA)
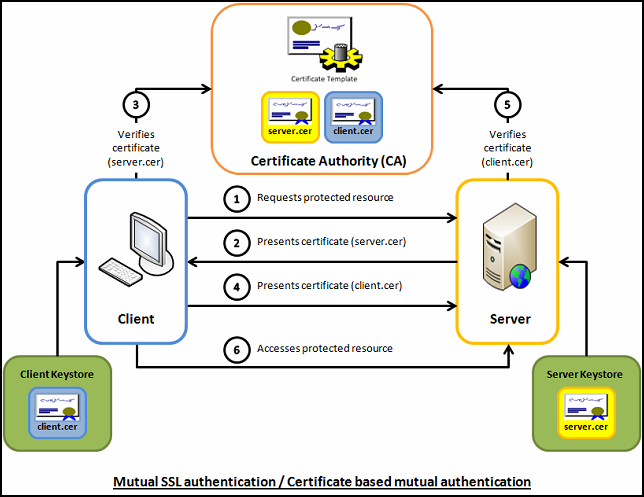
Tthe VIP needs to have the PKI CA certificate configured so that it can authenticate the users who are trying to gain access to the DirectAccess resource that is protected over SSL; we call this: Mutual SSL Authentication
Figure 55
Here you can see a brief explaination how client certificate verfication works. In SSL profile for front-end clients we enabled the Client Authentication.
Figure 56
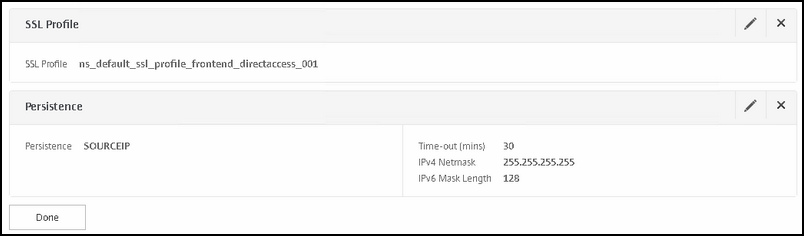
Settings for the SSL profile settings.
Type
Value
SSL Profile
The Front-end profile you created earlier
Persistence:
Method:
Source IP
Time-out
30 minutes
IPv4 Netmask
255.255.255.255
NOTE: Persistence is important, otherwise you will sometimes see the same user with connection to both DA servers, thus making manage-out very difficult if not impossible. By using persistency, you can resolve this.
Figure 57
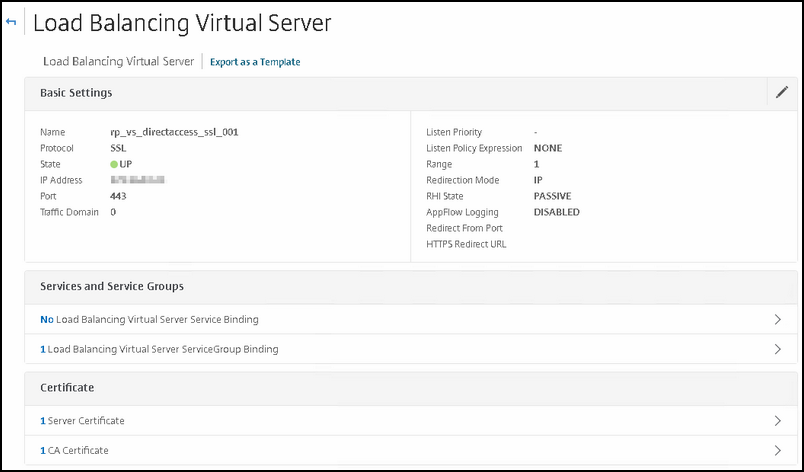
Now create the VIP or the DirectAccess client connections when they are not on premise and it looks the same as the inside VIP.
Below the settings for your VIP:
Type
Value
Name
You can take over my naming convention
Protocol
SSL
IP Address
your VIP address
Service group
Select the service group that you created earlier.
Certificate (SERVER)
The DirectAccess certificate that you will use for client connections
Certificate (CA)
Tthe VIP needs to have the PKI CA certificate configured so that it can authenticate the users who are trying to gain access to the DirectAccess resource that is protected over SSL; we call this: Mutual SSL Authentication
Figure 58
Configure the SSL profile and Persistence the same as the settings below:
Type
Value
SSL Profile
The Front-end profile you created earlier
Persistence:
Method:
Source IP
Time-out
30 minutes
IPv4 Netmask
255.255.255.255
Figure 59
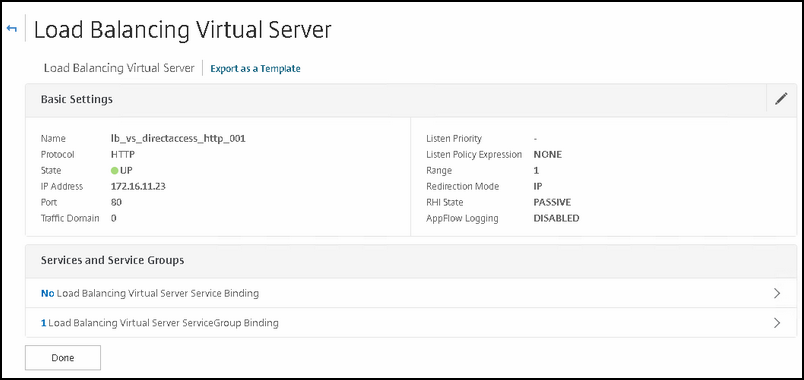
Let's create the VIP the HTTP connections:
Below the settings for your VIP:
Type
Value
Name
You can take over my naming convention
Protocol
HTTP
IP Address
your VIP address
Port
80
Service group
The HTTP group we created earlier
Figure 60
DNS records (internal)
Make sure that the following records are configured correctly:
That's it; where done here. Now you can test DirectAccess by first deploying the policy that DirectAccess created automaticly during installation to your mobile workstations (make sure that they are member of the security group you choose earlier) and that the GPO is loaded on the workstation. Sit back; grab a cup of coffee and enjoy the DirectAccess ride
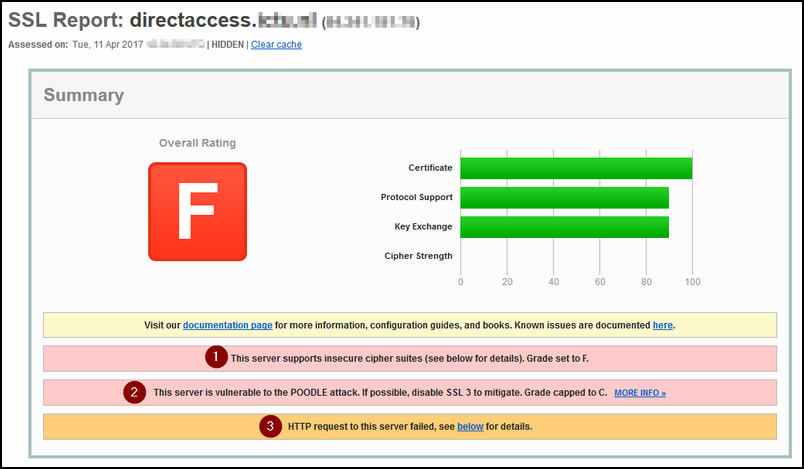
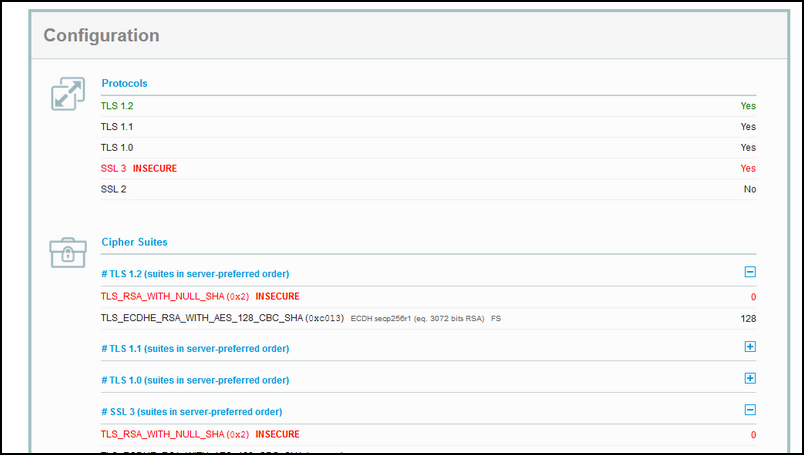
But wait a minute, what about the RED F on SSLLabs.com ?
Figure 61
Figure 62
Yes, that is true, I said earlier that it would come back on that one.
The Thick Red F is based on a few things: 1. The insecure NULL cipher suite that is available for use, though we need it for Windows 10 clients. 2. By using SSLv3, the server is vulrneralbe for POODLE attack, but again, we need this protocol for the Windows 10 clients. 3. We did our best by requesting a Client Certificate before the connection can be established, thats why the HTTP request failed (and that is a good thing :) )
So there is no risk for POODLE attacks of man in the middle attack if you made sure that: 1. The certificates that you issue to your computer clients are protected by SHA256 2. Exporting them is prohibited.
You can choose to force internal WiFi laptops accessing your resources via a DirectAccess tunnel, to put a extra security layer on top the existing one you use for WiFi (assuming that you are not using Open wifi opcourse ) To accomplish, you must only make the VIP available for HTTPS connections to directaccess.domain.tld. The other VIPS like DirectAccess-WebProbeHost and the Network Locations Services VIP should not be accessable, otherwise the clients sees that is on premise and does not try to create a DirectAccess Tunnel
Oh before I forget to mention, look at my other post regarding ISATAP and the things that you should not do on your DirectAccess environment.
NOTE: read my post carefully and thoroughly! I know; you are probably (frustrated )searching for a first time right fix; and I can assure you; this is it.
But It all depends of course that you RELAX, ARE NOT IN A HURRY AND YOU READ THIS THOROUGHLY AND DO NOT JUMP TO THE POWERSHELL SYNTAXES WITHOUT READING THE CONTEXT!
If you have 2 DirectAccess servers on your site; and you want to accomplish manage-out; you're in a challenge.
Just like I did; if you Google on this; you probably will go to Richard Hick's Website; a thru guru when it comes to Direct Access.
In one of his Webinars, he speaks about ISATAP for Manage out Connectivity; this is how its called for connecting to your Direct Access Clients from within the corporation.
This is not possible over the same connection a Direct Access Client makes to the Direct Access Server.
Richard didn't gave price the details about accomplishing this, but it told me; it is possible, although officially not supported by Microsoft :).
So it eventually cost me 36 HOURS of reading various articles on the interweb and reverse engineering it to make it fit a multi-server Direct Access environment that uses an external load balancer.
You have 2 or more Direct Access servers on the same site (not multi site) and it's probably in the same VLAN; in other words; routing is not used between the 2 DA servers.
You are loadbalancing with use of a External Loadbalancer; a KEMP, NetScaler or F5; what ever the brand.
You are NOT using Windows NLB.
The ISATAP router (Windows Server) is in the same site as the 2 DA servers, and in the same VLAN.
The DA servers already have a IPv6 address assigned to it.
The ISATAP server already has a IPv6 address.
A short introduction to DirectAccess.
DirectAccess server uses solely IPv6 for its connectivity. If you are using IPv6 throughout your corporation, you will not have any problems with manage out. But the fact you are reading this; you are probably not using IPv6 throughout your environment :)
So; DirectAccess is using IPv6 for its connectivity to Direct Access clients when using IP-HTTPS; it wraps its 'interesting' traffic (using the Cisco terminology :) ) in a IPv6 packet, it is natively encrypted with IPsec due to the nature of IPv6, and put again in a HTTPS package and sent off to the Direct Access servers (or Load balancer VIP)
When it arrives at the DA servers; it is unpacked and sent off to its destination in its IPv4 form.
This connection is not bidirectional; in other words; the connection between the DA client and the DA server cannot be used as a upstream connection from another endpoint in your environment. For this you must setup a new connection to the DA client.
Here comes the problem if you try to manage your DA client from a IPv4 station; your IPv4 station cannot communicate to the DA client because it is only reachable by its IPv6 address.
To solve this; you have two options; one: make your environment IPv6 ready two: use a technique called ISATAP.
So ISATAP; what is it ?
ISATAP is a technique that lets a server (or router) function as a gateway between IPv6 and IPv4 networks with use of NAT64 and DNS64. Your IPv4 clients builds a ISATAP tunnel interface to the ISATAP routers IPV4 address. When you try to connect to a IPv6 client; your computer will get a IPv6 address back from the DNS server. Your client will try to connect to the IPv6 address via its ISATAP tunnel; hence that is the only way it knows how to connect to the destination. The ISATAP router will make sure that the packet will be sent to the corresponding destination that you wanted to reach. But this doesn't mean that the return traffic will flow correctly back; you must add specific routes on your DA servers so that return traffic will it reach its source (read: destination).
OK; let's go!
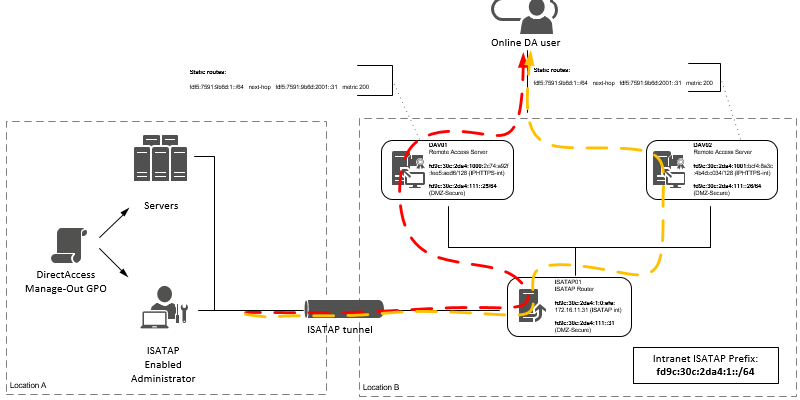
The Overview of the DA environment.
I have written down my IPv6 addresses that i used throughout this post.
Also i have made a Visio drawing, so that you have a visual idea of how everything is tied together :)
Server
IPv6 address
VLAN 111
DAV01
fd9c:30c:2da4:111::25/64
Yes
DAV02
fd9c:30c:2da4:111::26/64
Yes
ISATAP01
fd9c:30c:2da4:111::31/64
Yes
On the ISATAP server.
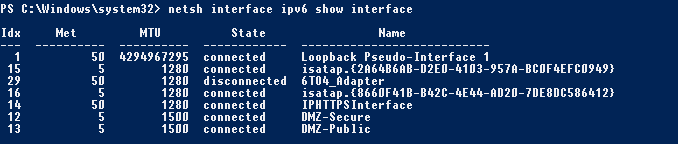
First; use the the following netshell cmd-let to find how your interfaces are named and what index numbers it has assigned to.
The following cmd-lts throughout this post I will use the index numbers of the interfaces.
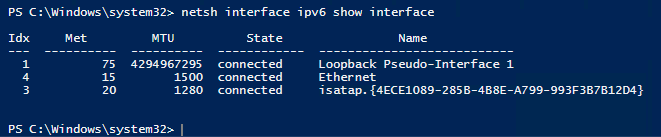
netsh interface ipv6 show interface
In my case the result was the following below.
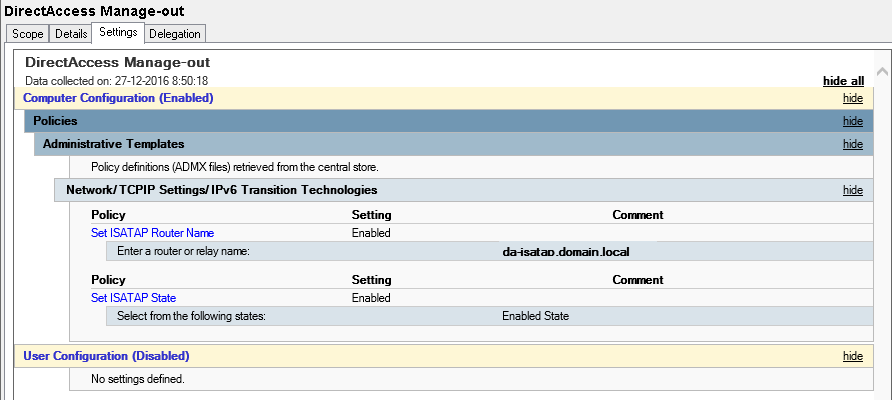
Now; configure the ISATAP router to set itself as the ISATAP router:
Make sure that you configure a DNS record for this name; it should point to you ISATAP router/server.
In my case; i created a CNAME record for the da-isatap.domain.local and pointed to the isatap01.domain.local
TIP; you could choose to go for the isatap.domain.local; you will notice that if you do a get-netisatapconfiguration in PowerShell on one of your DA servers, you will see that it points to isatap.domain.local. If you create a DNS record isatap in your domain, every ISATAP capable device (that is, it has ISATAP enabled on it) will see this and create a ISATAP interface. It may virtually break every communication on it (and thus on every computer that has ISATAP enabled). This is because when the computer detects that it can reach its destination via a IPv6 address, it will use the ISATAP interface to get there. That is not want you want (although, i think that you don't want it :) )
You can read more on this here
Here is the cmd-let to set it as the ISATAP router:
C:\Windows\system32> netsh interface ipv6 isatap set router da-isatap.domain.local
TIP; incase of that you want to bring 'down' the ISATAP interface and afterwards 'up' again, use to following cmd-let in PowerShell:
Set the ISATAP interface to enable its routing functionality; look carefully at the number 6; you should replace it with the interface index number that you have on your own server that corresponds with the ISATAP interface.
netsh interface ipv6 set interface 6 forwarding=enable
Set the ISATAP interface to advertise the routes to its 'ISATAP clients'. Again; take in account that you should change the interface index number that corresponds with your own ISATAP interface.
netsh interface ipv6 set interface 6 advertise=enable
Next thing is quit important, if not, one of the key steps to let this work:
This will set the ISATAP prefix for your ISATAP clients. Here it is very very very important that you must verify that this will be EXACTLY the same as the ISATAP prefix that is used on your DA servers. Why? Well this is because this prefix is in the list of 'interesting' traffic that is allowed in the IPSEC tunnel between the DA servers and DA clients.
If you check your DA server; you will see under 'Tunnel adapter isatap.{GUID}' next to IPv6 address, the IPv6 prefix listed that you should use on your ISATAP server.
In my case; you see two ISATAP adapters -each one belonging to one interface-, you must look at the adapter that holds the IPv4 address of the configured 'INSIDE' interface;
that is fd9c:30c:2da4:1:0:5efe:172.168.16.10.25
Incase if you don't see a correct formed ISATAP address on your ISATAP adapter (recognizable via the /96 IPv6 prefix ánd trailing IPv4 address ) you can see it also on the DA server.
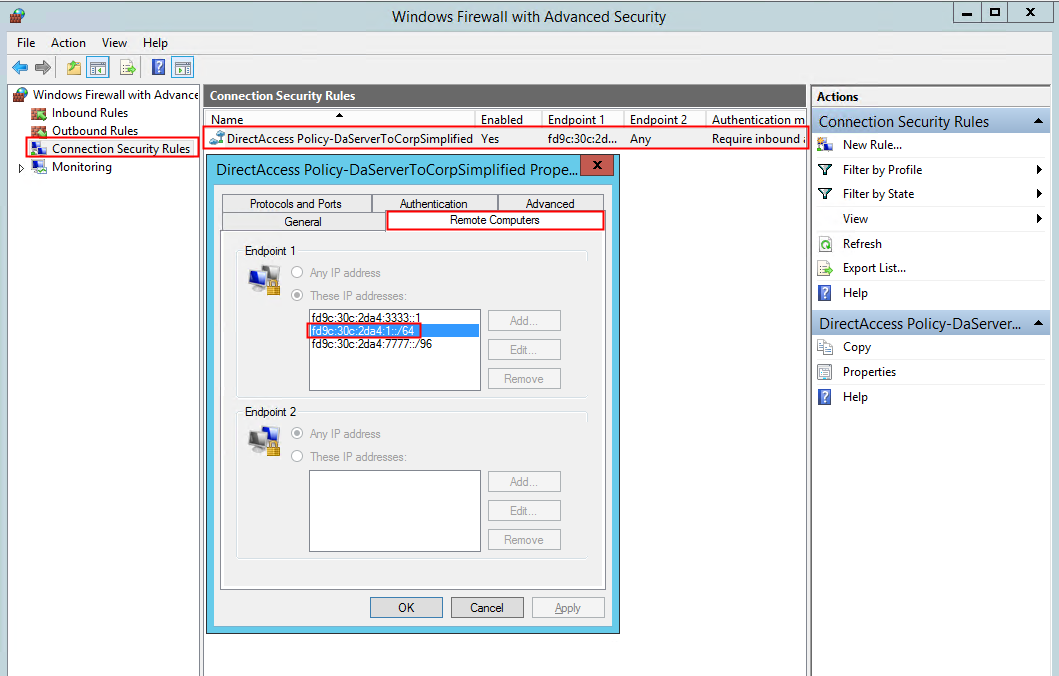
Go to your Windows Firewall Advanced Security management console of your DA server and check the Connection Security Rules.
There should be one rule configured by DirectAccess via Policy; on the tab Remote Computers, you'll see three IPv6 addresses:
The one with a 3333 address in it, is for the DNS64 service. Richard Hicks explains more in depth on this via this link.
The other one with 777 address in it, is for the NAT64 translation. Also more on this on Richard Hicks his blog via this link.
So in my case; the middle one is interesting to us; we should use this IPv6 prefix for your ISATAP clients.
So get the first 64bits of the prefix; that is fd9c:30c:2da4:4::/64 and publish this via the following cmdlet.
Take note again I use my interface index 6; you should change it to yours :)
Next; make sure that routing is enabled on your ethernet interface that is connected to your internal network
netsh interface ipv6 set interface 10 forwarding=enabled
OPTIONAL; with the following cmdlet; you can make sure that the ISATAP router will advertise itself as the default route for IPv6 related traffic on you ISATAP client.
In some cases this is feasible, when you have a lot of DA servers in your cluster. In my blog post you'll see that I use static routes that I publish via the ISATAP router to the ISATAP clients so that you will get a clear understanding how it is built from ground up and what you will expect to see in the routing table on the ISATAP router and ISATAP client.
netsh interface ipv6 set interface 6 advertisedefaultroute=enabled
Now you must make sure that your ISATAP router knows the route to your DA servers when it receives packets destined for DA clients.
You must know that the DA clients are registered on your DNS server consisting out of the first 64-bits that are unique to each one of your DA servers. The trailing 64-bits of the IPv6 address belonging to the DA client are built dynamically by the DA client itself.
Go to your each one of you DA servers and fill in the following cmdlet to get hold of the IPHTTPS IPv6 prefix:
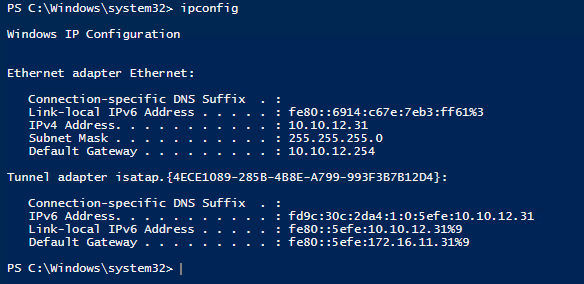
ipconfig
Below you'll see that it is fd9c:30c:2da4:1000 on my first DA server
My second DA server has the following IPHTTPS IPv6 prefix: fd9c:30c:2da4:1001
You'll should notice that the first 48-bits are the same, but the following 16-bits are slightly different
The following should route statements should be done on your ISATAP server:
Replace the pink part for your IPHTTPS IPv6 prefix that corresponds to your first DA server .
Make sure that the interface ID in orange is similar to yours; it must be the ethernet connection to your internal network.
Replace the green section with the IPv6 address of your first DA server IP v6 address.
Replace the pink part for your IPHTTPS IPv6 prefix that corresponds to your second DA server.
Make sure that the interface ID in orange is similar to yours; it must be the ethernet connection to your internal network.
Replace the green section with the IPv6 address of your first DA server IP v6 address.
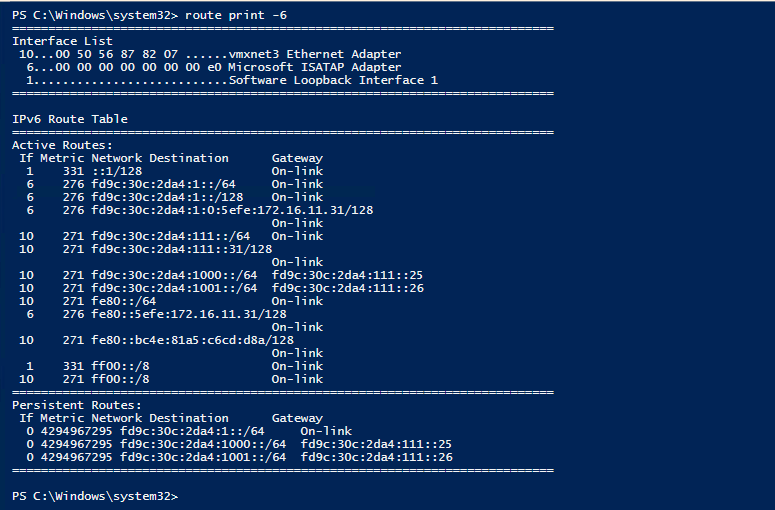
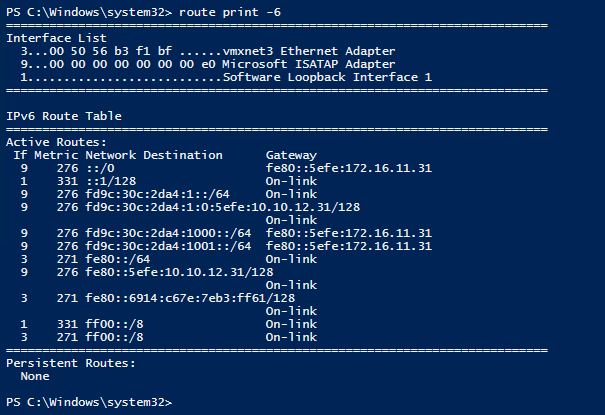
When all done; you should see the following (or similar of course :) ) when issuing the following cmd-let route print -6.
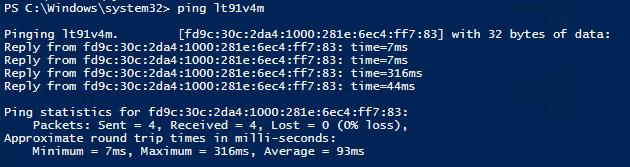
Now should be able to ping a DA client from your ISATAP server.
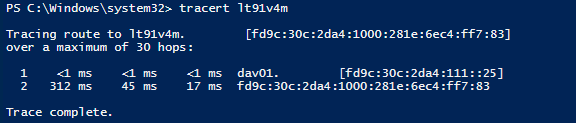
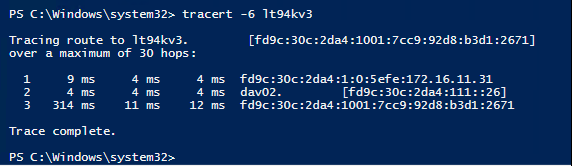
If you do a traceroute to your DA client; you'll see it traverses an IPv6 path from your ISATAP router to your DA server and then from there to your DA client.
Important Notice:
ICMP does not traverse a path that would expect; it traverses a 'lane' next to the 'interesting' traffic 'lane'.
So it means that if you can ping, it doesn't mean that other traffic, like HTTP etc., can reach it.
Microsoft did this so that you can test basic connectivity
On the Direct Access server 01
Now let's move to the first DA server.
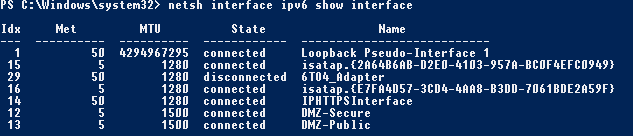
Use the the following netshell cmd-let to find how your interfaces are named and what index numbers it has assigned to.
The following cmd-lts throughout this section I will use the index numbers of the interfaces.
netsh interface ipv6 show interface
In my case the result was the following below.
This cmd-let will let the DA server find the path back to the ISATAP client. You'll recognize the purple part; it should be the same as the IPv6 prefix the ISATAP router publishes in the preceding section of this post.
So let's get to it:
The pink part is the IPv6 prefix the ISATAP router publishes (and in return the ISATAP clients will use to form a ISATAP client address)
The orange part is the interface index number from where the ISATAP router can be reached; in my case the 'DMZ-Secure' interface
The yellow part is the IPv6 address of the ISATAP router's normal ethernet interface (not the ISATAP routers ISATAP interface)
The light gray section is the metric you'll give with this route; it is important that the metric is lower than the metric of the current ISATAP interface on your DA server (I'll elaborate on that one below)
Remember that the DA server also has a ISATAP interface, and that prefix can be found in the Endpoint 1 list of the Connection Security Rules of the DA server and DA clients)
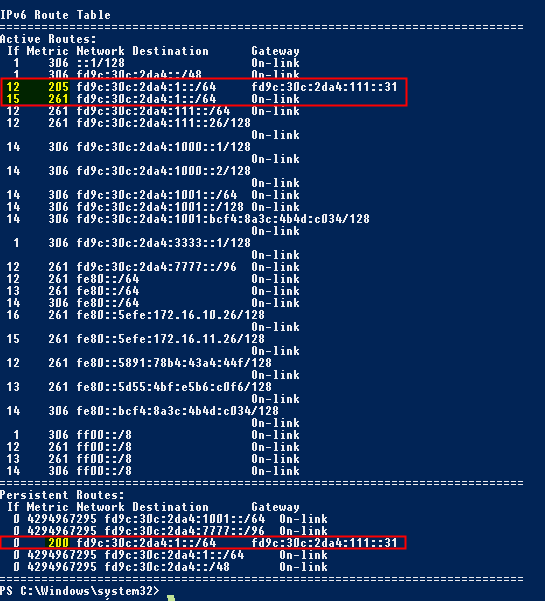
Here you see the live example of my DA server; in the first red box you see two active routes; the first route is the persistent route I add via the cmdlet above. The second route is the route added by DA itself. Notice the metrics and Interface ID's; I altered the traffic flow so that it will reach my ISATAP server, not its own ISATAP interface. This is because Microsoft doesn't officially support Load balanced DA setups with ISATAP; they only support ISATAP via single DA server setups. Microsoft used to support ISATAP on Load balanced DA setups, but withdrawn there Technet Article from the web due to the 'complexity'.
I now know why :) this can be quit overwhelming for a Sysadmin that has no networking knowledge :)
So back to the metrics; I made sure that my custom added route has a lower metric, thus will be chosen first above the route of the DA server's ISATAP interface itself.
It is possible that you need a lower or higher metric that the number I used in my setup; it purely depends on your own setup. I hope that by explaining the thought behind it, you'll understand what to change so that it will work in your own environment.
You're done here; you can move on to your second DA server
On the Direct Access server 02
Again; use the the following netshell cmd-let to find how your interfaces are named and what index numbers it has assigned to.
The following cmd-lts throughout this section I will use the index numbers of the interfaces.
netsh interface ipv6 show interface
In my case the result was the following below.
This cmd-let will let the DA server find the path back to the ISATAP client. You'll recognize the purple part; it should be the same as the IPv6 prefix the ISATAP router publishes in the preceding section of this post.
So let's get to it:
The pink part is the IPv6 prefix the ISATAP router publishes (and in return the ISATAP clients will use to form a ISATAP client address)
The orange part is the interface index number from where the ISATAP router can be reached; in my case the 'DMZ-Secure' interface
The yellow part is the IPv6 address of the ISATAP router's normal ethernet interface (not the ISATAP routers ISATAP interface)
The light gray section is the metric you'll give with this route; it is important that the metric is lower than the metric of the current ISATAP interface on your DA server (I'll elaborate on that one below)
The result of this should be similar of that of mine setup:
Enable ISATAP interface on your Clients and test it
There are a few options you can choose from for enabling ISATAP on your client. I will elaborate on the one via Group Policy.
I mentioned earlier that i created the DNS A-record 'da-isatap.domain.local'.
Create a GPO that matches my figure below :) (save's me some typing) (I assume that you are familiar with creating GPO's)
When you created the GPO, make sure that only selected clients get them; you can do this via security group.
Then, make sure that your clients get the GPO, you can verify this by issuing the following cmd-let from PowerShell:
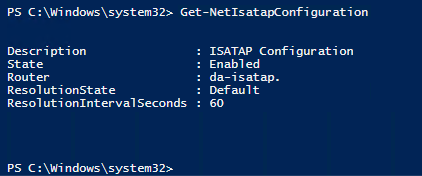
Get-NetISATAPConfiguration
If you check your interfaces; you should see that the ISATAP interface is now Connected and that is has a IP address
Also you see that the ISATAP interface has a IPv6 address
And you can see that you have learned routes to your two DA servers (via the ISATAP router)
Finally try to traceroute a DA client via its NETBIOS name (or FQDN; what you would like).
Fin.
That's really it. Nothing more. I hope to create in the future a new post about creating a ISATAP environment when using Multi Site Direct Access Deployments; that involves using ISATAP tunnel's between ISATAP servers when you have a not adopted IPv6 internally. That's my new challenge :)
You can read my next post here about Things to NOT to DO on Direct Access deployments (and what the consequences of them are).