Hi I am David

Network & Systems Professional From the Netherlands

ADFS

In this post I will show you how to migrate Azure AD connect with SQL and passive/standby (staging)
 
Migrating Azure AD Connect to another server is quite simple if you follow the following steps :)
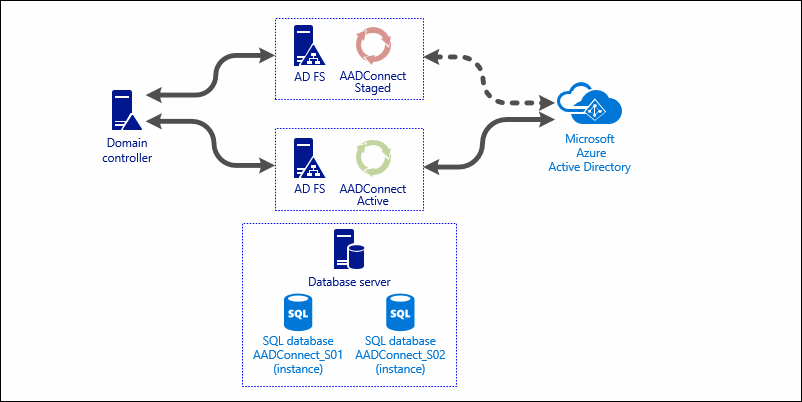
Also, I will explain how you can achieve a passive active/standby setup for Azure AD Connect.


Hold up! I already have a AAD Connector running on another machine!

 
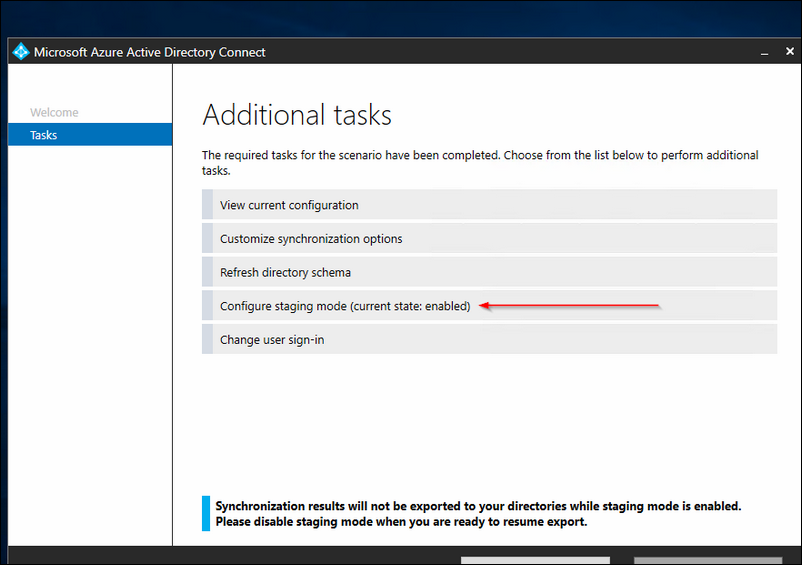
No worries! You can go ahead and follow this guide, just make sure that both new AAD connect instances are kept in a 'staged' configuration (see figure 13) ; they will start syncing with your AD DS and have everything ready. The AAD Connect service will not sync to Azure AD when staged. The only thing that you have to do is shutdown your old AAD connect server (or uninstall AAD Connector software) and immediately 'unstage' your new primary AAD connect service (see figure 16).
Normally when you think about 'migration'; you move something from point A to point B; in this case a SQL Database. But the nice thing about AAD Connect is that is quite static; everything is pulled from your AD DS, and as long as you keep the configuration inline with the old AAD connect service, everything will be fine.
 
What about a real High Availability setup? Well a HA setup for Azure AD Connect is at this moment not possible; it is not supported to let two Azure AD Connect services communicate with one and the same SQL Database instance.
However, if you are looking for the next best thing, you can achieve almost the 'same' by setting up a second Azure AD connect service and configure it as 'staged'. Only thing is that you must remember to take a manual action if the primary Azure AD Connect servers goes offline for somewhat reason for a certain period of time. Microsoft calls this 'staging'. And if you change some configuration on the primary AADConnect server, you must also make the same change on the staged AADConnect serverMore about staging can be read here.
 
Also, it is not supported (or at least advised) to have two Azure AD Connect services syncing/exporting to Azure AD. More on this here.


OK enough said; lets go!

 
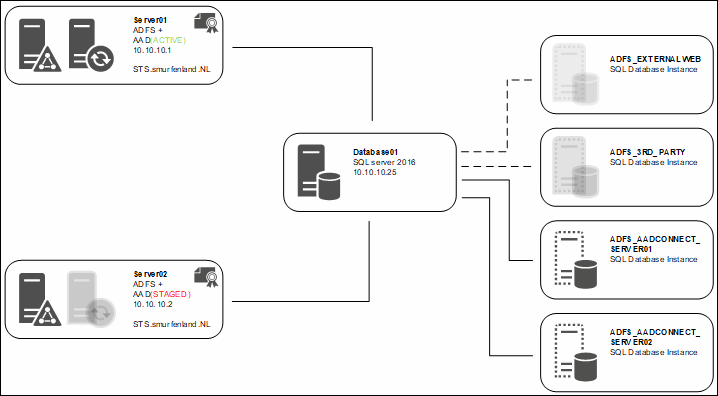
Below you see the setup I will be writing about.
 
It consists of three Windows 2016 servers; two of them already have a ADFS role, and one is solely for Microsoft SQL 2016. The SQL server has in total 4 database instances running; two of them will be used for Azure AD Connect.
 

Figure 1


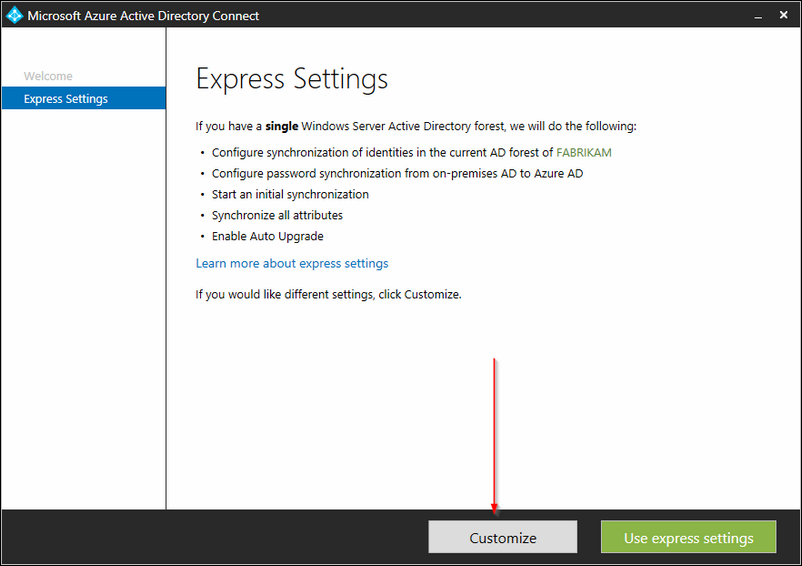
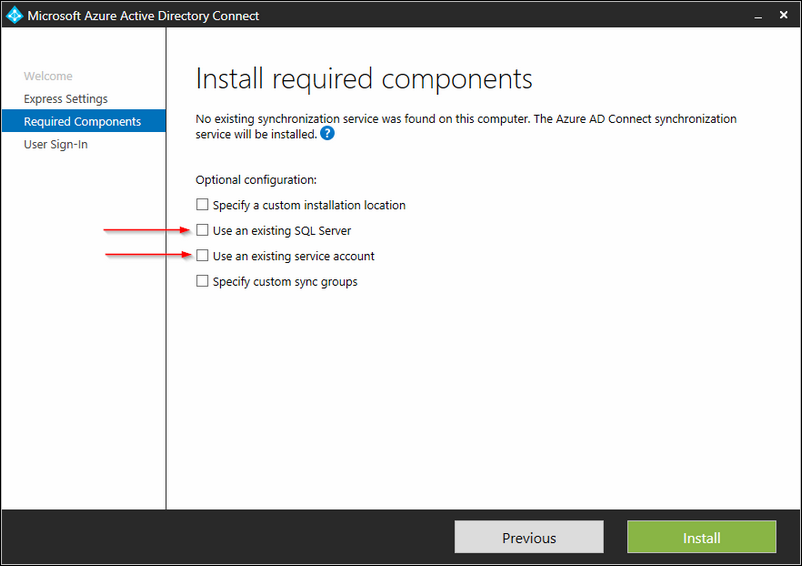
I will be doing a customized install; more in depth information can be found here. For now click on 'Customize'.
 

Figure 2


Next select 'use an existing sql server' and 'use an existing service account'
 

Figure 3


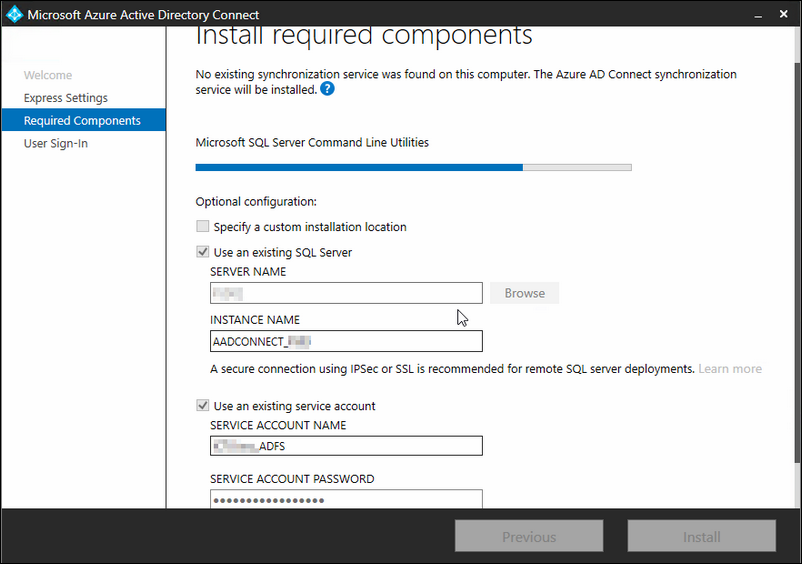
Select the SQL server that will host the SQL database and type in a instance name so that you can identify it later.
Also fill in the service account details; under that account will Azure AD Connect service be running and will be the DBO of the SQL database.


Important: You can only set the service account on first installation. It is not supported to change the service account after the installation has completed.


Figure 4


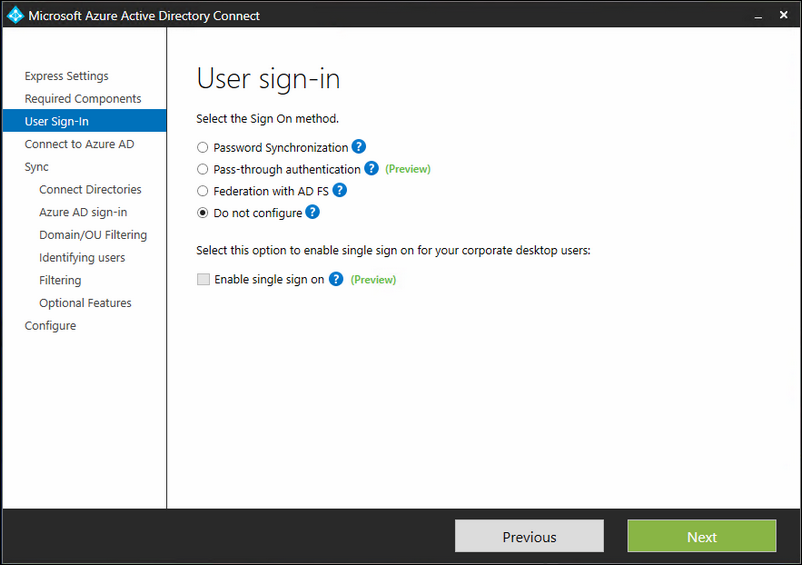
Because we are using ADFS and have already installed it, we are configuring nothing here.
 

Figure 5


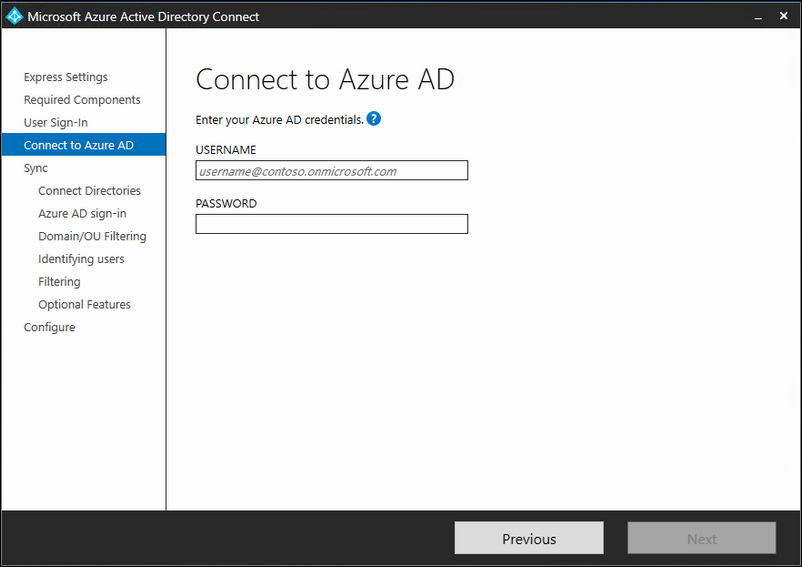
Fill in your Azure Global Administrator account, most of the time '[email protected]' .
If you are using MFA on this account; you will be prompted for this.
 

Figure 6


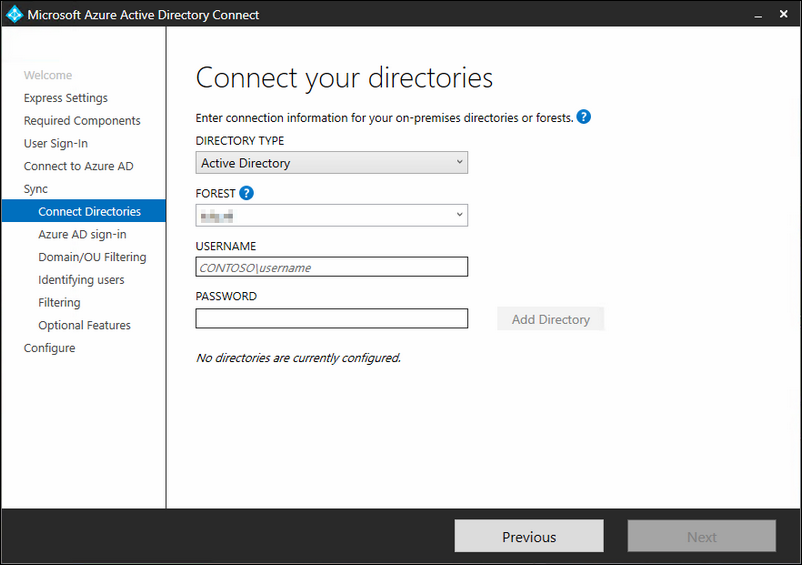
Select Active directory as directory type and select your AD forest that must be synced.
Also fill in the username of you ADFS service account that will be used by the AAD Connect service to connect to the AD DS directories.
 

Figure 7


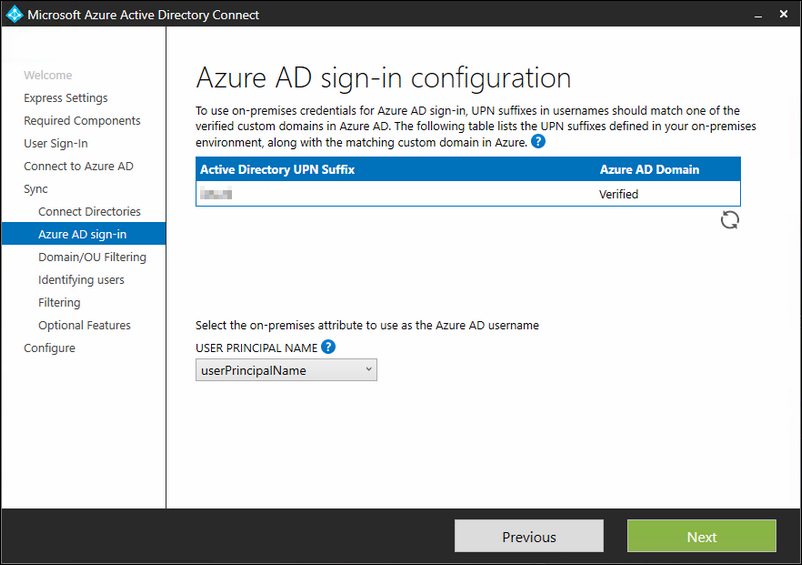
Here you can see which domains are configured for Azure AD and if they are verified. Also you can select the attribute that will be used as Azure AD username; select here 'UserPrincipleName'
 

Figure 8


Next select the OU with users that must be synced with Azure AD. Default every account will be synced, but in some cases you don't want this. You can modify it here.
 

Figure 9


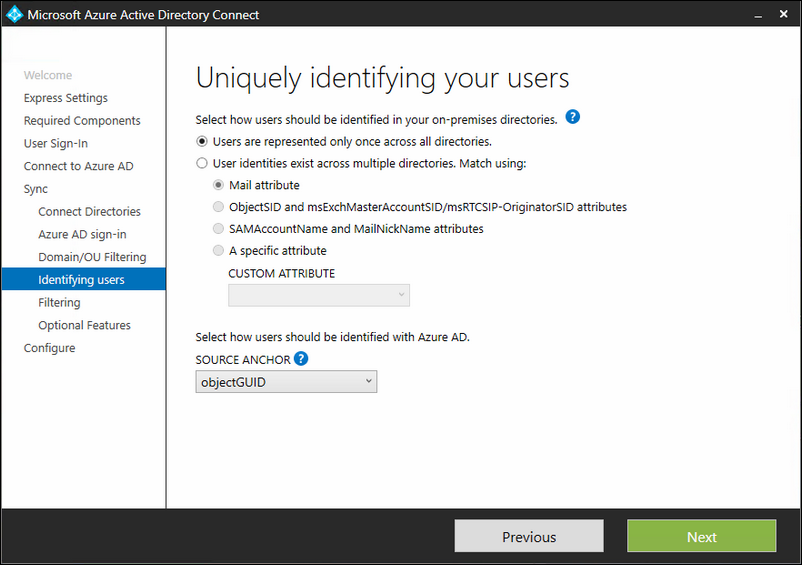
Configure this as displayed; I selected the objectGUID because it doesn't change when you change the name of the user account.
 

Figure 10


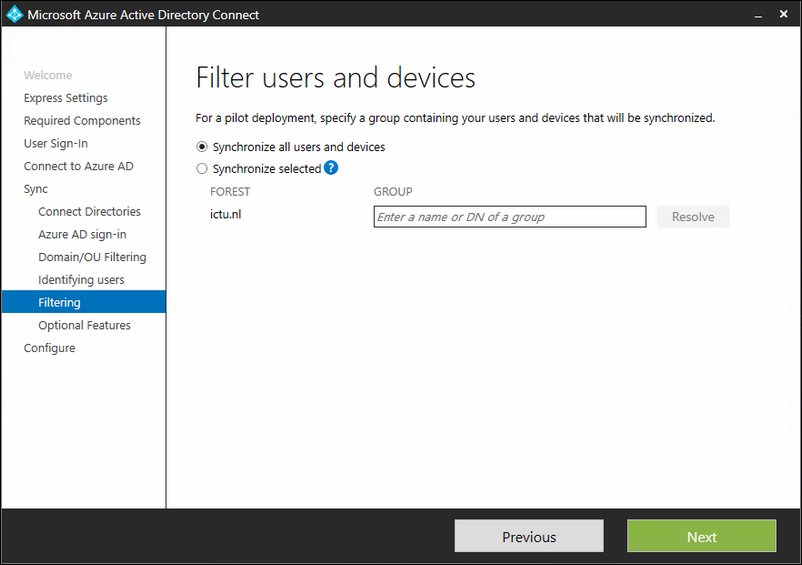
Synchronize all users and devices.
 

Figure 11


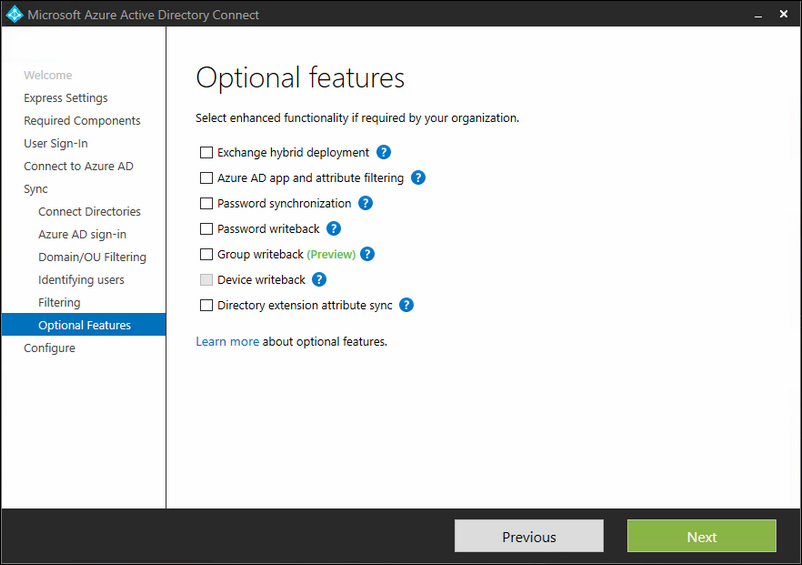
Optional features are left blank.
 

Figure 12


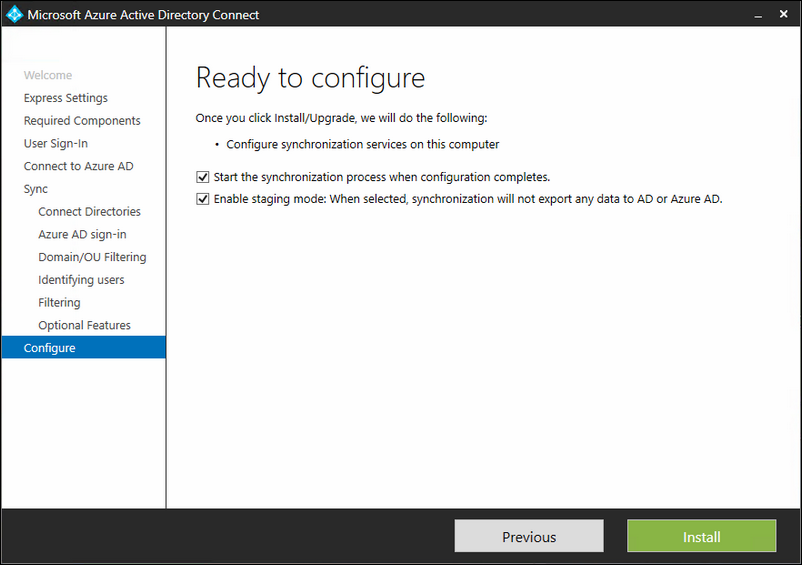
Now here it will become important what you are going to select.


For the primary AAD Connect server

Make sure that only the first box is check marked for the server that will be 'active'; this server will actively sync to Azure AD. The second box must be unchecked!


For the secondary 'staged' AAD Connect server 

The second server will be the 'staged' server; so this server must have both boxes check marked.
 
When done, click Install.
 

Figure 13


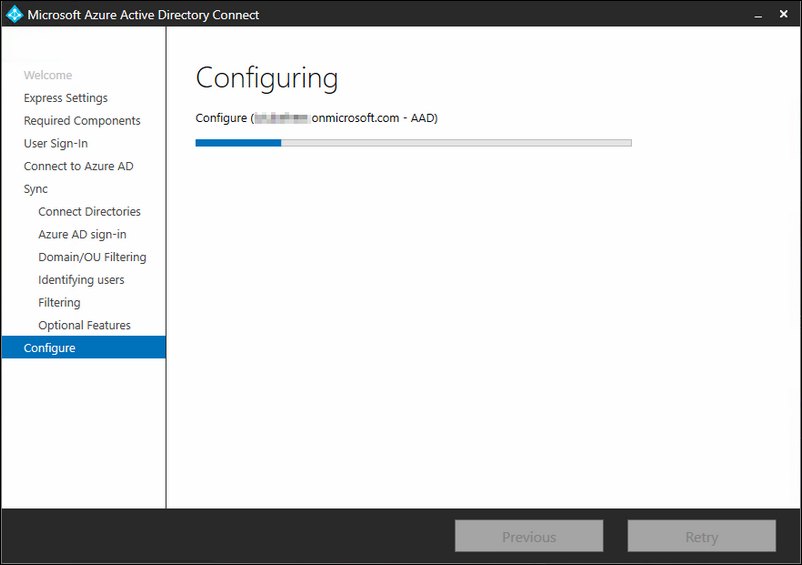
The setup will do its magic now, hang on; just get a cup of coffee and lean back for a moment.
 

Figure 14


On your 'staged' server, the wizard will show the following remark
 

Figure 15


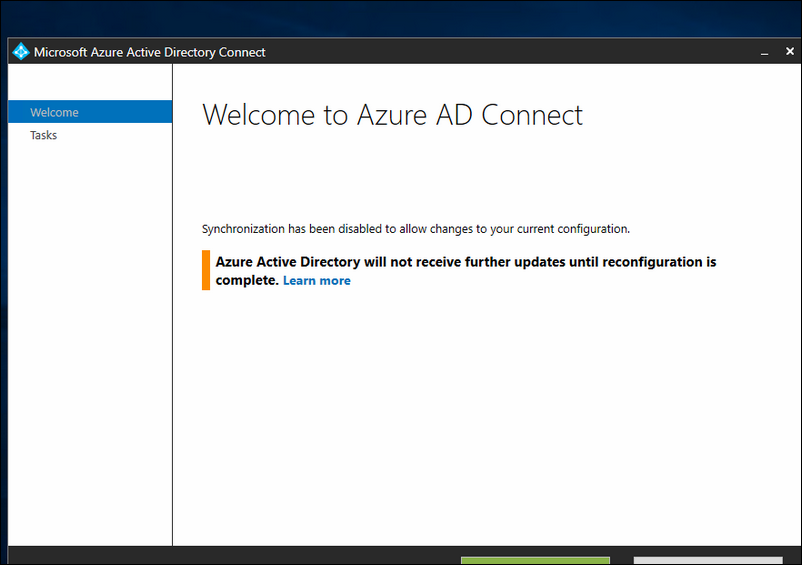
You can see here that the server is currently 'staged'. That means it will sync with your On Premise Active Directory, but it will not sync those changes to Azure AD.
 

Figure 16


How can I check if Azure AD Connect is working ?

 
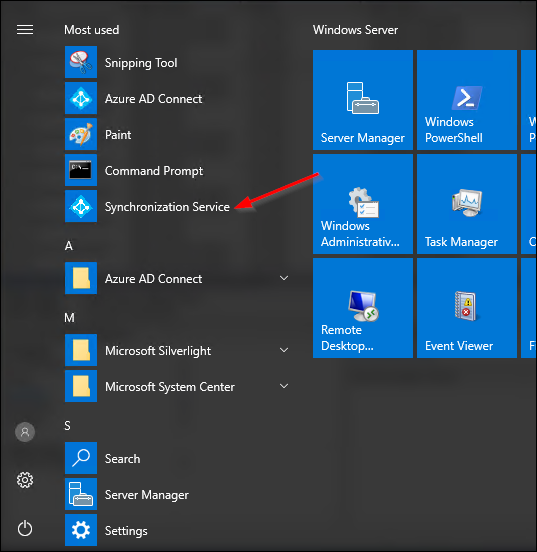
Start the Synchronization Service on one of your servers where it is installed.
 

Figure 17


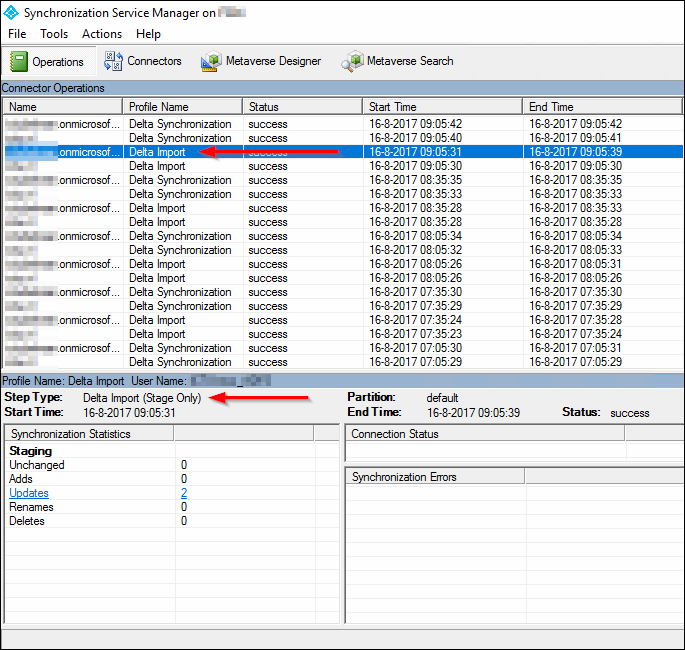
On your server that is 'staged', you can see that there are only two profiles running; Delta Synchronisation and Delta Import.
 

Figure 18


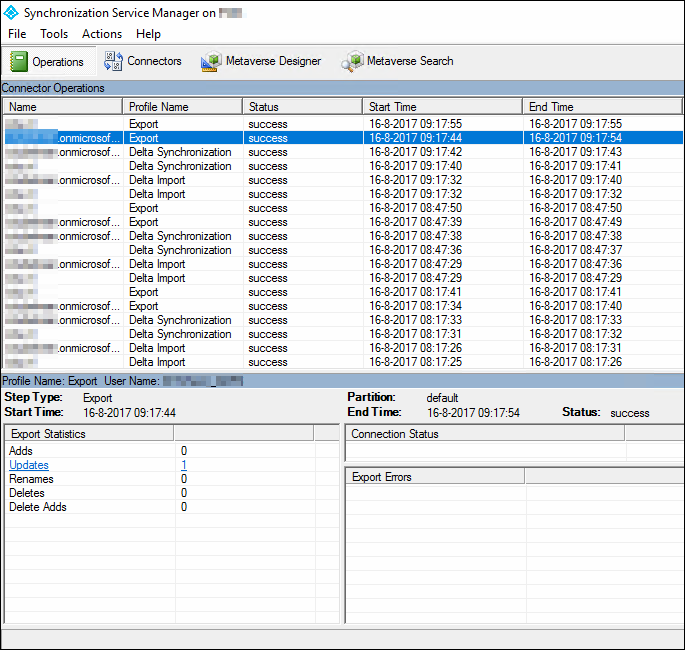
If you check the active server, here you can see that, besides the Delta Synchronisation and Delta Import, also an Export job is running. That tells you that this server is actually syncing to Azure AD.
If you click on the Export job (see figure 19) you can see which updates have been made in Azure AD.
 

Figure 19


So that's it, you're done now, be sure to check on a regular basis if there is a update of Azure AD Connect available here and install the update on both servers; the primary and staged.

Thank you for reading and be sure that you check my other posts.


I stumbled upon this error when I was busy upgrading a ADFS v3.0 farm built on Windows 2012 R2 to a brand new ADFS v4.0 built on Windows 2016. I will write a full article how to do that yourself, but that is for something later.
 
This error is a very strange error 'Message: Unable to determine the current Farm Behavior. Error retrieving configuration from remote SQL Server instance...'  
Probably you Googled it and ended up with nothing or something that wasn't what you were looking for.
 
I got this error, like i said earlier, when i was busy with adding ADFS servers to the existing ADFS farm.
 
After searching, and eventually pulling my hair out, I opened up an TAC (Technical Assistance Center) case at Microsoft Support. After running the standard diagnostic tools, the Engineers over in Redmond started with their analysis.
 
In the meantime, I contacted a Microsoft consultant I worked with earlier and asked his advice what it could be.
He suggested to change back the Database and Catalog name to the original ones by renaming them; that turned out to be the golden answer :-)
 
As you notice in the figure 1 below, I have a PowerShell cmd-let that specifically targets an ADFScatalog and ADFSDatabase. The original syntax that I pulled out of the summary, just before you click Finish in the GUI adding a ADFS server to a farm, is different in comparison to mine.


So why were the database and catalog files renamed?

 
Well the engineer that designed this particular farm found a way to place two ADFS databases of two separate ADFS farms on one SQL Database server. The catch here… that it is on one instance… yes; two ADFS environments on 1 SQL instance. You'll probably thinking; that is not possible!. And yes, that was my immediate thought also. Because during the install of your first ADFS server, thus your ADFS Farm, you don't have a option to rename the ADFS database. So it is also not possible to place 2 ADFS environments on the same SQL instance. You can place them on the same SQL server, but only if you use two separate instances,, but that was not the case in my situation.
 
So how did this engineer accomplished this in the first place? We'll, I think he got his inspiration by following this article.
 
The article shows you how to migrate a WID (Windows Internal Database) to a SQL database, and in the process adjust some files to make the whole thing work.
 
I think that engineer in my case followed this article and did the following:
 
-  Take Offline and dismount SQL databases.
-  Renamed the files *.MDF and *. LDF to something else, rather than 'AdfsConfiguration' and 'AdfsArtifactStore'; in my case <NETBIOSname>Configuruation and <NETBIOSname>ArtififactStore
-  Executed the following sql script:
 

USE [master]
GO
CREATE DATABASE [<NETBIOSNAME>Configuration] ON
( FILENAME = N'C:\Program Files\Microsoft SQL Server\MSSQL11.MSSQLSERVER\MSSQL\DATA\<NETBIOSNAME>Configuration.mdf' ),
( FILENAME = N'C:\Program Files\Microsoft SQL Server\MSSQL11.MSSQLSERVER\MSSQL\DATA\<NETBIOSNAME>Configuration_log.ldf' )
FOR ATTACH
GO
 
CREATE DATABASE [<NETBIOSNAME>ArtifactStore] ON
( FILENAME = N'C:\Program Files\Microsoft SQL Server\MSSQL11.MSSQLSERVER\MSSQL\DATA\<NETBIOSNAME>ArtifactStore.mdf' ),
( FILENAME = N'C:\Program Files\Microsoft SQL Server\MSSQL11.MSSQLSERVER\MSSQL\DATA\<NETBIOSNAME>ArtifactStore_log.ldf' )
FOR ATTACH
GO
ALTER DATABASE AdfsConfiguration set enable_broker with rollback immediate
GO

 
-  Set appropriate permissions like in the blog post on blog.loud.com.au.
-  Executed the custom PowerShell cmd-lets:
 

$temp= GEt-WmiObject -namespace root/ADFS -class SecurityTokenService
$temp.ConfigurationdatabaseConnectionstring="data source=[sqlserver\instance];initial catalog=<NETBIOSNAME>configuration;integrated security=true"
$temp.put()


Set-AdfsProperties -ArtifactDbConnection "Data Source=[sqlserver\instance];Initial Catalog=<NETBIOSNAME>ArtifactStore;Integrated Security=True"

 
-  Followed the rest of the blog post I presume.
 
By following the above, you can install two ADFS farms on one SQL server with one instance, as long if you make sure that the original name is not the same. But still, it was a assumption that I made. Unfortunatly for me, it was nowhere documented how the farm was built and where there was deviated from a standard ADFS implementation.
 
So what to do? I started by following the advice I got from my Microsoft Consultant contact.
 

Figure 1


I started by backing up the complete database; you can follow this TechNet article.
 
Then I took the databases offline and renamed the physical files. After that I started with the restore procedure in SQL Management studio, and suddenly (yes, that Eureka moment) it struck me. I noticed that the Logical  file names where different compared to the physical file names… so that meant something or somebody really altered the stuff to make it fit!
 

Figure 2


So I began the ' fix and repair' procedure by following the blog article I mentioned earlier and using the original names again. Afterwards ran some tests to make sure ADFS was still working, which wast the case.
 
Checked if now can add a ADFS node to the existing farm, and that succeeded.
 

Figure 3


Lessons learned

 
Keep in mind that when you alter the names of ADFS databases and its configuration like in the blog article, you can never add new ADFS servers to the existing ADFS Farm because you cannot point the powershell cmd-let to a specific database. Hence that my earlier attempts didn't succeed (figure 1)
 
So that's it, everything is honky dory now.
 
Thank you for reading and see you next time. Now take a cup of coffee first :)
 

Some companies pay (allot) attention to corporate branding. The cool thing is that Microsoft AD Federation Services (AD FS) supports this. A lot of customization can be found here on this link. But some customization is hard to come by; like I experienced myself.

Adjusting the signin page description and fitting in a background is fairly easy to do. But when it comes to lettertype, favico and placeholder(s); it can be challenging.

I will show you how to adjust:
 

  1. Illustration

  2. Logo (both Sign in Page and applications like OneDrive)

  3. Login message (Sign in with organizational account)

  4. Username placeholder

  5. Sign in page description

  6. Lettertype (CSS)

  7. Favicon


Figure 1


By following this guide, I assume that you have completed the 'create custom web theme'. If not; first create a custom web theme by following this Microsoft article.

New-AdfsWebTheme –Name CUSTOM_WEBTHEME –SourceName default
Export-AdfsWebTheme –Name CUSTOM_WEBTHEME –DirectoryPath C:\temp\adfs\customwebtheme
Set-AdfsWebConfig -ActiveThemeName CUSTOM_WEBTHEME


Set illustration and logo

 
Open PowerShell and do the following:
 

## Set logo and background
##
Set-AdfsWebTheme -TargetName CUSTOM_WEBTHEME -Illustration @{path="C:\temp\adfs\customwebtheme\ADFS_Illustration.png"}
Set-AdfsWebTheme -TargetName CUSTOM_WEBTHEME -Logo @{path="C:\temp\adfs\customwebtheme\ADFS_Logo.png"}  

 
NOTE: Microsoft recommends that the dimensions for the logo are 260x35 @ 96 dpi with a file size of no greater than 10 KB.
For the illustration Microsoft recommends for the illustration to be 1420x1080 pixels @ 96 DPI with a file size of no greater than 200 KB.


Login message

 
Open the script file your custom web theme from "C:\temp\adfs\customwebtheme\script\onload.js" on one of your AD FS servers in Notepad(++).

Go to the end of the file and paste the following code.
You can adjust 'Your login message here'  accordingly.
 

// Code to change “Sign in with organizational account” string.  
// Check whether the loginMessage element is present on this page.  
var loginMessage = document.getElementById('loginMessage');  
if (loginMessage)  
{  
       // loginMessage element is present, modify its properties.  
       loginMessage.innerHTML = 'Your login message here';  
}

 
Then run the following PowerShell line to commit the JavaScript file.
 

Set-AdfsWebTheme -TargetName CUSTOM_WEBTHEME-AdditionalFileResource @{Uri=’/adfs/portal/script/onload.js’;path=”C:\temp\adfs\customwebtheme\script\onload.js”}


Username placeholder

 
Open the script file your custom web theme from "C:\temp\adfs\customwebtheme\script\onload.js" on one of your AD FS servers in Notepad(++).
 
Go to the end of the file and paste the following code.
 

## Set  and change the username placeholder
##
// Code to change “Username” string in the placeholder.
function UpdatePlaceholders() {
    var userName;
    if (typeof Login != 'undefined'){
        userName = document.getElementById(Login.userNameInput) 
    }
    if (typeof UpdatePassword != 'undefined'){
        userName = document.getElementById(UpdatePassword.userNameInput);
    }
    if (typeof userName != 'undefined'){
        userName.setAttribute("placeholder","CHANGE ME ; I'M THE USERNAME PLACEHOLDER");
    }
}
 
document.addEventListener("DOMContentLoaded", function(){
  // Handler when the DOM is fully loaded
  UpdatePlaceholders()
});

 
Then run the following PowerShell cmd-let to commit the JavaScript file.
 

Set-AdfsWebTheme -TargetName CUSTOM_WEBTHEME -AdditionalFileResource @{Uri=’/adfs/portal/script/onload.js’;path=”C:\temp\adfs\customwebtheme\script\onload.js”}


Change lettertype

 
Open the script file your custom web theme from "C:\temp\adfs\customwebtheme\css\style.css" on one of your AD FS servers in Notepad.
 
Go to the begin of the file and add font to the font-family the following code under HTML, body:
The font you want to use, must be place at the begin of the font-family line in order to be used, like I did with Century Gothic. More info here.
 

font-family:"Century Gothic" , "Segoe UI" , "Segoe" , "SegoeUI-Regular-final", Tahoma, Helvetica, Arial, sans-serif;


Set Sign in description (sort of disclaimer)

 
Sign In Page description can be enriched with HTML Text Formatting like I did below:

Just paste the PowerShell cmd-let on one of your ADFS servers.
 

Set-AdfsGlobalWebContent -SignInPageDescriptionText "<p><b>DIT SYSTEEM IS ALLEEN VOOR GEAUTORISEERDE GEBRUIKERS!</b><br><br>Toegang tot dit systeem is niet toegestaan, tenzij geautoriseerd door een daartoe bevoegde persoon van de <company>. Als je autorisatie nodig hebt, neem dan contact op met de <A href='https://www.domain.tld/help'>company servicedesk</A>.<br>Gebruikers accepteren bij gebruik van dit systeem geldende Informatie Beveiligingsbeleid van de <company>. Dit beleid en de Sociale Code kun je vinden op het <A href='http://intranet.domain.tld/'>intranet</A>.</p>"


Favicon

 
Open the script file your custom web theme from "C:\temp\adfs\customwebtheme\script\onload.js" on one of your AD FS servers in Notepad.
Go to the end of the file and paste the following code:
 

// Code to add custom favicon. 
function customfavicon(){
var link = top.document.createElement("link");
link.type = "image/x-icon";
link.rel = "shortcut icon";
link.href = "https://www.domain.tld/images/favicon/favicon.ico";
top.document.getElementsByTagName("head")[0].appendChild(link);
}
customfavicon();

 
This function uses the favicon.ico from somewhere else; just make sure that the favicon.ico is available by adjusting the link.href accordingly and save the file.

Then run the following PowerShell cmd-let to commit the JavaScript file.
 

Set-AdfsWebTheme -TargetName CUSTOM_WEBTHEME-AdditionalFileResource @{Uri=’/adfs/portal/script/onload.js’;path=”C:\temp\adfs\customwebtheme\script\onload.js”}

 
Your favicon.ico should be present now.


Remove microsoft copyright

 
Microsoft link with more information.

Locate the Style.css file that is located in the output folder. 
By using the previous example, the path would be C:\CustomWebTheme\Css\Style.css and open it.

Locate the #copyright portion, and then change it to the following:
 

#copyright {color:#696969; display:none;}

 
Save the file and exit. Then open PowerShell cmd-let and run the following cmd-let:
 

Set-AdfsWebTheme -TargetName custom -StyleSheet @{locale="";path="C:\temp\adfs\customwebtheme\css\style.css"}

  
That's all for now, thank you for reading and till next time!

Replacing the ADFS certificate can be a painful process.

I have learned it the hard way, that's why i thought; let make a thread for this on my blog, for future reference and to help others out.


Let's go!


Import certificates


First import the certificates on your ADFS server(s) and import hem also on your WAP servers (if you have any).

Notice: you must also import all the certificates in the chain (intermediates; see green checkmarks) except for the ROOT certificate (unless you haven't' in your computer store; but usually all globally trusted root CA's are in your computer certificate store.

To easily import the service communication certificate; use the following cmdlet:

Import-PfxCertificate -FilePath C:\certs\mycert.pfx -CertStoreLocation 'cert:\localmachine\my' -Password $(Read-Host "PFX File Password -AsSecureString)


Step one; open the certificate and click on Install Certificate


Then select the Local Machine as store location


Let the wizard automatically choose the store based on the type of certificate


And complete everything as a whole


The prompt after clicking Finish :)


Repeat the above steps for all certificates that are needed
    1. the ADFS certificate
    2. needed intermediates that the ADFS certificate rely on


Set permissions


After everything is imported correctly; you must set the correct permissions for the service account that is used by ADFS.
You can verify it, by looking in services.msc for the ADFS service, it is probably running under a specific user. That uses must have access to the private key.


Open Windows+R and type mmc and press enter.
After that, add the certificates snap-in


Choose Certificates and click Add


Select Computer account


Open folder Personal\Certificates and right-click on the certificate that should be used. Select All Tasks\Manage Private Keys


Set the permissions accordingly the picture below for your service account that ADFS wil use.


Replacing the certificates on the ADFS server(s).


Get hold of the current SSL thumbprint AND the SSL thumbprint of your new certificate.

Open Powershell with Elevated permissions and use the cmd-let:

dir cert:\localmachine\my


Check and make a note what the current certificate thumbprint that is in use and what the new certificate thumbprint is; that way we can make sure that we aren't replacing it with the same one that is installed right now :)

With the following cmd-let you can see what the current certificate is, that is used by ADFS:

Get-AdfsSslCertificate


Also check what the thumbprint is that is bonded via HTTP.sys; look for the Certificate Hash.


Here is the output

PS H:\> Get-AdfsSslCertificate

HostName                           PortNumber  CertificateHash
--------                           ----------  ---------------
sts.domain.com                     443         400323XXXXMY_OLD_THUMBPRINTXXXXX4D07B5C0
localhost                          443         400323XXXXMY_OLD_THUMBPRINTXXXXX4D07B5C0
sts.domain.com                     49443       400323XXXXMY_OLD_THUMBPRINTXXXXX4D07B5C0


PS H:\> dir cert:\localmachine\my


    Directory: Microsoft.PowerShell.Security\Certificate::localmachine\my


Thumbprint                                Subject
----------                                -------
XXXXXXXXXXXXXXXXXXXXXXXXXXXXXXXXXXXXXXXX  CN=SERVER, CN=6bXXXXXX-1234-XXXXXXXX-XXXXXXXXXXXX, OU=Microsoft ADFS Agent
400323XXXXMY_OLD_THUMBPRINTXXXXX4D07B5C0  CN=sts.domain.com, OU=PositiveSSL Multi-Domain, OU=Domain Control Validated
100XXXXXXXMY_NEW_THUMBPRINTXXXXXXXXXX904  CN=sts.domain.com, <output omitted>


PS H:\> netsh http show sslcert

SSL Certificate bindings:
-------------------------

    Hostname:port                : sts.domain.com l:443
    Certificate Hash             : 400323XXXXMY_OLD_THUMBPRINTXXXXX4D07B5C0
    Application ID               : {5d89a20c-beab-4389-9447-324788eb944a}
    Certificate Store Name       : MY
    Verify Client Certificate Revocation : Enabled
    Verify Revocation Using Cached Client Certificate Only : Disabled
    Usage Check                  : Enabled
    Revocation Freshness Time    : 0
    URL Retrieval Timeout        : 0
    Ctl Identifier               : (null)
    Ctl Store Name               : AdfsTrustedDevices
    DS Mapper Usage              : Disabled
    Negotiate Client Certificate : Disabled

    Hostname:port                : localhost:443
    Certificate Hash             : 400323XXXXMY_OLD_THUMBPRINTXXXXX4D07B5C0
    Application ID               : {5d89a20c-beab-4389-9447-324788eb944a}
    Certificate Store Name       : MY
    Verify Client Certificate Revocation : Enabled
    Verify Revocation Using Cached Client Certificate Only : Disabled
    Usage Check                  : Enabled
    Revocation Freshness Time    : 0
    URL Retrieval Timeout        : 0
    Ctl Identifier               : (null)
    Ctl Store Name               : AdfsTrustedDevices
    DS Mapper Usage              : Disabled
    Negotiate Client Certificate : Disabled

    Hostname:port                : sts.domain.com :49443
    Certificate Hash             : 400323XXXXMY_OLD_THUMBPRINTXXXXX4D07B5C0
    Application ID               : {5d89a20c-beab-4389-9447-324788eb944a}
    Certificate Store Name       : MY
    Verify Client Certificate Revocation : Enabled
    Verify Revocation Using Cached Client Certificate Only : Disabled
    Usage Check                  : Enabled
    Revocation Freshness Time    : 0
    URL Retrieval Timeout        : 0
    Ctl Identifier               : (null)
    Ctl Store Name               : (null)
    DS Mapper Usage              : Disabled
    Negotiate Client Certificate : Enabled


PS H:\>


Now we know what are starting point is and what thumbprints are used.

First update the service communication certificate for the ADFS running the following command and verify:

Set-AdfsCertificate -CertificateType Service-Communications -Thumbprint 100XXXXXXXMY_NEW_THUMBPRINTXXXXXXXXXX904
Get-AdfsCertificate


Then restart the ADFS service:

Restart-Service ADFSSRV


Then update the new SSL cert bindings to ADFS configuration and verify:

Set-AdfsSslCertificate -Thumbprint 100XXXXXXXMY_NEW_THUMBPRINTXXXXXXXXXX904
Get-AdfsSslCertificate


Again; restart the ADFS service (just to be sure)

Restart-Service ADFSSRV


Check if the certificates are in place and properly bounded:
 

PS H:\> netsh http show sslcert

SSL Certificate bindings:
-------------------------

    Hostname:port                : sts.domain.com:443
    Certificate Hash             : 100XXXXXXXMY_NEW_THUMBPRINTXXXXXXXXXX904
    Application ID               : {5d89a20c-beab-4389-9447-324788eb944a}
    Certificate Store Name       : MY
    Verify Client Certificate Revocation : Enabled
    Verify Revocation Using Cached Client Certificate Only : Disabled
    Usage Check                  : Enabled
    Revocation Freshness Time    : 0
    URL Retrieval Timeout        : 0
    Ctl Identifier               : (null)
    Ctl Store Name               : AdfsTrustedDevices
    DS Mapper Usage              : Disabled
    Negotiate Client Certificate : Disabled

    Hostname:port                : localhost:443
    Certificate Hash             : 100XXXXXXXMY_NEW_THUMBPRINTXXXXXXXXXX904
    Application ID               : {5d89a20c-beab-4389-9447-324788eb944a}
    Certificate Store Name       : MY
    Verify Client Certificate Revocation : Enabled
    Verify Revocation Using Cached Client Certificate Only : Disabled
    Usage Check                  : Enabled
    Revocation Freshness Time    : 0
    URL Retrieval Timeout        : 0
    Ctl Identifier               : (null)
    Ctl Store Name               : AdfsTrustedDevices
    DS Mapper Usage              : Disabled
    Negotiate Client Certificate : Disabled

    Hostname:port                : sts.domain.com:49443
    Certificate Hash             : 100XXXXXXXMY_NEW_THUMBPRINTXXXXXXXXXX904
    Application ID               : {5d89a20c-beab-4389-9447-324788eb944a}
    Certificate Store Name       : MY
    Verify Client Certificate Revocation : Enabled
    Verify Revocation Using Cached Client Certificate Only : Disabled
    Usage Check                  : Enabled
    Revocation Freshness Time    : 0
    URL Retrieval Timeout        : 0
    Ctl Identifier               : (null)
    Ctl Store Name               : (null)
    DS Mapper Usage              : Disabled
    Negotiate Client Certificate : Enabled


PS H:\>


Watchout for the default binding!

I experienced out of first hand, that it is possible that the new certificate is not bound on the HTTP.sys level after updating the certificate within ADFS.

This is mostly the case when you're working with a OSI Layer 7 Load balancer for example a Citrix NetScaler. Citrix doesn't support SNI binding to its back-end connections, only to its front-end facing connections; this was the case prior NS 11.1 build 54.
Since the release of NS 11.1 build 54, Citrix NetScaler supports SNI binding to its back-end connections, but i must make a annotation to this.

Citrix published this new feature in it's relase notes, but didn't mention this is only possible if you are NOT working with servicegroups or SSL profiles.

So check if the Certificate Hash is correct on the 0.0.0.0:443 or localhost:443; if not the case, use the following commands.

The AppID is the same for every ADFS server/instance for every ADFS server; you will notice that the AppID issued in my command is exactly the same as yours.

netsh http delete sslcert ipport=0.0.0.0:443
netsh http add sslcert ipport=0.0.0.0:443 certhash=<YOUR_NEW_THUMBPRINT> appid={5d89a20c-beab-4389-9447-324788eb944a} certstorename=MY sslctlstorename=AdfsTrustedDevices


or
 

netsh http delete sslcert ipport=localhost:443
netsh http add sslcert ipport=localhost:443 certhash=<YOUR_NEW_THUMBPRINT> appid={5d89a20c-beab-4389-9447-324788eb944a} certstorename=MY sslctlstorename=AdfsTrustedDevices


Notice: do this on every ADFS server in your farm (and yes; life is a b*tch) wink

When done; grab yourself a fresh cup coffee
Afterwards; go the next chapter.


Replacing the certificates on the WAP servers.

Go to the ADFS Proxy servers (WAP).

Do the same on your WAP server, concerning the import certificates.
Then issue the following commands:
 

Get-WebApplicationProxySslCertificate


Then do:
 

Set-WebApplicationProxySslCertificate -Thumbprint 100XXXXXXXMY_NEW_THUMBPRINTXXXXXXXXXX904


Check the result:


Double check the port bindings are correct; the Certificate Hash must be the same as your new thumbprint
 

PS C:\Users\Administrator> netsh http show sslcert

SSL Certificate bindings:
-------------------------

    Hostname:port                : sts.domain.com:443
    Certificate Hash             : 100XXXXXXXMY_NEW_THUMBPRINTXXXXXXXXXX904
    Application ID               : {5d89a20c-beab-4389-9447-324788eb944a}
    Certificate Store Name       : MY
    Verify Client Certificate Revocation : Enabled
    Verify Revocation Using Cached Client Certificate Only : Disabled
    Usage Check                  : Enabled
    Revocation Freshness Time    : 0
    URL Retrieval Timeout        : 0
    Ctl Identifier               : (null)
    Ctl Store Name               : AdfsTrustedDevices
    DS Mapper Usage              : Disabled
    Negotiate Client Certificate : Disabled

    Hostname:port                : sts.domain.com:49443
    Certificate Hash             : 100XXXXXXXMY_NEW_THUMBPRINTXXXXXXXXXX904
    Application ID               : {5d89a20c-beab-4389-9447-324788eb944a}
    Certificate Store Name       : MY
    Verify Client Certificate Revocation : Enabled
    Verify Revocation Using Cached Client Certificate Only : Disabled
    Usage Check                  : Enabled
    Revocation Freshness Time    : 0
    URL Retrieval Timeout        : 0
    Ctl Identifier               : (null)
    Ctl Store Name               : (null)
    DS Mapper Usage              : Disabled
    Negotiate Client Certificate : Enabled

Incase you see a default binding (probably the case if you are using an mature load balancer), you must also replace it there.

The AppID is the same for every ADFS server/instance for every ADFS server; you will notice that the AppID issued in my command is exactly the same as yours.

netsh http delete sslcert ipport=0.0.0.0:443
netsh http add sslcert ipport=0.0.0.0:443 certhash=<YOUR_NEW_THUMBPRINT> appid=100ad0af0b9505bdd4bac9d23de187255082a904 certstorename=MY

And finally; restart the ADFS service

Restart-Service ADFSSRV


So, how do I test the functionality of the ADFS?


The ADFS uses the IIS to host his own end points. There is also a simple Login-page that every user can use:
 

'https://sts.domain.com_or_other_FQDN/adfs/ls/IdpInitiatedSignon.aspx'


Afterwards a simple „Login-Page“ appears – after one click on „login“ you should see something 'you are signed in'

That's it! were done here. Thank you for reading!

The ADFS uses the IIS to host his own end points. There is also a simple Login-page that every user can use:
 

https://{ADFS-FQDN}/adfs/ls/IdpInitiatedSignon.aspx


Afterwards a simple „Login-Page“ appears – after one click on „login“ you should see something like 'you are signed in'.